
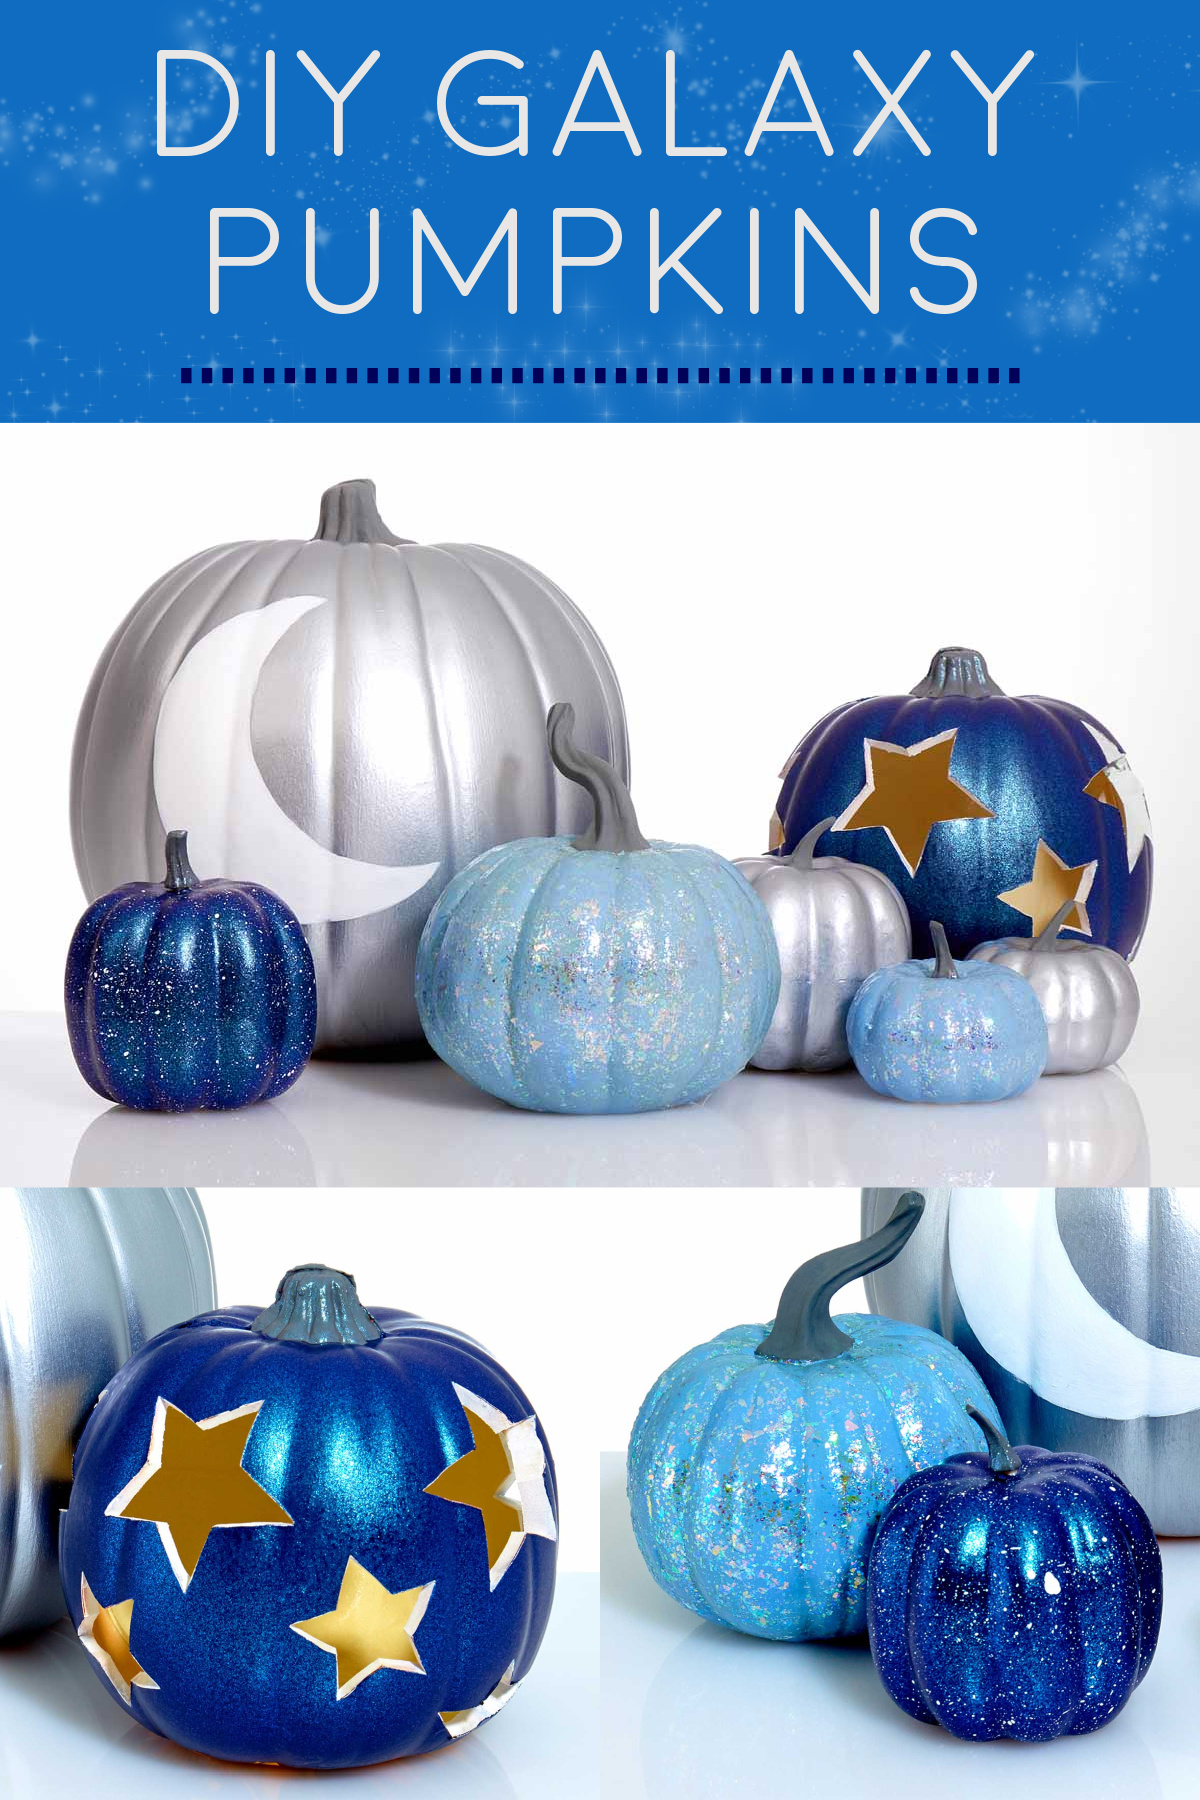
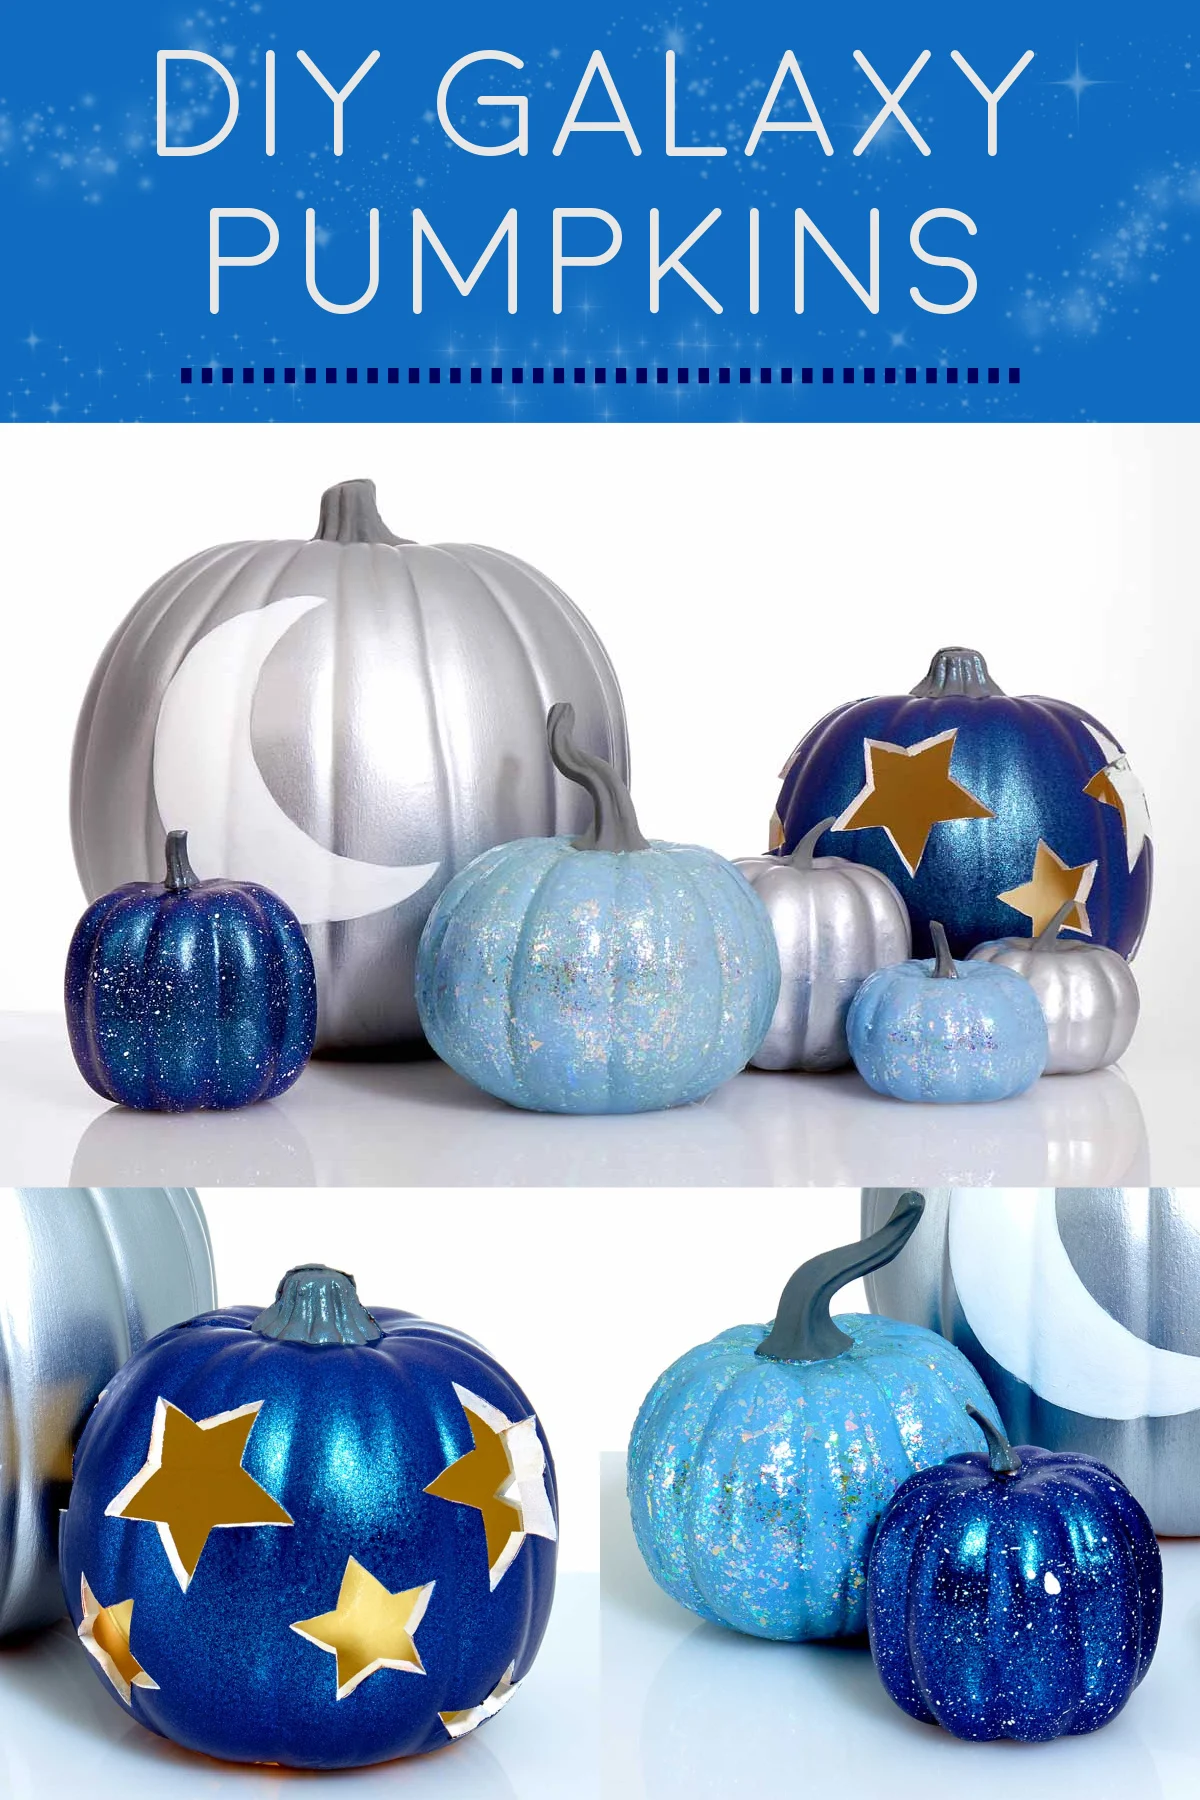
These cool painted galaxy pumpkins remind me of a night sky! Keep them on your porch for Halloween decor. No crafting skills required!
Skills Required: Beginner. You’ll be painting pumpkins, applying specialty acrylic paints, and cutting with a hot knife. It helps to have experience with crafting, specifically painting.
Did you ever have glow in the dark stars on your ceiling during your childhood? I was one of those late 80s/early 90s kids that had the stars up on their ceilings so I could experience the amazement of the night sky as I began my slumber.
Back in the day we’d save up our pennies, head to The Nature Company in the mall, and buy our star stickers with a complimentary guide to the constellations. And you can bet that when I put the stickers on the ceiling? I made sure a few constellations were up there. How else are you going to orient yourself with the night sky?
Now that I’m (a lot) older, times have changed. There are star stickers for a fraction of the price online, and you can even get projectors so you don’t to stick anything on your wall.
What hasn’t changed during that time is my love of the galaxy, so I decided to use the theme in this year’s pumpkin decorating! Because why go with traditional Halloween colors when you can do something different?
Galaxy Pumpkin Painting
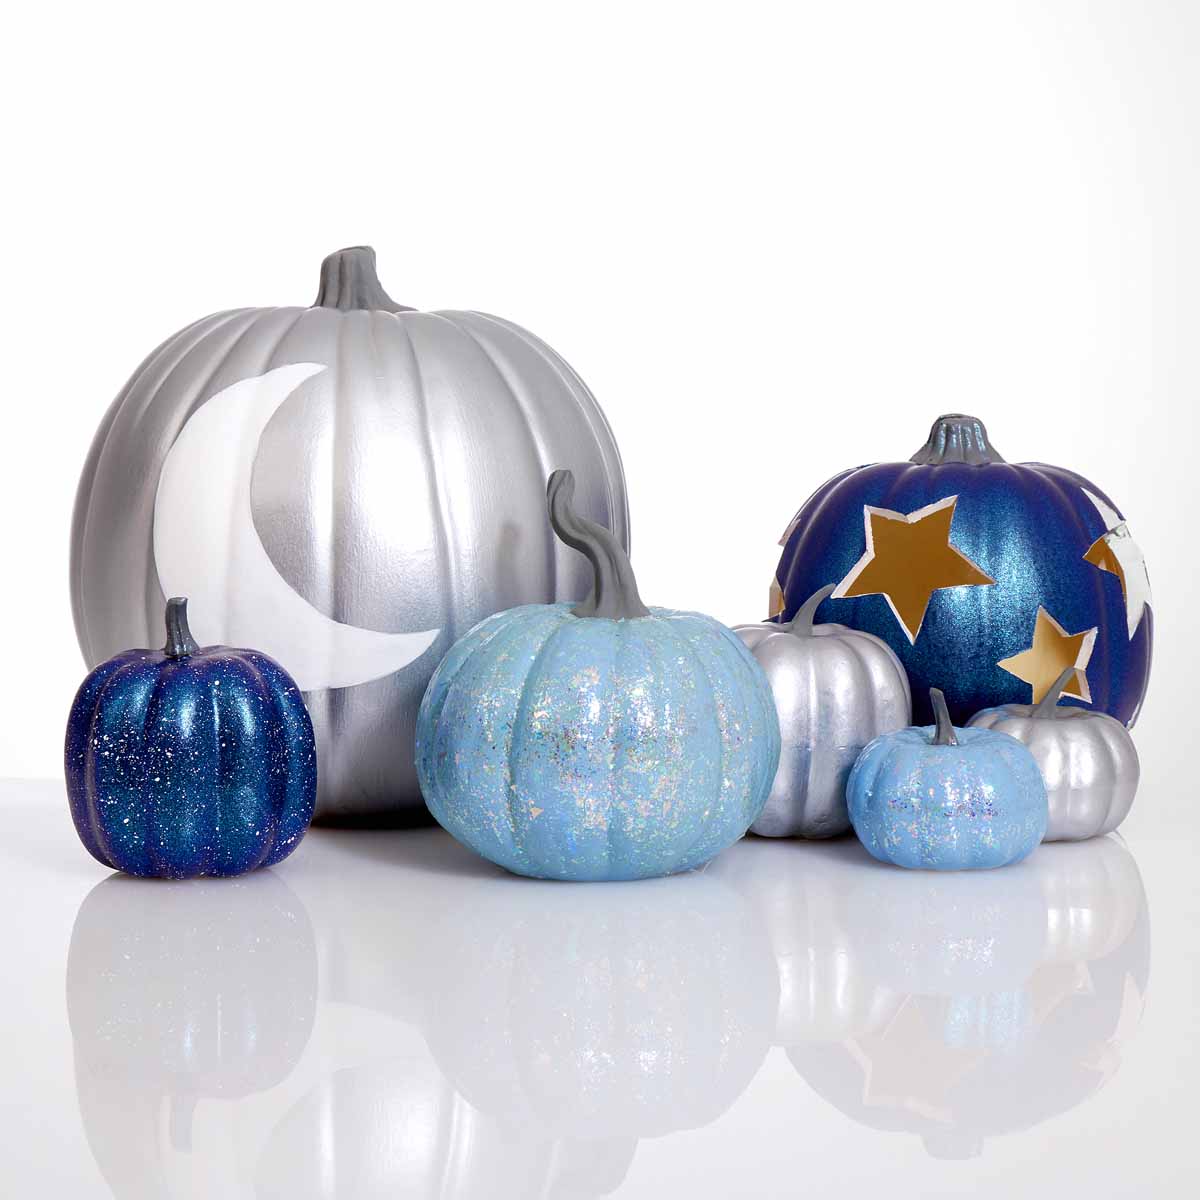
This Halloween galaxy pumpkin decor is made in four easy steps! You’re going to paint the pumpkins with basecoat colors, then add special finishes onto a few of them. Then you’ll cut out stars in one of the pumpkins, and finally do some simple painting.
This is a fun project to do with a group for Halloween, or the family. Everyone can a pumpkin that adds to the galaxy look! These would look great clustered on a mantel or entryway table.

Where to Get Pumpkins
You can use real or faux pumpkins for this project. I recommend faux galaxy pumpkins so that you can use them again each year, but some people love to paint real gourds. It’s up to you!
If you go with faux, then my suggestion is to check the Dollar Tree or go to the craft store when they are having a sale (check coupons too!). You can do this project with any color faux pumpkin, technically (though you might have to do less coats with white).
The faux pumpkins that you can carve are more expensive than the white, solid foam ones you can’t. Make sure to check the tag to see if you can carve before purchase. There are a variety of gourds on the market these days.
Once you choose your surface, the rest is just painting with a bit of cutting. Learn how to make these galaxy pumpkins below!
Gather These Supplies
- Large faux pumpkin – 1
- Medium faux pumpkin – 2
- Small faux pumpkin -4
- Apple Barrel acrylic paint – Cool Blue, Mountain Blue, White, Black
- FolkArt Treasure Gold – Platinum (or other silver metallic paint)
- FolkArt Glitterific – Clear Hologram
- FolkArt Dragonfly Glaze – Blue-Green-Gold (if you can’t find, look for Color Shift or color changing paint)
- Star stencil or printed shape
- Hot knife tool (to cut the foam pumpkin)
- Paintbrush
- Pencil
Basecoat the Pumpkins
You’re going to use three paint colors for this first step, and paint the pumpkins in this manner:
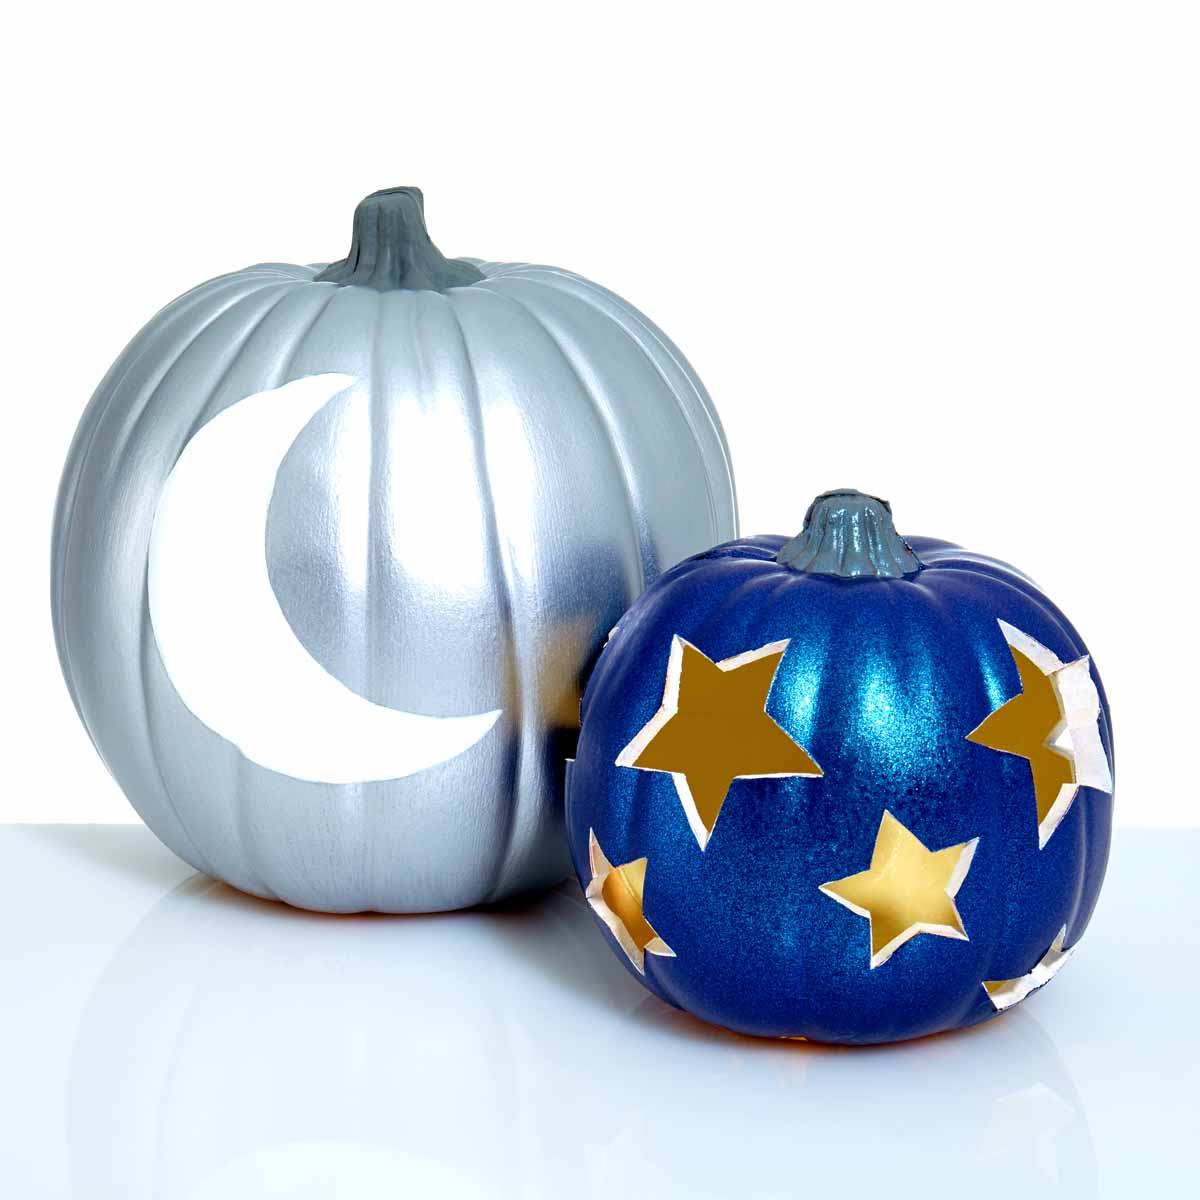
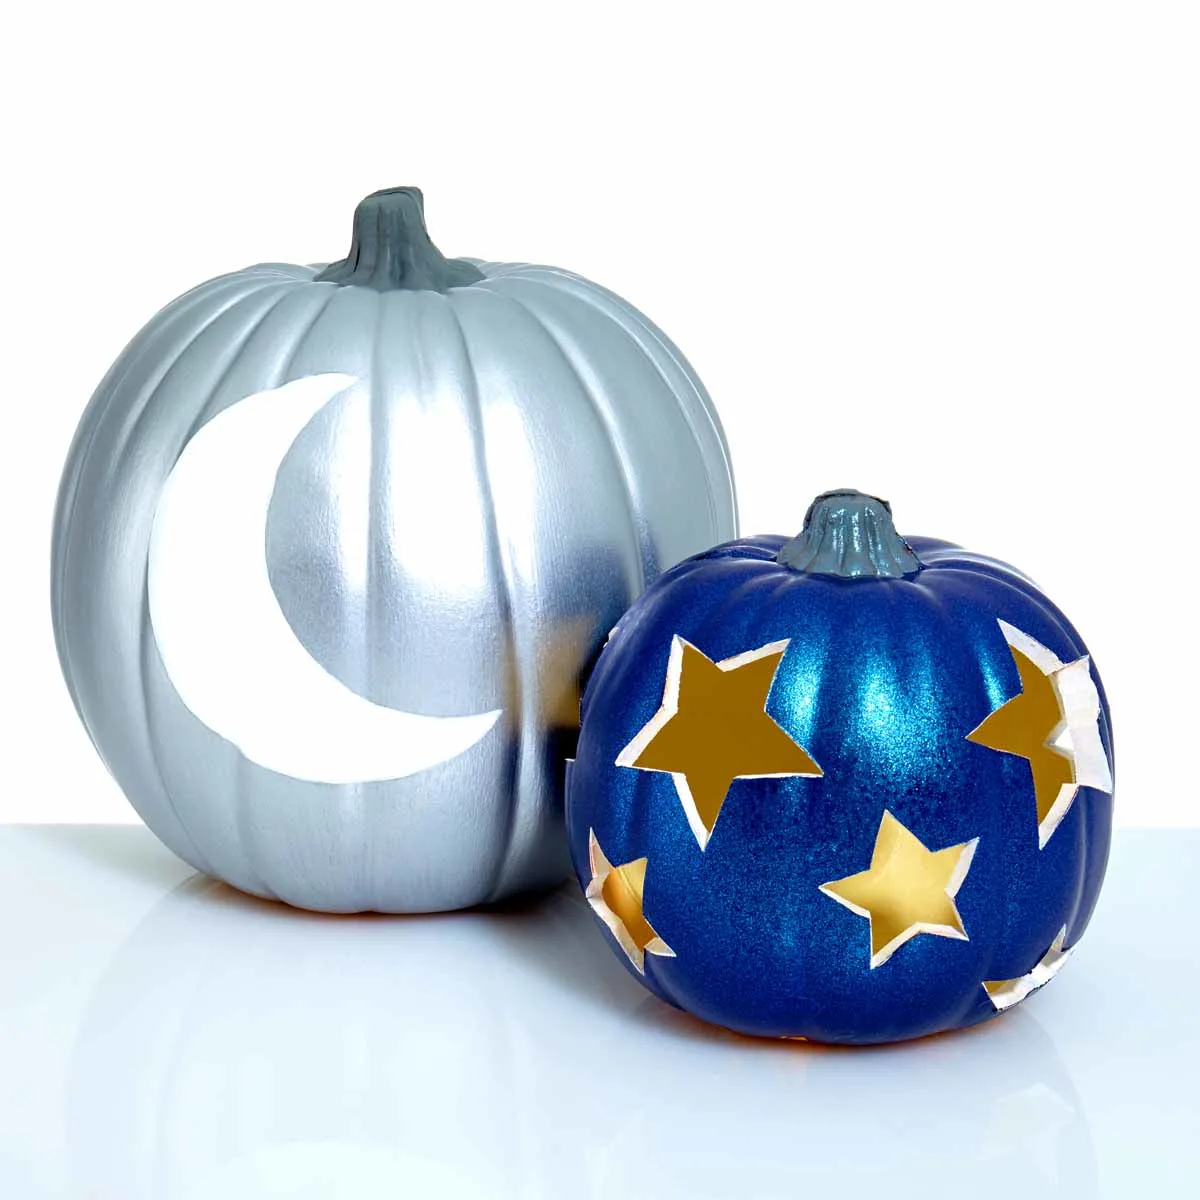
- Treasure Gold Platinum – one large, two small
- Mountain Blue – one medium, one small
- Cool Blue – one medium, one small
Use a medium brush and several layers of paint, letting dry between coats (thinner/more coats is best). Don’t do the stems yet. Let dry completely before moving onto the next step.
Add the Finishes
Once the pumpkins are dry, you’re going to apply the two special finishes:
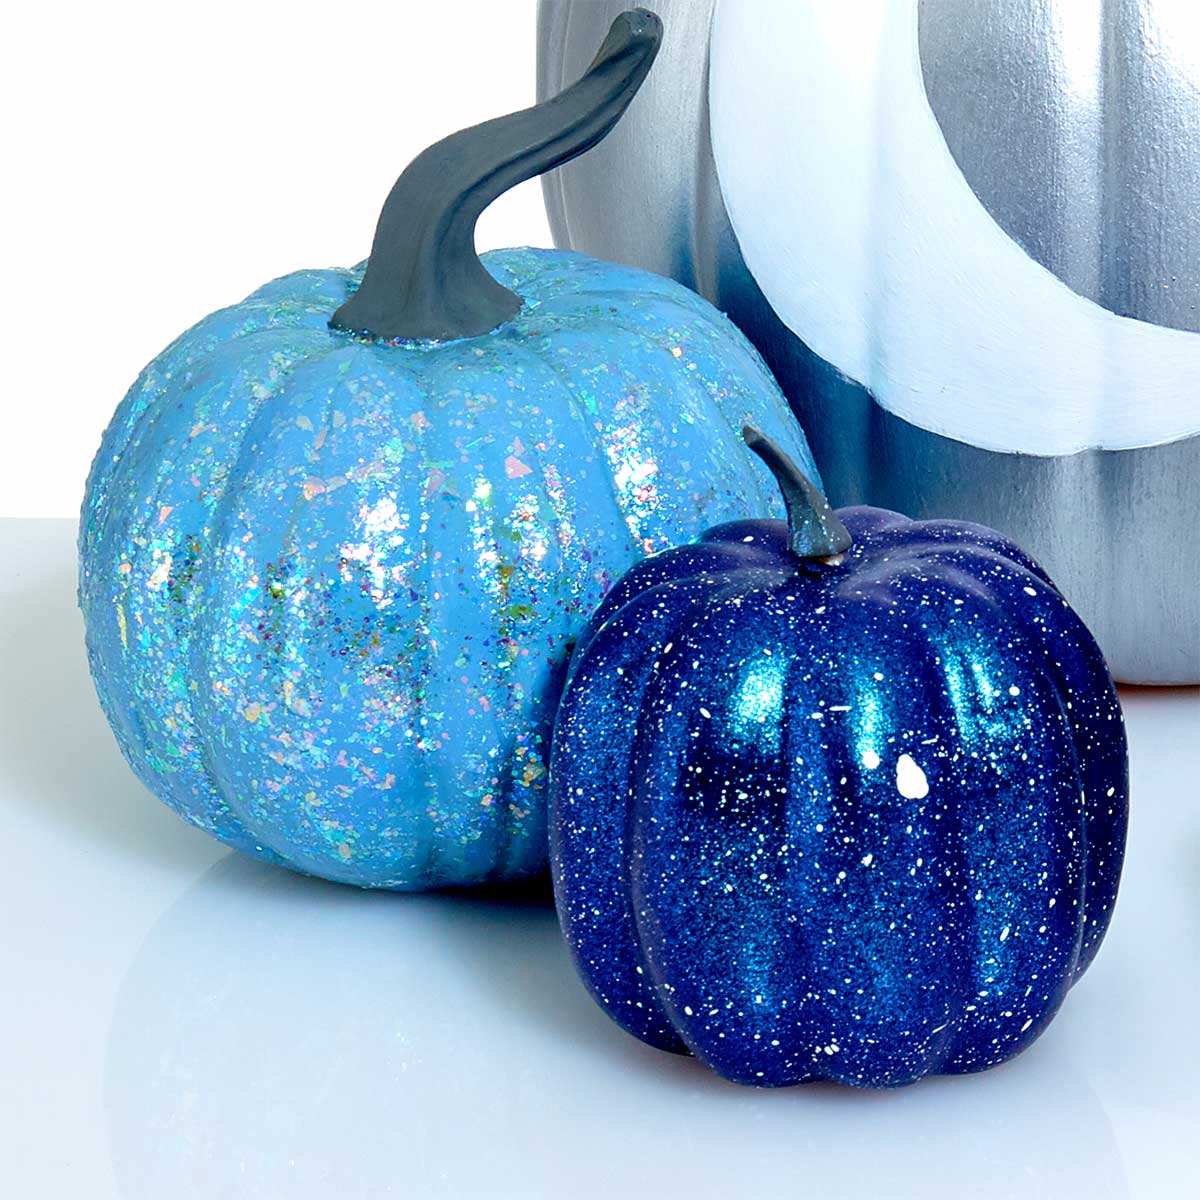
- Hologram Glitterific – both Cool Blue pumpkins (one medium, one small)
- Dragonfly Glaze – both Mountain Blue pumpkins (one medium, one small)
The Dragonfly Glaze should apply well enough with a brush, and you might end up giving two coats. The Glitterific (or whatever you use) can be applied with a brush too, but I find that some of the glitter speciality finishes apply best with foam spouncers.
This keeps the glitter right in place because you are moving the spouncer up and down, as opposed to brushing it around on the surface. You’ll find what works best for you when you apply it.
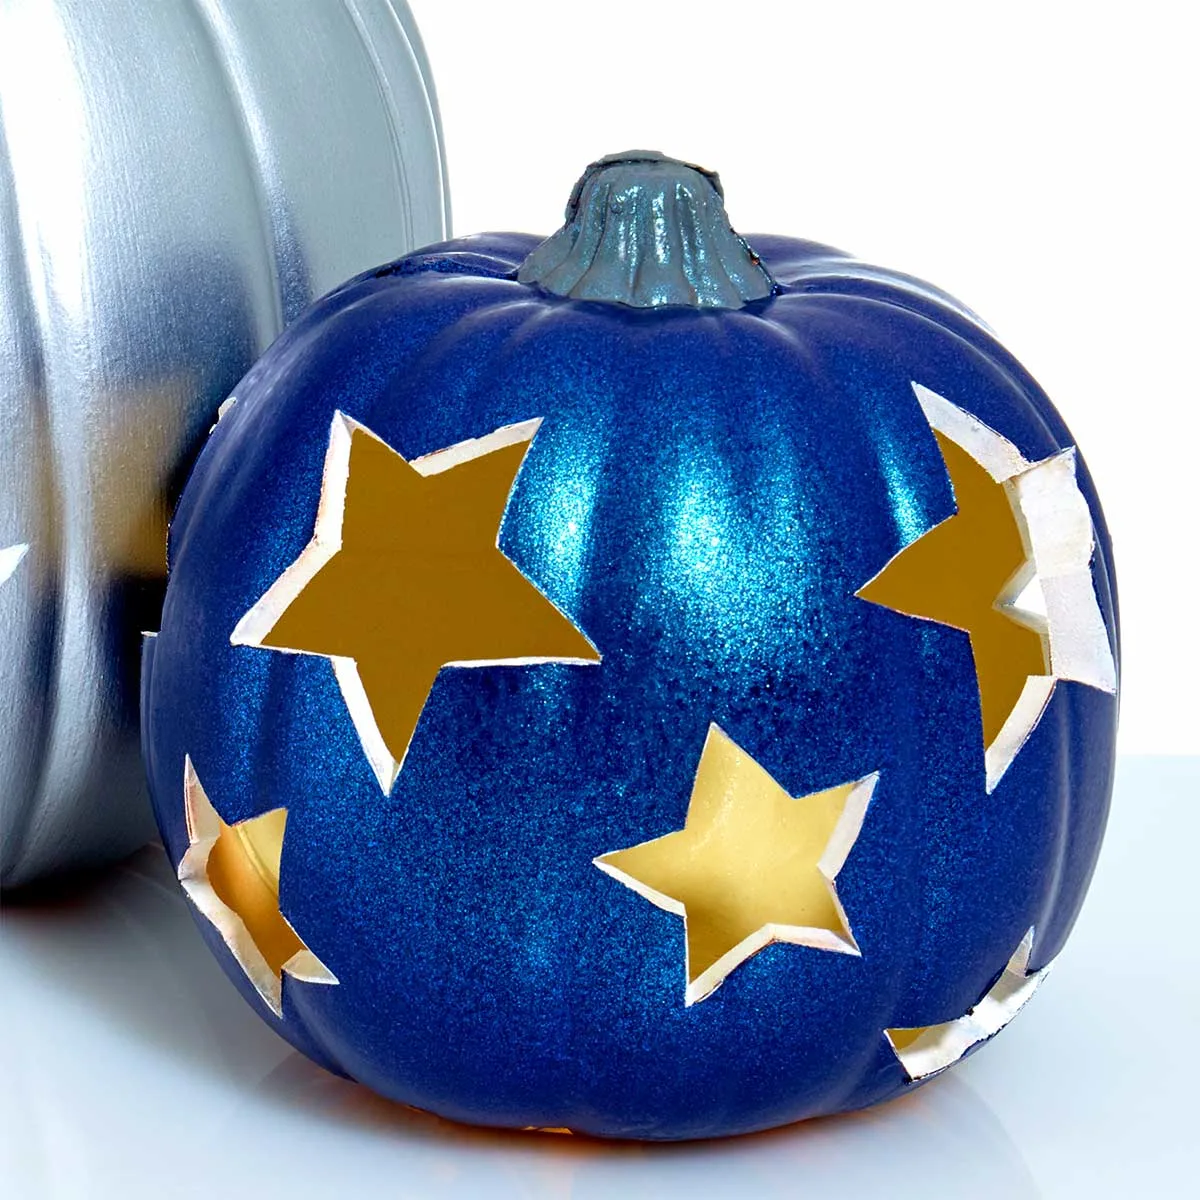
Cut out the Stars
Place the star stencil from your stencil pack over your medium Mountain Blue pumpkin and trace star shapes with a pencil or pen. Cut out the stars out with your hot knife.
If you decided to use real pumpkins, you can always trace star shapes and paint them in with white paint.

Final Painting
Paint all of your pumpkin stems with Black and let dry. If you want to add some hologram glitter over the top, go for it! Let the stems dry first.
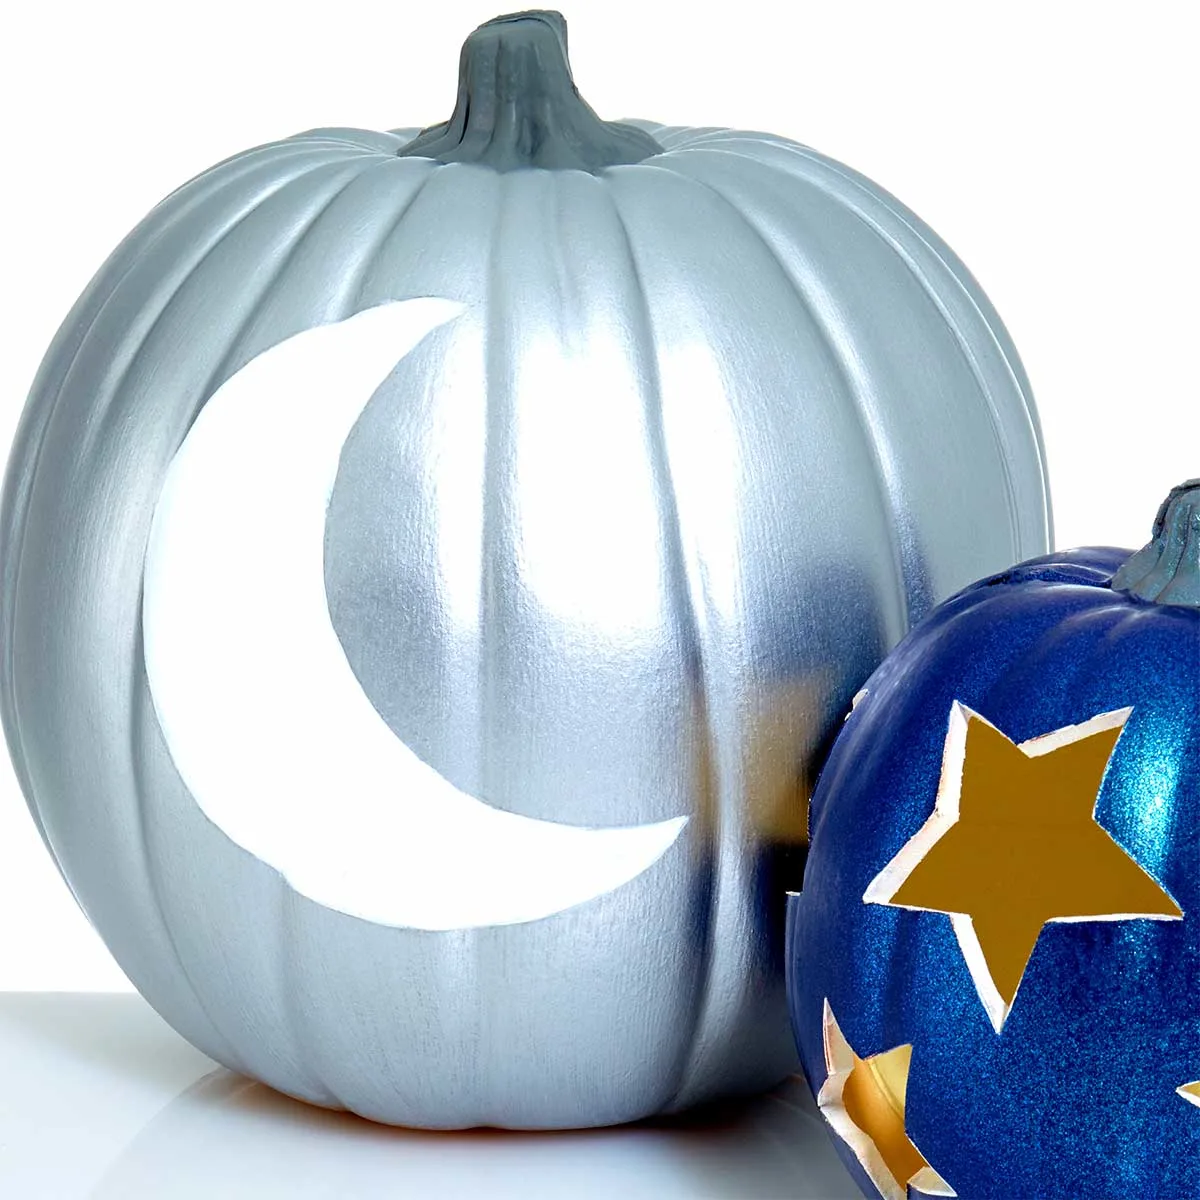
Use a pencil to draw a crescent moon shape on your large Platinum pumpkin. Paint in the moon shape with White and let dry.
The last step in painting your pumpkins is to add some star flecks on your small Mountain Blue pumpkin. You’ll do this by adding some white paint onto the end of a paintbrush, and then hitting the brush on your finger or another brush.
The flecks of paint will rain down onto the pumpkin and splatter a bit, creating a “galaxy” effect. You can see a demonstration of it here.
Splatter painting can be messy so protect your clothing and work surface. Definitely practice first!!

Once all the painting is done, let your gourds dry before displaying. They look so good all together!

You don’t need to stick to what we’ve done either – I’d love for you to customize this cool Halloween craft to your own style. And then let me know how you do it in the comments!
Galaxy Pumpkins


Learn how to make these galaxy pumpkins using paint! This collection of pumpkins will look great with your Halloween decor.
Materials
- Large faux pumpkin - 1
- Medium faux pumpkin - 2
- Small faux pumpkin -4
- Apple Barrel acrylic paint - Cool Blue, Mountain Blue, Black, White
- FolkArt Treasure Gold - Platinum
- FolkArt Glitterific - Clear Hologram
- FolkArt Dragonfly Glaze - Blue-Green-Gold
Tools
- Star stencil or printed shape
- Hot knife tool
- Paintbrush
- Pencil
Instructions
- Basecoat one large pumpkin and two small pumpkins in Treasure Gold Platinum. Let dry.
- Basecoat one medium pumpkin and one small pumpkin in Mountain Blue and let dry.
- Basecoat one medium pumpkin and one small pumpkin in Cool Blue and let dry.
- Place the star stencil from your stencil pack over your medium Mountain Blue pumpkin and trace the stars. Cut out the stars with your hot knife.
- Paint Blue Green Gold Dragonfly glaze over two Mountain Blue pumpkins and let dry.
- Paint Clear Hologram Glitterific over your two Cool Blue pumpkins and let dry.
- Paint all of your pumpkin stems with Black and let dry.
- Use your pencil to trace a crescent moon shape on your large Treasure Gold pumpkin. Paint a crescent moon shape with White and let dry.
Did you enjoy making these galaxy painted pumpkins? I’d love for you to check out these other ideas!
- Fabric Covered Pumpkins in Five Easy Steps (Real or Fake!)
- DIY Mini Pumpkin Vase for Your Fall Decor
- Colorful Harlequin Pumpkins Painted for Halloween
- Lighted Pumpkin Topiary for Your Halloween Front Porch
- R2-D2 and C-3PO Star Wars Pumpkins
- This Witch Pumpkin Craft Is Sparkly Good