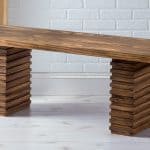
DIY Wooden Bench
Learn how to make a stacked wood bench inspired by a Crate & Barrel find!
Servings 1 bench
Cost $60
Equipment
- Gloves
- Miter saw
Ingredients
- Finished pine Cut list in Notes
- Wood glue
- Orbit sander or sanding block - 120 grit
- 8 Wood screws 3"
- FolkArt Home Decor Wax 8 oz bottles - Antique and Clear
- Staining rags
- 4 Cork circles 2"
Instructions
- Take your two 1" x 6" x 8' and 1" x 4" x 8' finished pine boards and cut each into two pieces. This will give you six pieces.
- Glue two 1" x 6" x 4' together on top of each other, two 1" x 6" x 4' together on top of each other, and two 1" x 4" x 4' together on top of each other. Hold together with clamps while they dry several hours.
- Lay the planks side by side and glue them together lengthwise - clamp and let dry.
- Using a miter saw, cut one of the 1" x 2" x 6' boards into two pieces: one that is 15 3/4" long and another that is 49 1/2" long. Repeat with the other board. Cut 45° angles on the ends of all four trim pieces.
- Use wood glue to attach the frame pieces to the outer edges of the bench top and clamp. Let dry. Sand the bench top with 120-grit sandpaper.
- Using a miter saw, cut your five 1" x 6" x 8's into (22) 1" x 6" x 10"s and (22) 1" x 6" x 10 ½"s.
- Take the (22) 1" x 6" x 10"s and, using a table saw, mill off a ½" strip off the 10" side, bring it down to 5 1/2" wide.
- Take two of the 1" x 6" x 10 ½"s and glue them to the underside of the bench top. Mine are attached 6" in from each end and centered.
- Take two of your milled 10” pieces and glue them in the center of the 10 ½” pieces. This should give you a ¼” boarder all the way around each 10” piece.
- Finally, glue a 10 ½” piece on top of each 10” piece. Let the glue cure for a few hours; these are your bench leg bases.
- Drill four pilot holes at the bottom of each leg as shown - screw in (4) 3” wood screws.
- The leg bases are made up of three pieces each, so to complete, each leg will take 19 more pieces each: (10) 10” pieces and (9) 10 ½” pieces.
- Start with a 10” piece and glue a 10 ½” piece to it, remember to center the 10” piece on the 10 ½” piece to give you a ¼” boarder all the way around.
- Continue gluing the alternating sized pieces of wood and clamp. You will start with a 10” piece and end with a 10” piece,
- After the glue on the legs cures flip the bench top over and attach the legs with glue; let the glue cure overnight.
- To stain the bench, use the home decor wax and a rag. Rag the wax on to get the shade you like. Let dry.
- Rag on the clear wax to add another layer of protection.
- Finish the wooden bench by adding cork to the feet. Use wood glue to attach the circles.
Notes
Cut List*
- 2 - 1" x 6" x 8' pine boards cut into two equal pieces each (1" x 6" x 4' each)
- 1 - 1" x 4" x 8' pine board cut into two equal pieces (1" x 4" x 4')
- 2 -1" x 2" x 6' pine boards cut into two pieces each: one that is 15 3/4" long and another that is 49 1/2" long
- 5 - 1”x 6”x 8' pine boards cut into (22) 1" x 6" x 10" pieces and (22) 1" x 6" x 10 ½" pieces