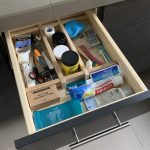
DIY Drawer Organizer
Learn how to make a DIY drawer divider with materials you have lying around the house! We made this organizer on the cheap with scrap wood.
Servings 1 organizer
Cost $2
Equipment
- Pencil(s)
Ingredients
- Scraps of cedar
Instructions
- Measure the width of the drawer to determine the length of the cross pieces.
- Using a table saw, cut two cross pieces 1/32” longer than the width of the drawer.
- Determine where you would like to place your divider pieces vertically in the drawer and mark on both pieces of wood. Use your table saw to cut notches in your cross pieces.
- Set your table saw blade to exactly half the height of your cross pieces.
- Measure the exact width of your divider pieces and mark that measurement in pencil on the cross pieces in the place you would like them to lock together.
- Holding the two cross pieces together, use the table saw to cut out notches for the divider pieces.
- Next you will want to cut notches in your divider pieces in the same manner as the step above.
- Lock the drawer divider pieces together using your notches. They should lock together tightly without nails or glue.
- Slide the drawer organizer in your empty drawer and load up your drawer.