IKEA Lack Hack
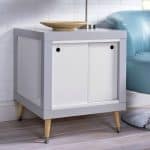
Learn how to hack two IKEA Lack tables and turn them into an end table with storage!
Servings 1 end table
Cost $50
Equipment
- Miter saw
- Drill with drill bits including a 1” drill bit and Countersink bit
Ingredients
- 2 IKEA Lack tables
- 2 pieces 24” x 48” 1/4” thick white dry erase board
- 2 ¾”x 1 ½” pieces of MDF cut to a length of 17 ½”
- 4 table legs and mounting plates
- 4 wood screws 3”
- 4 wood screws 1 ½”
- Primer optional
Instructions
- Open your Lack tables and set aside the hardware. You're going to use four of the eight legs that come with the tables.
- Use a table saw set the cut depth to ¼”, then cut a line the length of the table leg ¼” in from the one side. It doesn't matter which side. Do this on all four legs.
- Move the cutting guide over the width of the blade and make another cut down the length of each leg right next to the cut you just made - making the total width of the groove approximately ¼”.
- Two legs will need additional grooves on perpendicular sides for the sliding portion. Repeat step three on two legs.
- Attach the legs to the tabletop with the cut grooves. The two legs with additional cuts should be on the same side. You'll use the hardware that came with the tables to attach the legs.
- Using a table saw, cut three 18” x 15 ¾” panels out of ¼” thick white dry erase board. Take care as you cut your board; particular board can be somewhat delicate. Slide the panels into the grooves.
- Using four 3” wood screws, attach the other table top to the bottom of your structure with the finished side going toward the inside of the cube. There will be an opening on one side.
- If the MDF isn't white, prime it at this time. Let dry.
- Using a miter saw, cut two 17 ½” length pieces out of the ¾”x1 ½” MDF.
- Using a table saw, cut two ¼” grooves ¼” deep each in your MDF boards approximately ⅜” in from the edge (two blade widths thick).
- Using a table saw cut two 9 ¼”x 14 ¾” pieces of the dry erase board. These will be your doors.
- Use a 1” drill bit and drill a finger pull hole in the upper corners of each door - one in the upper left corner and the other in the upper right corner. You want to mark where you drill your 1" holes on each board so that they are in the same place.
- Put the doors into the two grooves of the MDF boards. Place one in the front groove and the second in the back groove. Place the doors so that the finger holes are in the upper right and the upper left corners when shut.
- Place the doors and the MDF guides into the open space in your DIY side table and screw into place using four 1 ½” wood screws. You'll insert the doors and MDF guides "assembled" into the space.
- Flip the table over and place the leg mounting plates on as shown. Put them in each corner so the legs will angle out to the corners. Screw the legs on and flip your end table back over.