
Why buy a platform bed frame when you can DIY it? Build this mid-century modern king platform bed frame using our easy-to-follow tutorial. Do it cheaper, better (higher quality), and make it any color you like!
Skills Required: Intermediate. You have to be able to use a miter saw, table saw, sander, drill with various bits, and possibly a router. You’ll be doing some gluing and screwing and lots of measuring.
This is not a hard project, but it can take time, especially given the clean lines that a DIY modern bed frame demands!

Welcome to our biggest “labor-of-love” project so far – a mid-century modern DIY platform bed frame! If you’ve ever shopped for a modern platform bed, you might notice a few things:
- It’s difficult to get an original piece from that era in a king size because not many people used king-sized beds in the 60s
- A lot of the platform bed frames are cheap and of poor quality or, if they aren’t, they’re a fortune. It’s hard to find something in the middle.
The “middle” is exactly where this DIY platform bed frame was born. We wanted a king platform bed frame of a particular style and color.
You see, Steve inherited a lot of original mid-century modern furniture from his parents, and this bed goes right next to one of his dressers.

DIY Bed Frame
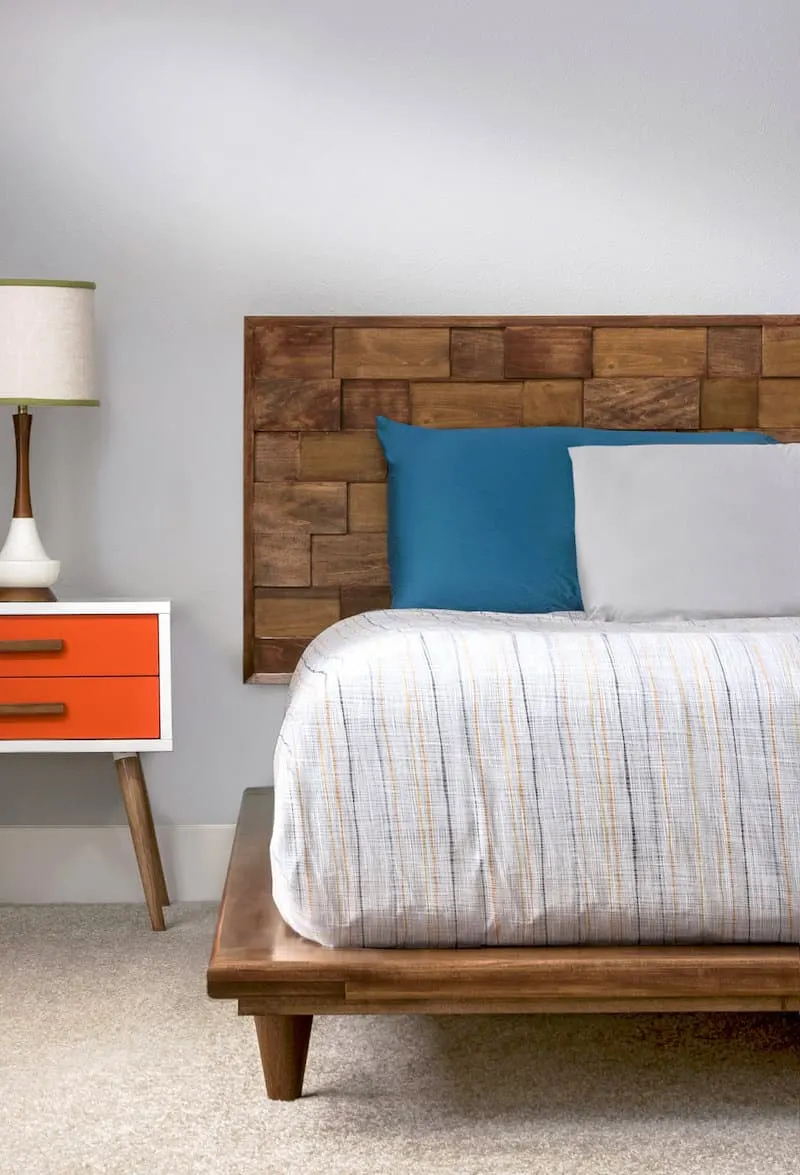
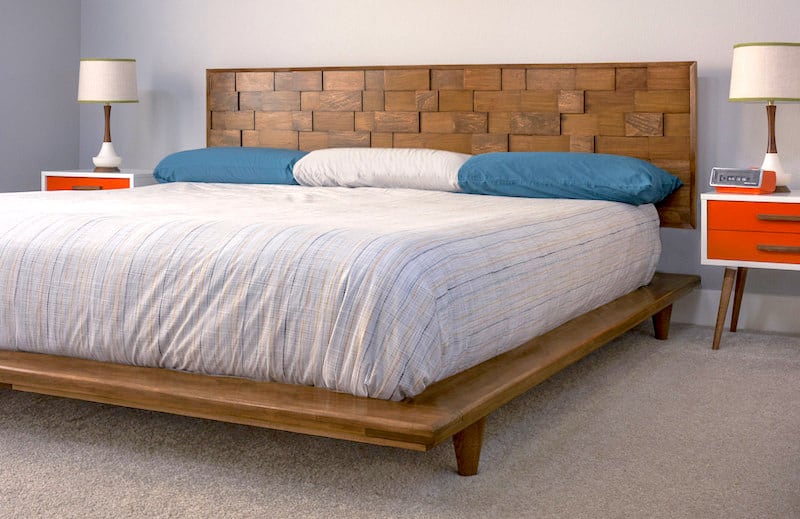
After looking at the quality of some of the options available, Steve decided to build his own king platform bed frame, and that is what you see above! It’s exactly what we wanted in exactly the right color.
And then there’s the DIY headboard (visit the other post!). It’s truly magnificent in real life. I only wish you could experience this entire DIY platform bed frame in person!
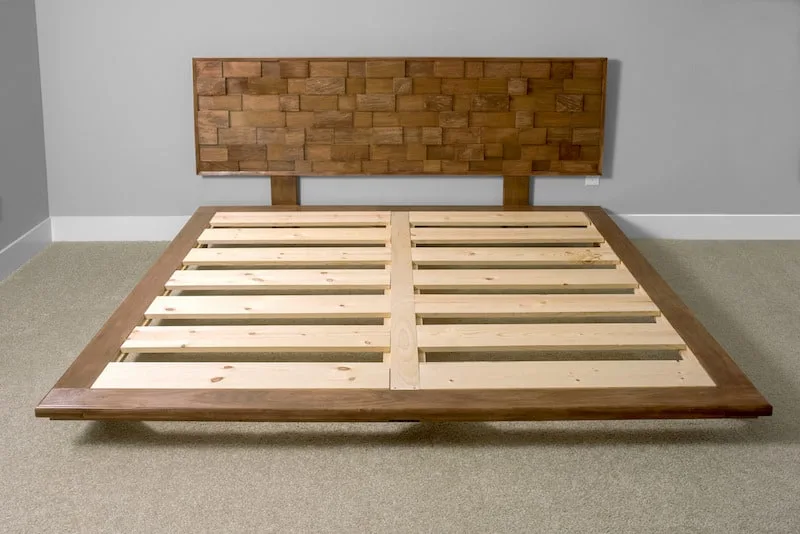
Three Layers
This king platform bed frame was constructed in three layers. There is a middle rectangular layer that is built first, then a top rectangular layer added for structural support (to take weight) and rigidity.
The bottom layer is a thinner label that the legs screw in to, and adds further support and rigidity.
Easy to Disassemble
You’ll notice in step eight of this project, we don’t glue the entire frame together at the corners. This is so we can disassemble the bed using a screwdriver or drill. That’s a BIG advantage to this frame.
There was NO WAY this DIY platform bed frame was going to fit through the doorway. Being able to take apart this DIY bed frame was important, and makes it suitable for anyone who is concerned about ever moving their bed.
Let’s begin the easy woodworking tutorial!

Modern DIY Platform Bed Frame
Tools and Hardware
- Ryobi Compound Miter Saw with Laser
- Ryobi Table Saw
- Ryobi Belt Sander
- Ryobi Router with bits (optional, see Step 15)
- Ryobi Drill with bits, also a 3/4″ countersink bit, and 5/8″ forstner bit
- Wood – as specified on cut list below
- Wood glue – we recommend Titebond III
- Wood screws – 1 1/4″ length (about 124 screws)
- Clamps
- Measuring tape
- Pencil
- Square ruler (optional)
- Modern bed legs – we used six from Tablelegs.com found here
Cut List*
- 2 – 1″ x 6″ x 8′ boards trimmed to 1″ x 5 1/2″ x 89″ each
- 2 – 1″ x 6″ x 8′ boards trimmed to 1″ x 5 1/2″ x 74″ each
- 1 – 1″ x 6″ x 8′ board trimmed to 1” x 5 ½” x 78”
- 2 – 1″ x 6″ x 8′ boards trimmed to 1″ x 4 3/4″ x 85″ each
- 2 – 1″ x 6″ x 8′ boards trimmed to 1″ x 4 3/4″ x 79 1/2″ each
- 1 – 1” x 4” x 8′ board trimmed to 1″ x 3 1/2″ x 79 ½”
- 1 – 1″ x 4″ x 8′ board trimmed to 1 x 3 1/2″ x 82″
- 1 – 1″ x 4″ x 8′ board trimmed to 1” x 3 1/2” x 84 ¼”
- 2 – 1″ x 4″ x 8′ boards trimmed to 1” x 3 ½” x 39 ½”
- 2 – 1″ x 4″ x 8′ boards trimmed to 1” x 3 ½” x 80 ¾”
- 2 – 1″ x 4″ x 8′ boards trimmed down to eight 1″ x 4″ x 15″ pieces, with the ends cut at 45 degree angles
- 6 to 8 – 1″ x 6″ x 8′ pine boards trimmed to eight slats, 1″ x 5 1/2″ x 35 3/4″
*if you are a newbie woodworker, remember that wood sizes are given as the cut from a log. For example, a 2″ x 4″ is cut that size, from a rough log but then it dries smaller (around 1.5″ x 3.5″). So your EXACT measurements may vary, though they will be close.
Wood and Where to Purchase
We purchased poplar for the main portion of the frame from Home Depot, which is also where we got our Ryobi Tools. We wanted a hard wood that was easy to work with, and we like the grain.
Our cost for this bed frame using poplar was around $250 (not including the headboard), but you could reduce the cost by using a less expensive wood.
For the slats, we used pine. There’s no reason to use anything more expensive. Pine is cheap but sturdy, and no one is going to see the slats.
DIY Platform Bed Frame

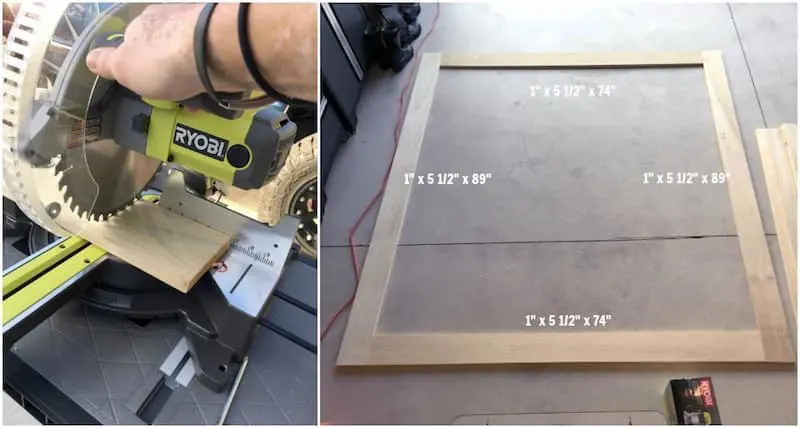
Step 1: You’ll start this DIY platform bed frame project by constructing the middle layer of the frame first. Use a miter saw to cut two 1″ x 6″ x 8′ pieces to 1″ x 5 1/2″ x 89. When you’re done, use the saw to cut the head and foot rails. You’ll cut two more 1″ x 6″ x 8′ pieces to 1”x 5 ½” x 74”.
Note: You likely do not need to cut the board width for most of the cuts in this tutorial – just the board length. The boards will probably have dried to about 5 1/2″ wide (but check). Use a table saw to cut the width if you need to.
Lay out the side rails as well as the head and foot rails. The outer dimension should be approximately 85” wide by 89” long, and the inside dimension should be approximately 74” wide by 78” long.


Step 2: Use a miter saw to cut the support piece from a 1″ x 6″ x 8′ for this middle layer of your frame to 74” length. Dimension of the board should be 1” x 5 ½” x 78”.
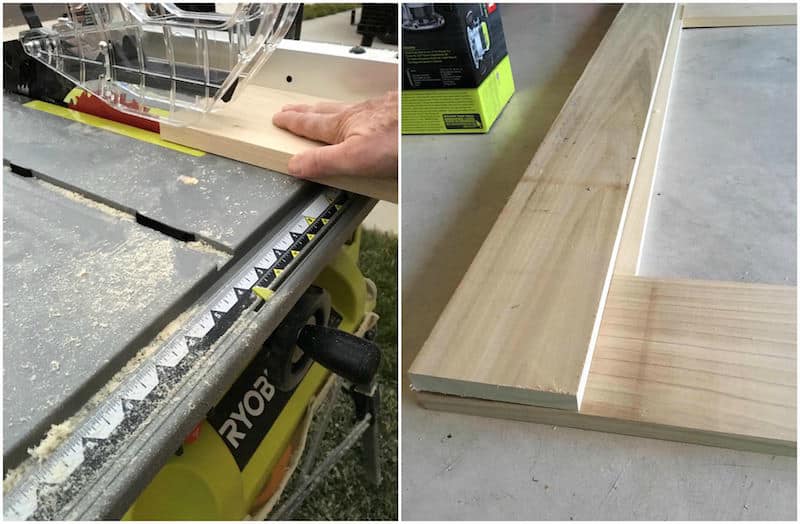

Step 3: Begin on the top layer of your king platform bed frame. You’ll start with the head and foot rails. Use your miter saw to cut two pieces of 1” x 6” x 8′ piece of wood to 85” lengths. Then use a table saw to rip both pieces to a 4 ¾” width.
Step 4: Cut the side rails of your platform bed. Use your miter saw to cut two pieces of 1” x 6” x 8′ boards to 79 1/2” lengths. Then use a table saw to rip both pieces to a 4 ¾” width.

Step 5: For the support rail, use your miter saw to cut a 1” x 4” x 8′ board down to a 1″ x 3 1/2″ width x 79 ½” length. It’s going to fit on top and in the center of your middle support rail as shown (but you won’t attach it now).

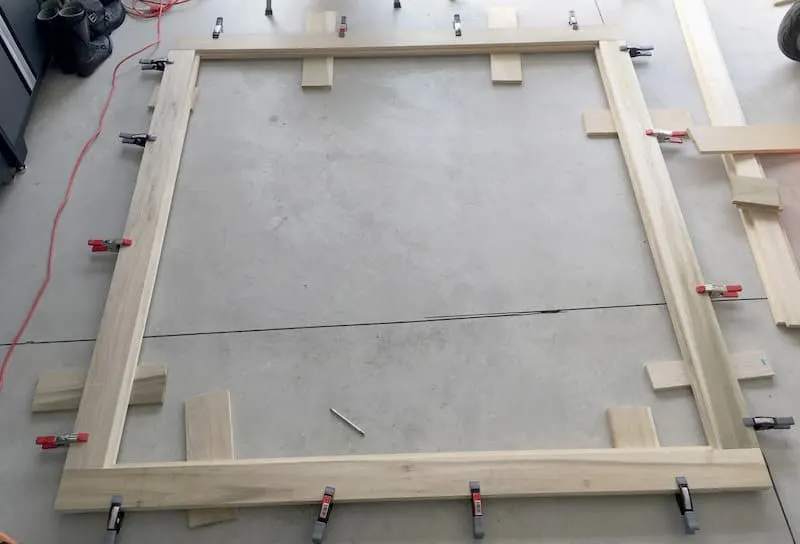
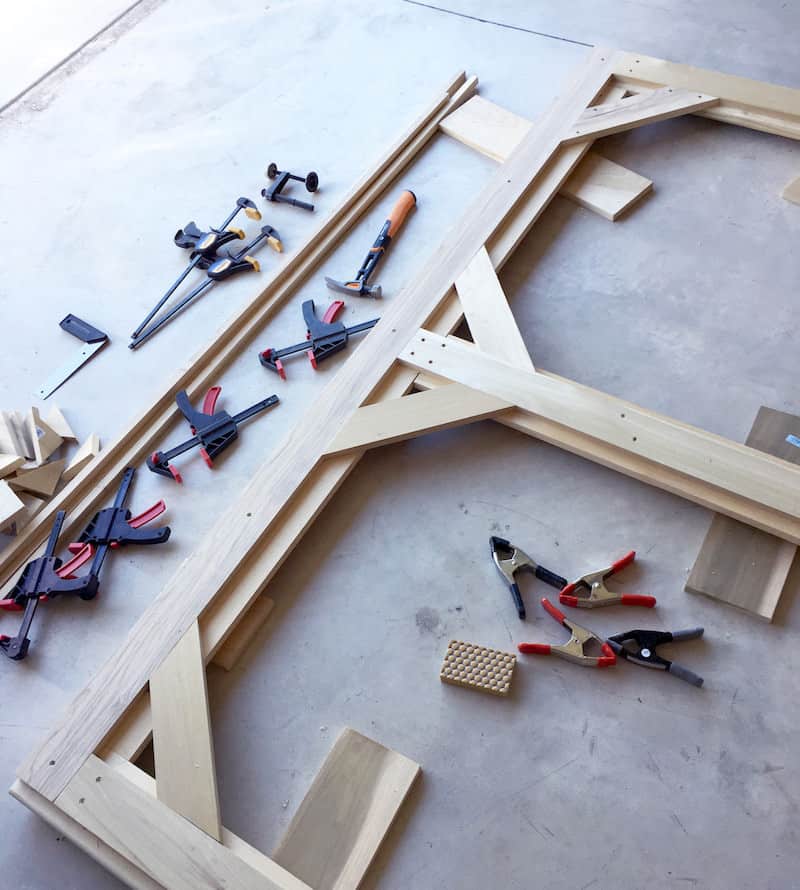
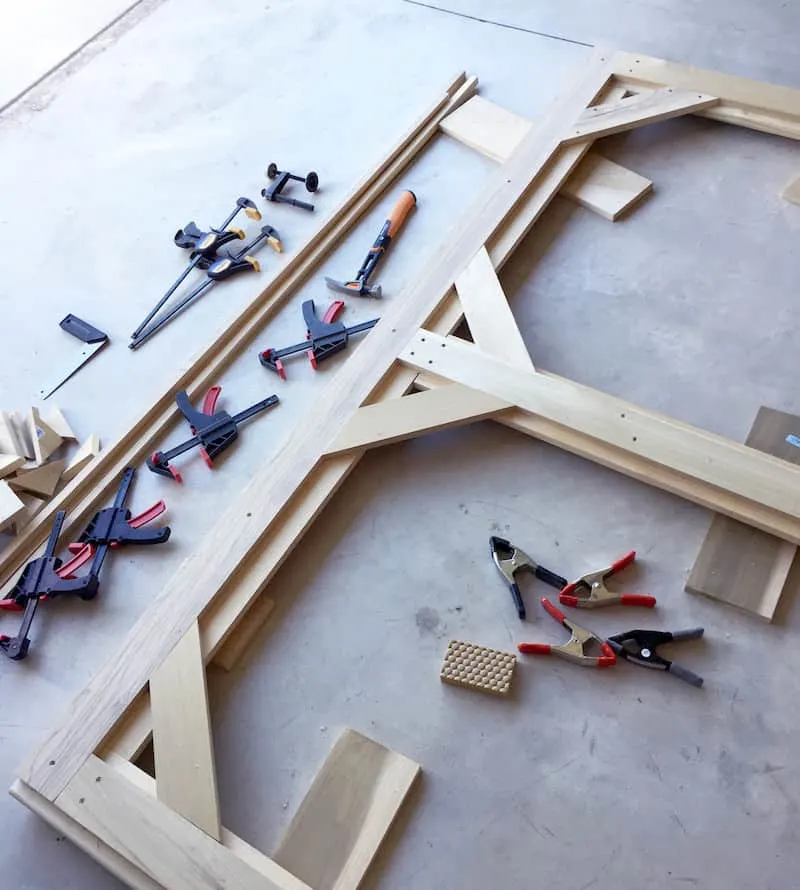
Step 6: Lay out the frame pieces with the middle layer on the bottom and the top layer above it. Line up the outside edges so that they are flush.
You’re doing this to see if any adjustments need to be made to your cuts (to make sure the frame will be square). You can also begin to see your DIY platform bed frame take shape, as you’ve created a 3/4″ ridge all the way around the inside edge just for the slats that are going to support the mattress.
Two tips:
1) the width of the boards doesn’t have to be perfect as long as the bed frame layers are flush around the outside. If you have a little larger than a 3/4″ ridge or a little less, it’s fine.
2) if you are working in a garage on the floor like Steve did, use extra wood to keep the frame propped up off of the ground. This keeps the wood from getting scratched.
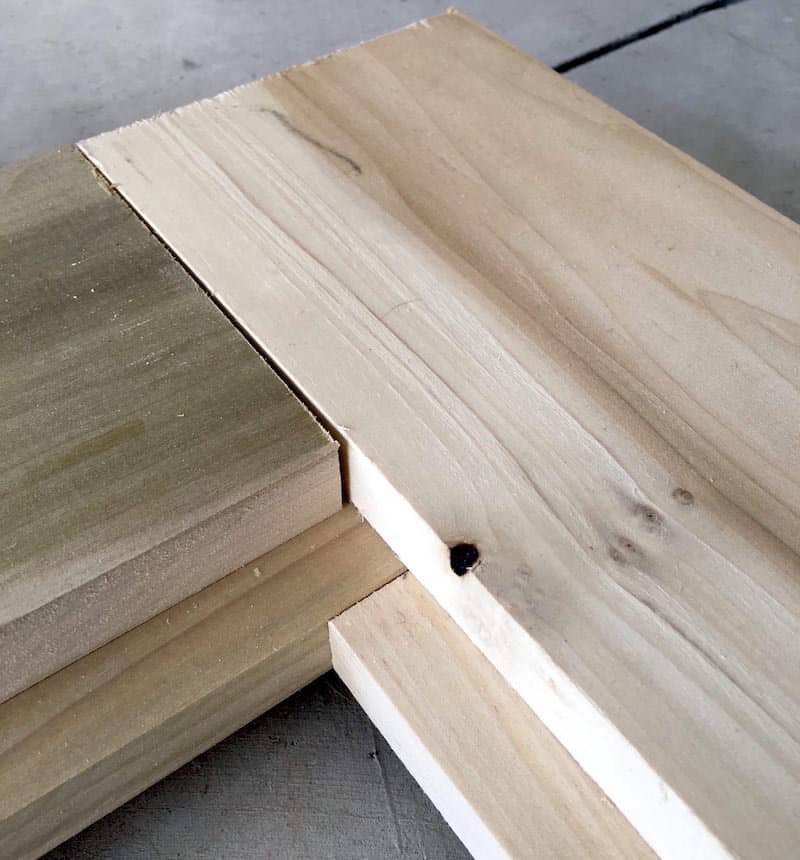

You’ll notice that each corner should overlap, like a simple box joint (see image above).
Step 7: Place the center support pieces in place by centering the lower (5 ½”) piece in the frame parallel to the side rails and then centering the (3 ½”) upper middle support piece on top. This creates a 1″ ledge on both sides of the center support rail.

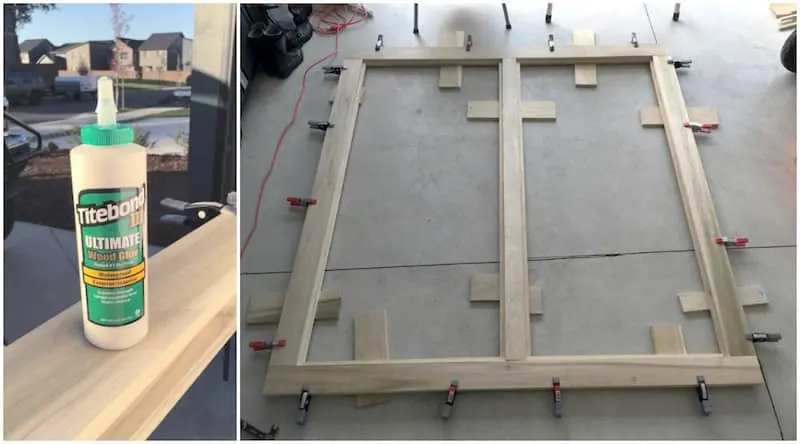
Step 8: After laying out the DIY platform bed frame components, start gluing the top layer pieces to their corresponding middle layer pieces below using wood glue.
We always use Titebond III after a fabulous recommendation from a reader! It works very well. Remember: You aren’t going to glue the corners if you want the bed to disassemble.
Use squeeze or bar clamps to hold everything in place.
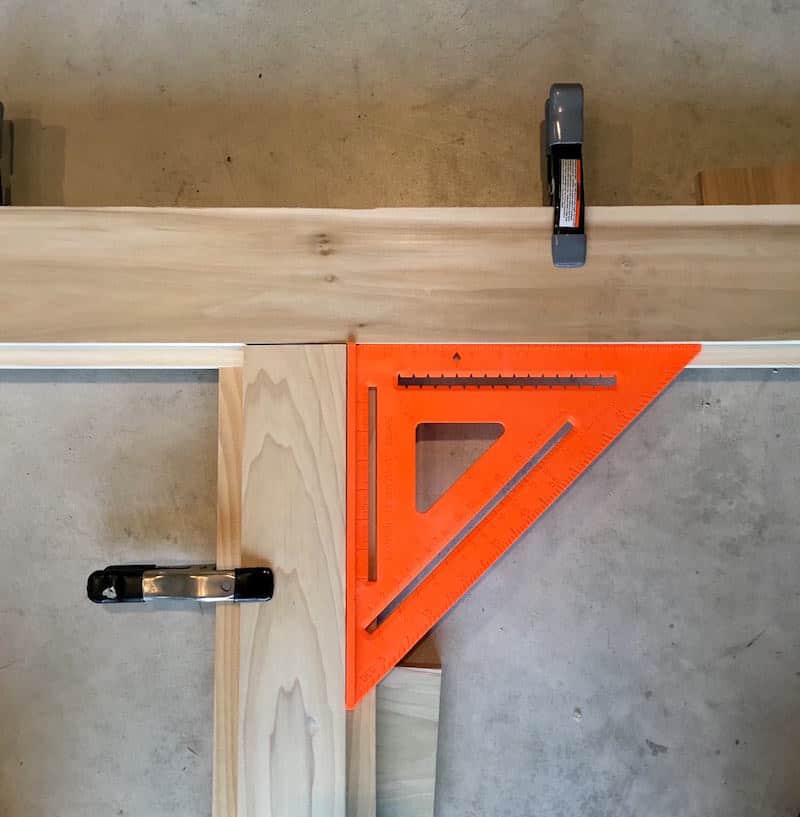

Check to make sure your king platform bed frame stayed square. Even though the corners aren’t glued together, you want to make sure your pieces still fit together.

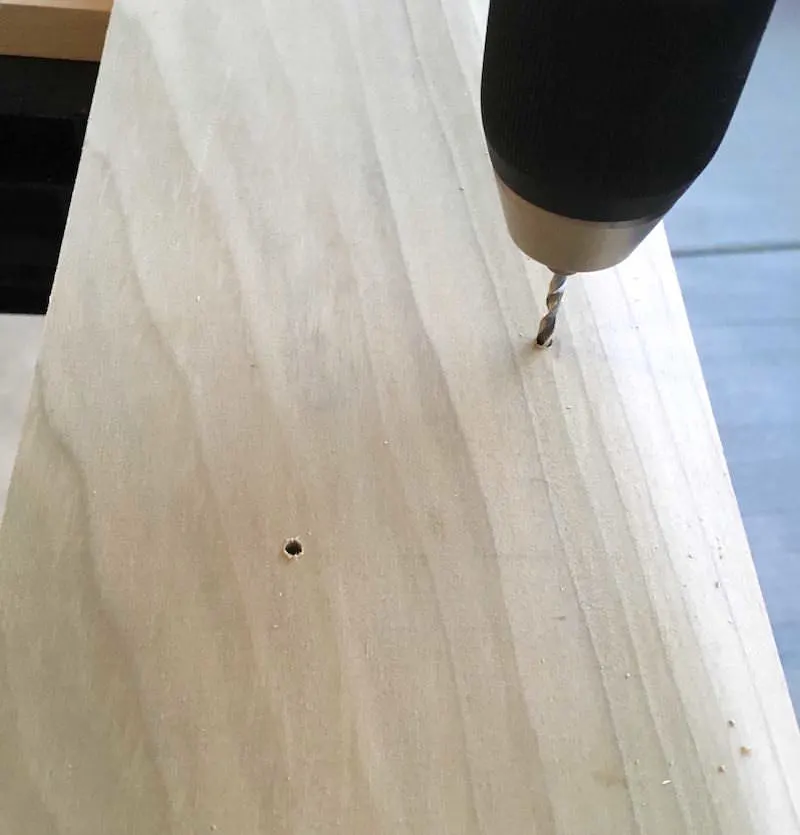
Step 9: Now that you’ve glued, you’re going to screw (so to speak!). This will aid the glue in bonding the rail layers together. Flip each rail over separately.
In the middle of the rail, drill two pilot holes – one about 1 1/2″ from the outside edge and one about 3 1/2″ in from the outside edge and a few inches away to the left.
Only drill the pilot hole into the first layer of wood. You’re going to put five sets of two screws each down each rail. So basically, you have ten screws in each rail holding them together! You do not need to screw the center support rail, though you can.
Note: when drilling the pilot holes select a drill bit a size or two smaller in diameter than the screws you’re going to use.
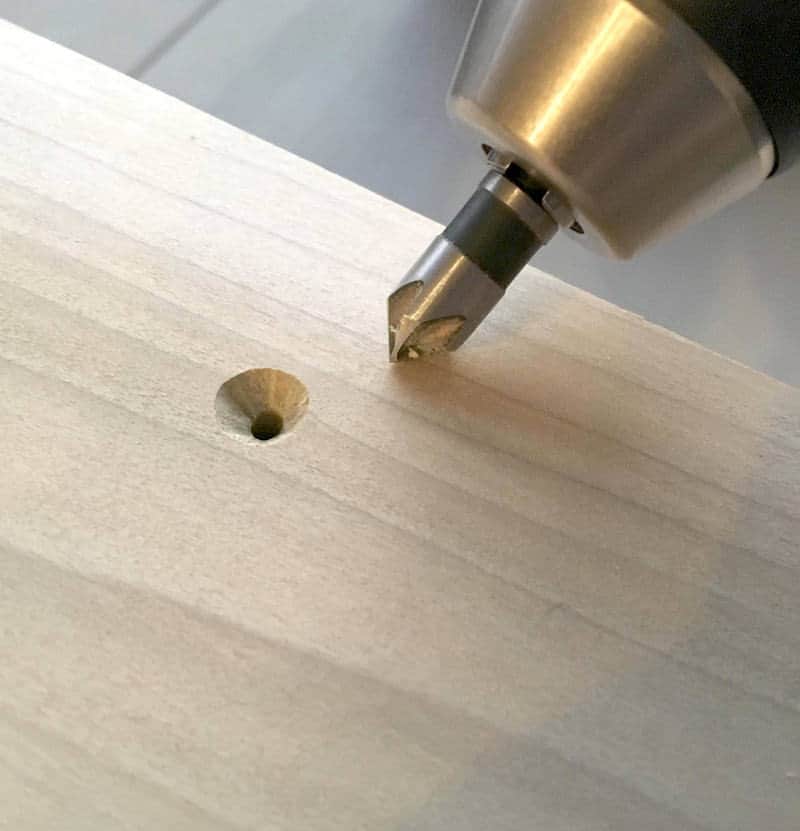
Step 10: Use a countersink drill bit on each drill hole so you can sink the screw flush to the bed frame surface.
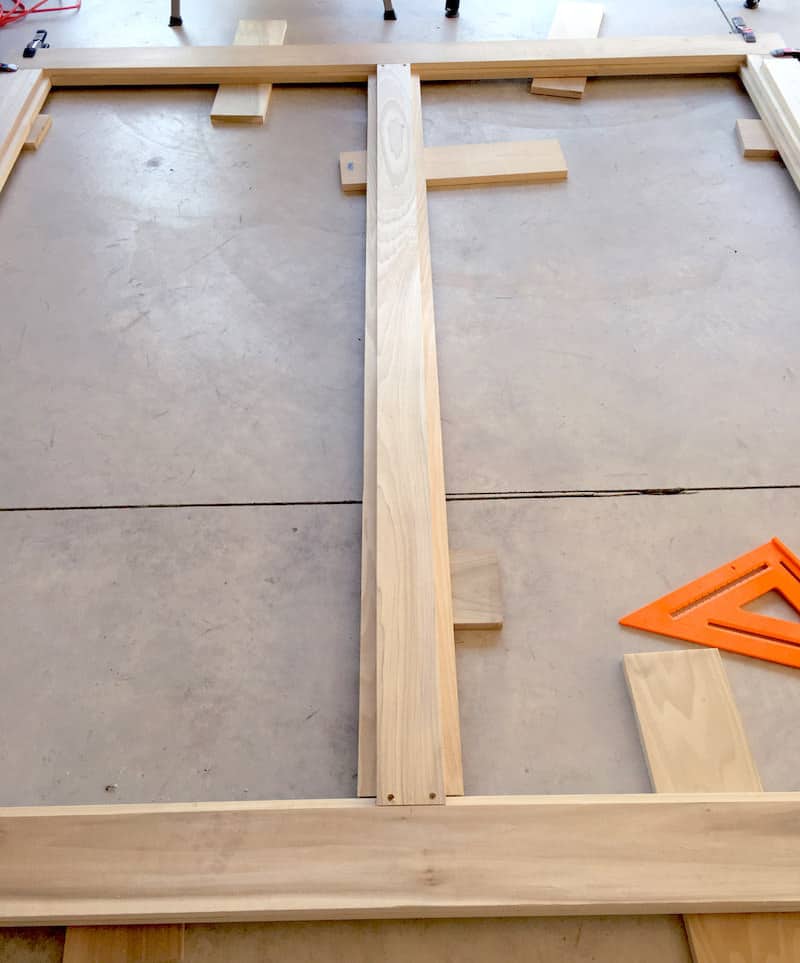

Step 11: With everything glued and screwed, do another test fit. At this point you’re going to center the middle support rail and attach it to the head and foot rails with two screws on each end.
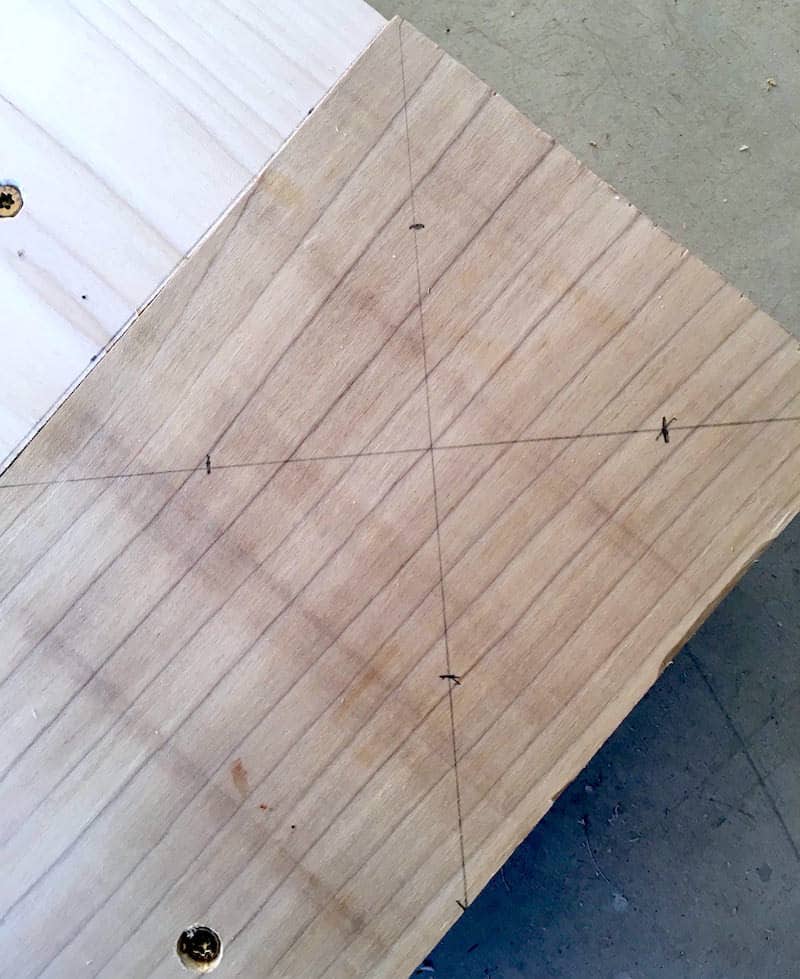

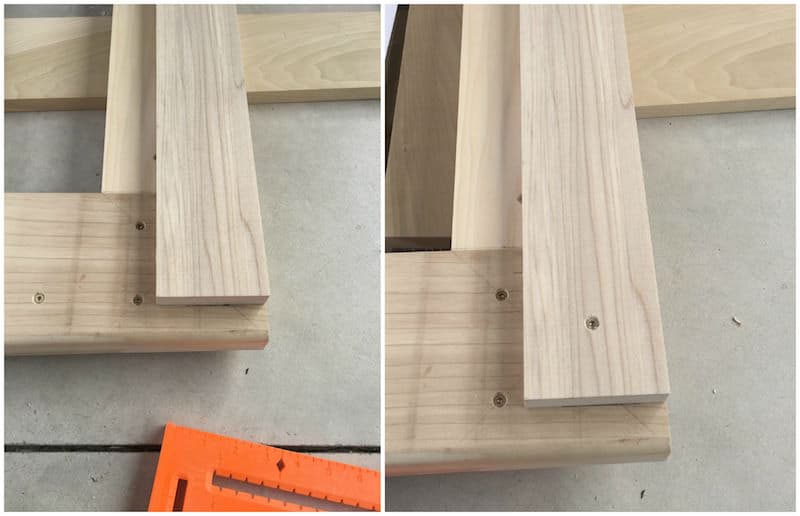
Step 12: Flip your frame pieces over and refit together. You’re now going to screw all four corners. In each corner, draw an “X” – this will help you locate where to put the screws (see the photo above).

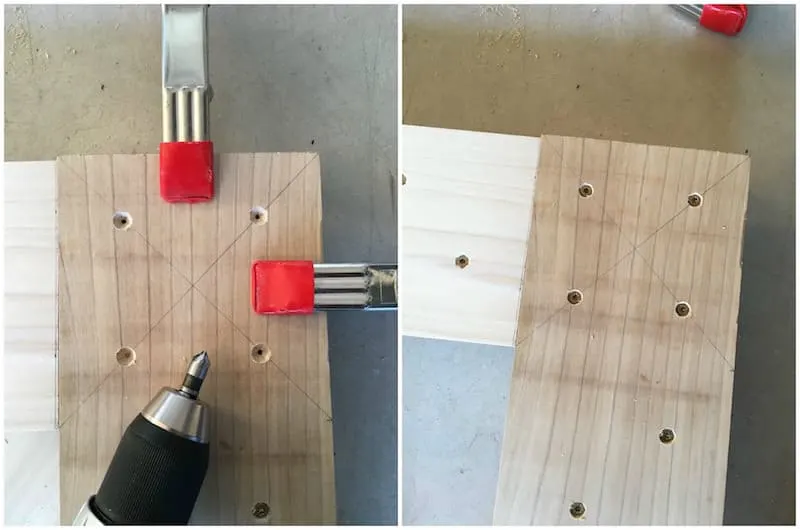
Step 13: Clamp the corners together. Drill pilot holes, countersink those holes, and screw in your wood screws.

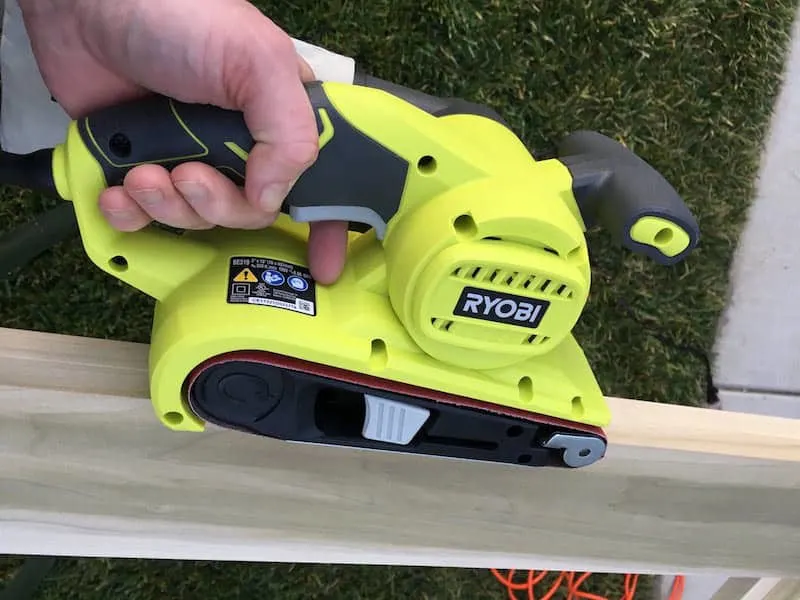
Step 14: Clean up the outside edges of the assembled bed frame. Use a small Ryobi belt sander with a 120-grit sanding belt and a very light touch.
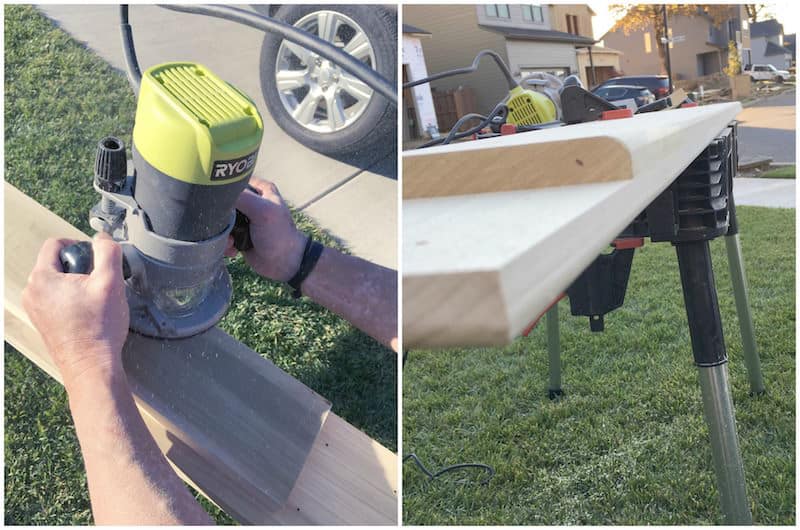

Step 15: This step is completely optional, but we wanted a round edge on our frame. So at this point we disassembled the frame at the corners and use a Ryobi router to round the edges. Rout the upper and the lower outside edges of the foot and side rails. You’ll only need to rout the side edge of the head rail.
If you like a square edge but want to soften it a bit, use a 80-grit foam sanding block to sand the edge a little. Then go back over with a 120-grit (sand with the grain of the wood) for a nice finished edge.
It’s finally time to build the bottom layer of your DIY platform bed frame! This is the layer that the legs will attach to. For all screw holes, I did pilot holes and a countersink for each as we did in the steps above.

Step 16: Start with the head rail piece. Using your miter saw, cut a 1″ x 4″ x 8′ board down to 1 x 3 1/2″ x 82″. Place this piece flush with the outer edge of the head rail, 1 ⅛” in from each end. Screw down in four places.
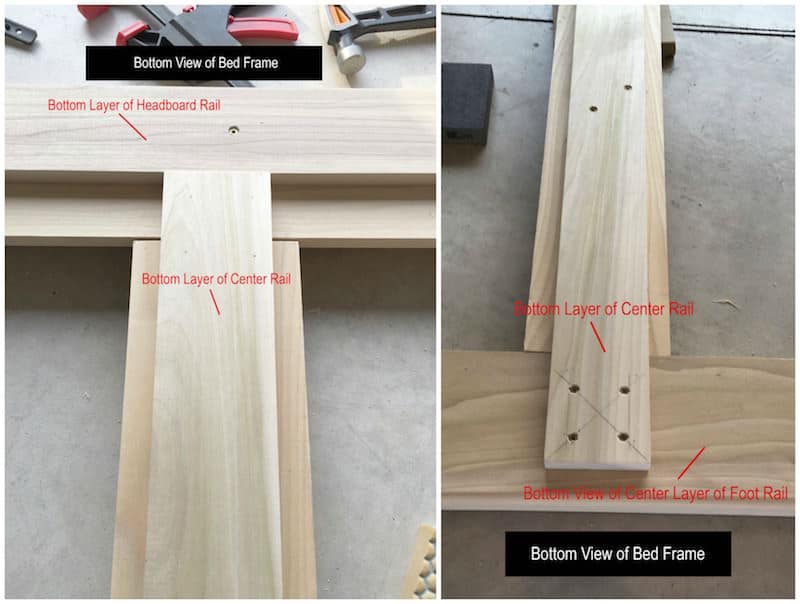
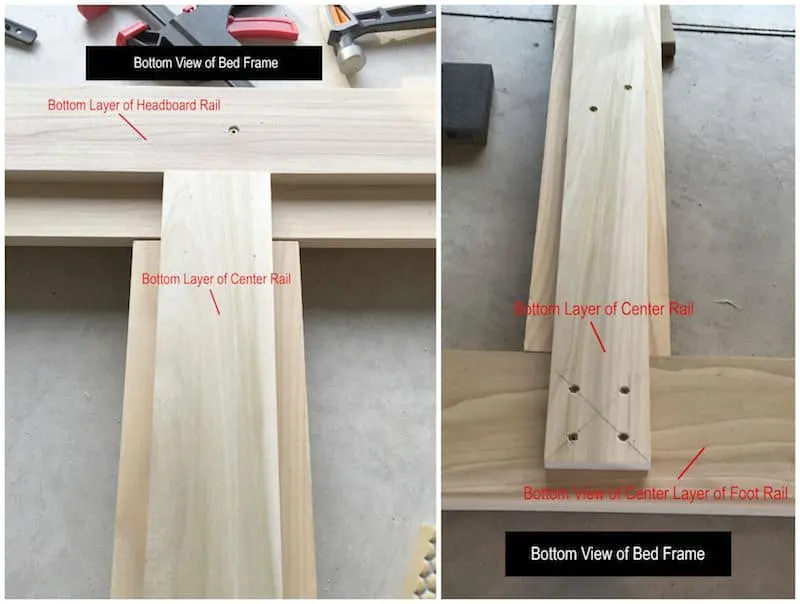
Step 17: Using a miter saw, cut a 1″ x 4″ x 8′ board down to 1” x 3 ½” x 84 ¼” . Center it on the bottom of the center support rail and place against the bottom layer of the head rail. Screw it down in the middle, towards the top, and then in four places at the foot rail (see above).

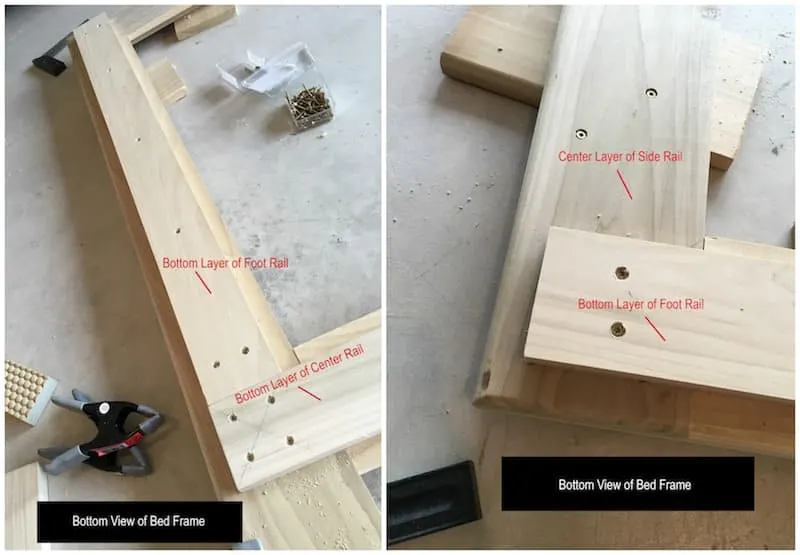
Step 18: Using a miter saw, cut two 1″ x 4″ x 8′ boards down to 1” x 3 1/2” x 39 1/2”. These will be the foot rail bottom support layer and will go on either side of the center rail. They will end 1 1/8″ from both sides of the frame. Screw them down using 14 screws total (7 on each side) as shown above.

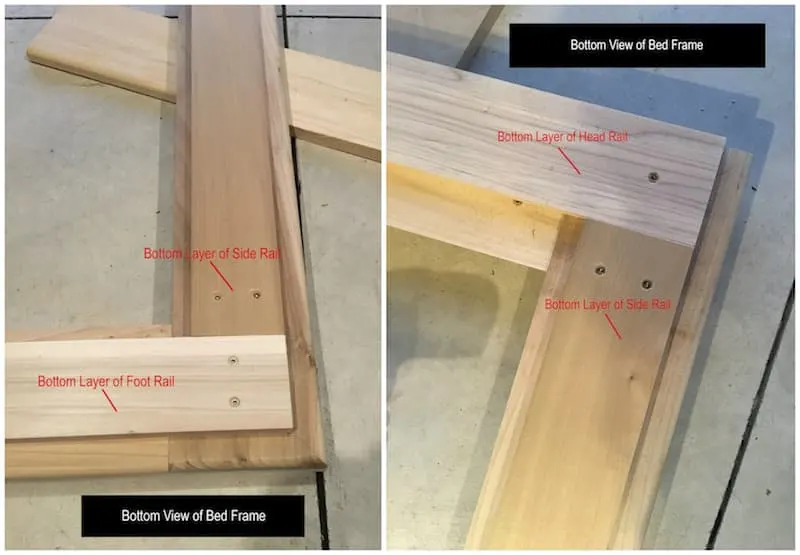
Step 19: Using a miter saw, cut two 1″ x 4″ x 8′ boards down to 1” x 3 ½” x 80 ¾”. These will be the bottom layer side rail support pieces. You will be attaching the legs to these pieces. Place these pieces between the bottom layer of the head and foot rails and screw down using 14 screws total.

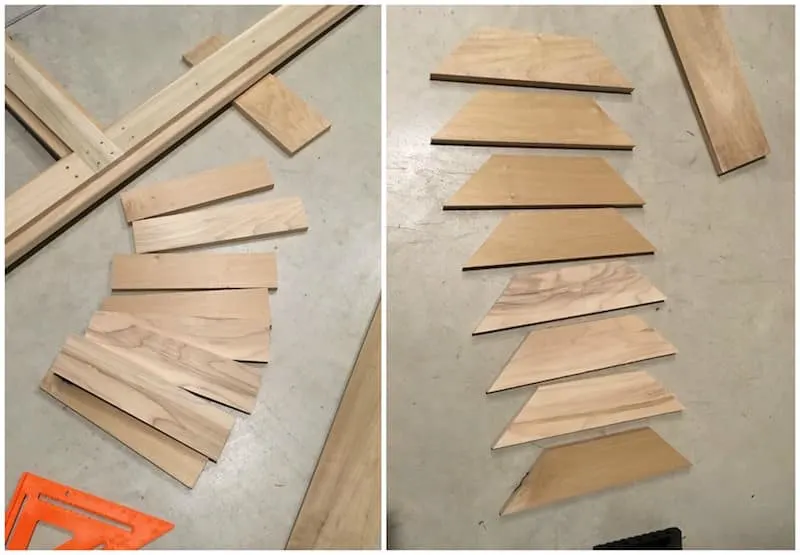
Step 20: Create the supports. Using a miter saw, cut two 1″ x 4″ x 8′ boards into eight pieces that are 1″ x 3 1/2″ x 15″. then add 45° angles at both ends.
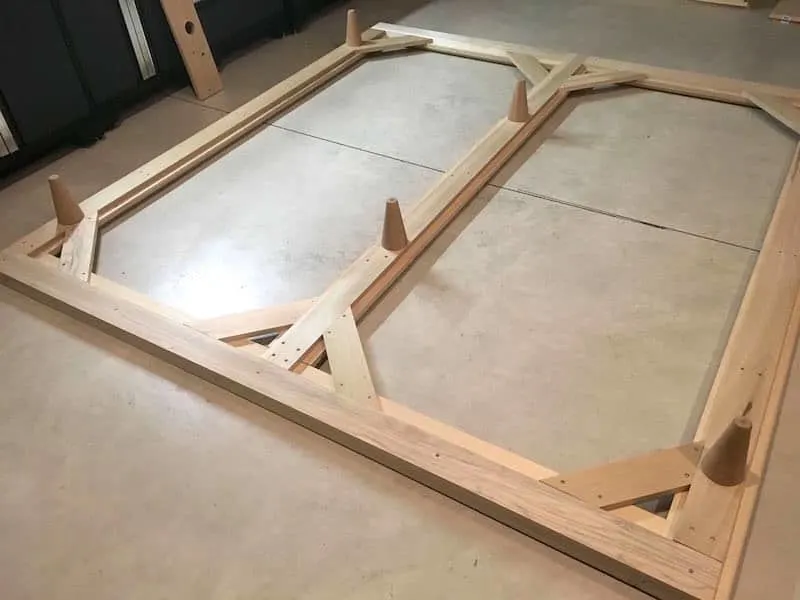
Step 21: On the bottom side of the frame, place a support in each corner screw into place with four screws each.
Your DIY platform bed frame is getting so close!

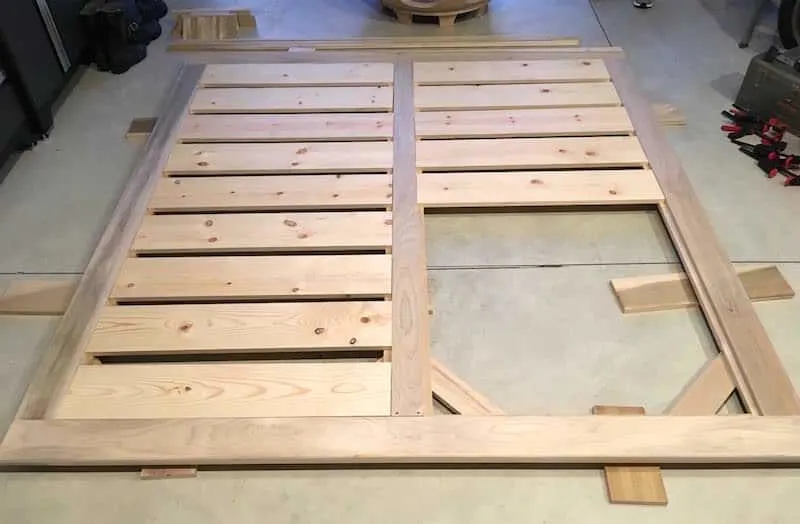
Step 22: Cut the slats out of 3/4″ thick pine. Flip the frame over so you can make sure the slats fit as you cut them. Cut about 12 – 16 slats that are 1″ x 5 1/2″ x 35 3/4″. If you run hot while you’re sleeping, cut less slats so that more heat escapes out the bottom.
The last part of this frame project is to attach the legs. We purchased six legs from Tablelegs.com. I highly recommend that you purchase the dowel screw installed in the leg. It increases the price a bit, but it’s worth it based on what we had to go through to get them in the feet and centered. Trust us!
Step 23: Now you’re going to insert the mounting sleeves into the bed frame. Flip the frame over so the bottom is facing up. Place two pencil marks in the center of the bottom of the footrail – 1 ¾” in from the edge and 11 ½” from each end. Repeat at the headrail.
Place two pencil marks in the center of the support piece, 26″ from each end.
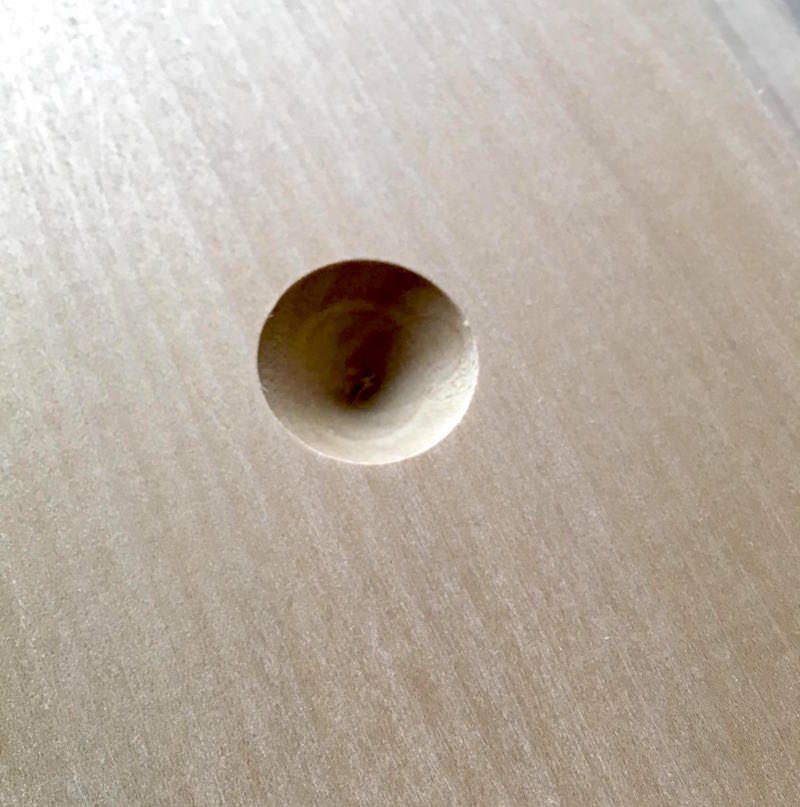
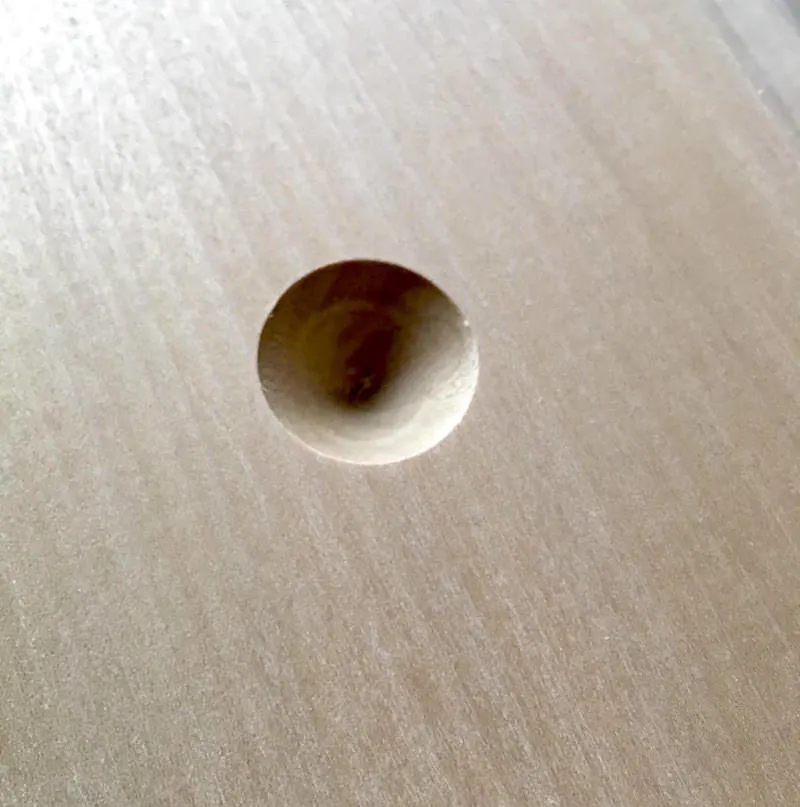
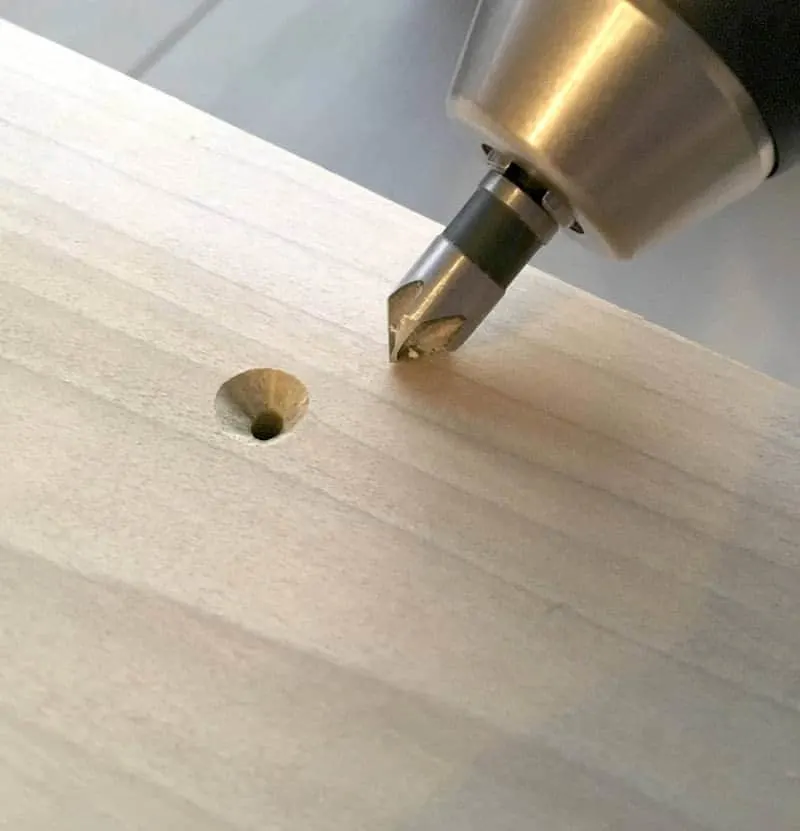
Step 24: Use a ¾” countersink drill bit and, on each pencil mark, drill until you have a ¾” hole.

Step 25: Use a 5/8” forstner bit to drill down into the center of the countersink hole you just made. You only need to drill the hole deep enough to completely sink the mounting sleeve, but no more.
Note: The forstner bit hole you drill keeps the mounting sleeve insert from splitting the wood surrounding the hole when being screwed into place.

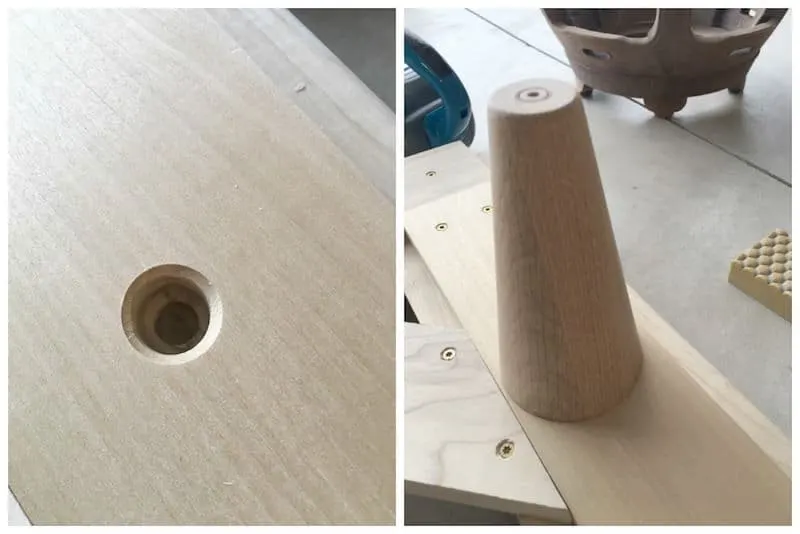
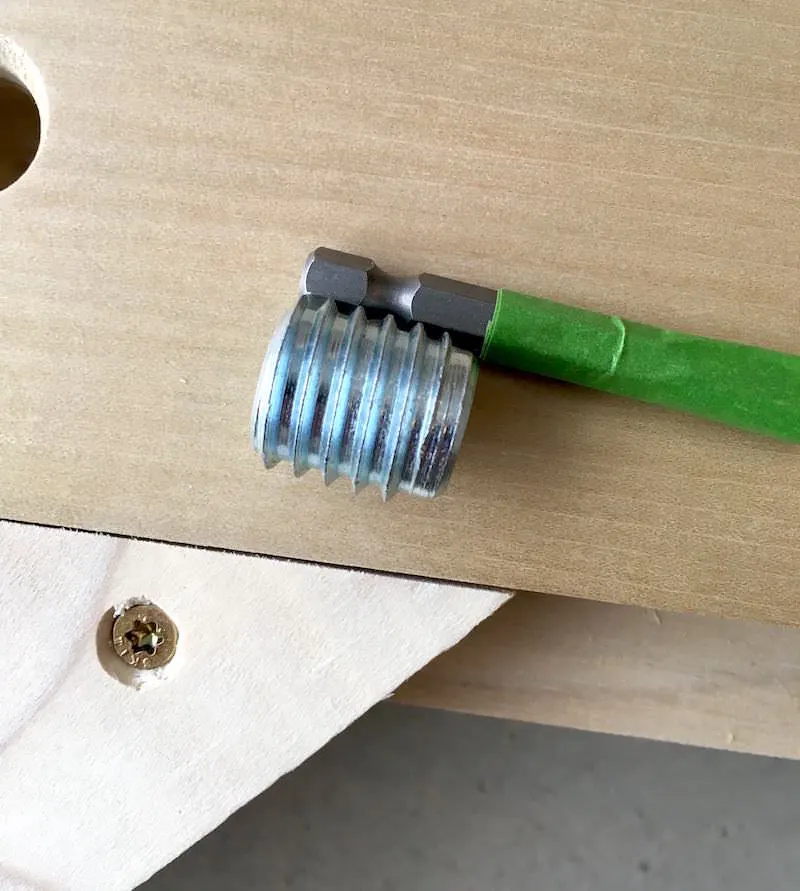
Step 26: Using a 13/32” drill bit, drill a pilot hole so that the extra threads from the leg stud have a place to go. Test fit the leg when you are done to make sure the leg will lay flush to the frame.
Use a 10mm hex key wrench to insert the mounting sleeve flush to the frame surface – then screw in the leg until it is completely secure.

Wow! Your DIY platform bed frame is complete!
The last thing we did was stain with Minwax waterbase stain (a custom color to match the existing furniture). Then we coated with a Minwax waterbase polycrylic and let dry for 24 hours.
Would you try making this king platform bed frame? The cool part about this project is that you can resize it easily based on the size of your mattress. I recommend drawing it out on grid paper.
The inside area of your bed frame should fit your mattress so that a nice lip extends out around the frame for all to see!
DIY Bed Frame


Why buy a platform bed frame when you can DIY it? Build this mid-century modern king platform bed frame using our easy-to-follow tutorial. Make your DIY bed frame cheaper, better (higher quality), and any color you like!
Materials
- Wood - as specified on cut list in the Notes, we used Poplar
- Wood glue - we recommend Titebond III
- Wood screws - 1 1/4" length (about 124 screws)
- Pencil
- Modern bed legs - we used six from Tablelegs.com
Tools
- Ryobi Compound Miter Saw with Laser
- Ryobi Table Saw
- Ryobi Belt Sander
- Ryobi Router with bits (optional, see Step 15)
- Ryobi Drill with bits, also a 3/4" countersink bit, and 5/8" forstner bit
- Clamps
- Measuring Tape
- Square ruler (optional)
Instructions
- You’ll start this DIY platform bed frame project by constructing the middle layer of the frame first. Use a miter saw to cut two 1″ x 6″ x 8′ pieces to 1″ x 5 1/2″ x 89″. When you’re done, use the saw to cut the head and foot rails. You’ll cut two more 1″ x 6″ x 8′ pieces to 1”x 5 ½” x 74”.
- Lay out the side rails as well as the head and foot rails. The outer dimension should be approximately 85” wide by 89” long, and the inside dimension should be approximately 74” wide by 78” long.
- Use a miter saw to cut the support piece from a 1″ x 6″ x 8′ for this middle layer of your frame to 74” length. Dimension of the board should be 1” x 5 ½” x 78”.
- Begin on the top layer of your king platform bed frame. You’ll start with the head and foot rails. Use your miter saw to cut two pieces of 1” x 6” x 8′ piece of wood to 85” lengths. Then use a table saw to rip both pieces to a 4 ¾” width.
- Cut the side rails of your platform bed. Use your miter saw to cut two pieces of 1” x 6” x 8′ boards to 79 1/2” lengths. Then use a table saw to rip both pieces to a 4 ¾” width.
- For the support rail, use your miter saw to cut a 1” x 4” x 8′ board down to a 1″ x 3 1/2″ width x 79 ½” length. It’s going to fit on top and in the center of your middle support rail as shown (but you won’t attach it now).
- Lay out the frame pieces with the middle layer on the bottom and the top layer above it. Line up the outside edges so that they are flush.
- Place the center support pieces in place by centering the lower (5 ½”) piece in the frame parallel to the side rails and then centering the (3 ½”) upper middle support piece on top. This creates a 1″ ledge on both sides of the center support rail.
- After laying out the DIY platform bed frame components, start gluing the top layer pieces to their corresponding middle layer pieces below using wood glue. Use squeeze or bar clamps to hold everything in place.
- Flip each rail over separately. In the middle of the rail, drill two pilot holes – one about 1 1/2″ from the outside edge and one about 3 1/2″ in from the outside edge and a few inches away to the left.
- Only drill the pilot hole into the first layer of wood. You’re going to put five sets of two screws each down each rail. You do not need to screw the center support rail, though you can.
- Use a countersink drill bit on each drill hole so you can sink the screw flush to the bed frame surface.
- With everything glued and screwed, do another test fit. At this point you’re going to center the middle support rail and attach it to the head and foot rails with two screws on each end.
- Flip your frame pieces over and refit together. You’re now going to screw all four corners. In each corner, draw an “X” – this will help you locate where to put the screws.
- Clamp the corners together. Drill pilot holes, countersink those holes, and screw in your wood screws.
- Clean up the outside edges of the assembled bed frame. Use a small belt sander with a 120-grit sanding belt and a very light touch.
- Time to build the bottom bed frame layer. Start with the head rail piece. Using your miter saw, cut a 1″ x 4″ x 8′ board down to 1 x 3 1/2″ x 82″. Place this piece flush with the outer edge of the head rail, 1 ⅛” in from each end. Screw down in four places.
- Using a miter saw, cut a 1″ x 4″ x 8′ board down to 1” x 3 ½” x 84 ¼” . Center it on the bottom of the center support rail and place against the bottom layer of the head rail. Screw it down in the middle, towards the top, and then in four places at the foot rail.
- Using a miter saw, cut two 1″ x 4″ x 8′ boards down to 1” x 3 1/2” x 39 1/2”. These will be the foot rail bottom support layer and will go on either side of the center rail. They will end 1 1/8″ from both sides of the frame. Screw them down using 14 screws total (7 on each side).
- Using a miter saw, cut two 1″ x 4″ x 8′ boards down to 1” x 3 ½” x 80 ¾”. These will be the bottom layer side rail support pieces. You will be attaching the legs to these pieces. Place these pieces between the bottom layer of the head and foot rails and screw down using 14 screws total.
- Create the supports. Using a miter saw, cut two 1″ x 4″ x 8′ boards into eight pieces that are 1″ x 3 1/2″ x 15″. then add 45° angles at both ends.On the bottom side of the frame, place a support in each corner screw into place with four screws each.
- Cut the slats out of 3/4″ thick pine. Flip the frame over so you can make sure the slats fit as you cut them. Cut about 12 – 16 slats that are 1″ x 5 1/2″ x 35 3/4″. If you run hot while you’re sleeping, cut less slats so that more heat escapes out the bottom.
- Now you’re going to insert the mounting sleeves into the bed frame. Flip the frame over so the bottom is facing up. Place two pencil marks in the center of the bottom of the footrail – 1 ¾” in from the edge and 11 ½” from each end. Repeat at the headrail. Place two pencil marks in the center of the support piece, 26″ from each end.
- Use a ¾” countersink drill bit and, on each pencil mark, drill until you have a ¾” hole.
- Use a 5/8” forstner bit to drill down into the center of the countersink hole you just made. You only need to drill the hole deep enough to completely sink the mounting sleeve, but no more.
- Using a 13/32” drill bit, drill a pilot hole so that the extra threads from the leg stud have a place to go. Test fit the leg when you are done to make sure the leg will lay flush to the frame.
- Use a 10mm hex key wrench to insert the mounting sleeve flush to the frame surface – then screw in the leg until it is completely secure.
- Paint or stain; let dry 24 hours before flipping over and using.
Notes
Cut List
- 2 – 1″ x 6″ x 8′ boards trimmed to 1″ x 5 1/2″ x 89" each
- 2 – 1″ x 6″ x 8′ boards trimmed to 1″ x 5 1/2″ x 74" each
- 1 – 1″ x 6″ x 8′ board trimmed to 1” x 5 ½” x 78”
- 2 – 1″ x 6″ x 8′ boards trimmed to 1″ x 4 3/4″ x 85" each
- 2 – 1″ x 6″ x 8′ boards trimmed to 1″ x 4 3/4″ x 79 1/2" each
- 1 – 1” x 4” x 8' board trimmed to 1" x 3 1/2" x 79 ½”
- 1 – 1" x 4" x 8' board trimmed to 1 x 3 1/2" x 82"
- 1 – 1" x 4" x 8' board trimmed to 1” x 3 1/2” x 84 ¼"
- 2 – 1" x 4" x 8' boards trimmed to 1” x 3 ½” x 39 ½”
- 2 – 1" x 4" x 8' boards trimmed to 1” x 3 ½” x 80 ¾”
- 2 – 1" x 4" x 8' boards trimmed down to eight 1" x 4" x 15" pieces, with the ends cut at 45 degree angles
- 6 to 8 - 1" x 6" x 8' pine boards trimmed to eight slats, 1" x 5 1/2" x 35 3/4"
What do you think? I’d love to know in the comments! I’d also love for you to check out these other furniture projects I think you might enjoy:
Marie
Thursday 21st of September 2023
Hi Amy, my question is about taking the bed apart for moving. Do you have to take then entire bed frame apart for moving? And if so, does it affect the integrity of the construction since your removing and reinstalling screws from existing holes?
Thank you!
Amy
Tuesday 3rd of October 2023
Hi Marie! We took it apart to move and it's really easy to do. We just had to take the headboard off though, didn't disassemble the bed frame portion. The doors are big enough here. And if you end up taking it apart and putting it back together again, you should be fine. Just don't tighten anything down too crazy.
Katie Perry
Sunday 22nd of March 2020
Hi! Very comprehensive tutorial! Do you have the cut list for a California king? (I’m a bit of a beginner rising to the intermediate occasion?)
Jack
Sunday 1st of March 2020
Hi there,
We are looking at your cut list and pricing everything on the Home Depot website and the website you purchased the legs off. It is coming to around 750$ all in. How did you manage to do the base for 250$?
Jack
Amy
Sunday 29th of March 2020
Hi Jack! This post was originally written several years ago, so it would definitely have been cheaper - but not that much. I did some recalculating and it's about $325 using the Home Depot website. You don't want to use the Swaner hardwood? We bought just the open stock.
Pete Perry
Sunday 16th of June 2019
Any chance you have a step by step for a headboard as well?
Not sure I would match the exact design, but the measurements would be cool.
Amy
Monday 17th of June 2019
Hi Pete! Yes, we do - here you go: https://diycandy.com/mid-century-modern-diy-headboard/
Natalie Zurfluh
Sunday 17th of March 2019
Hi, we are going to adapt this to a queen size and can't wait to get started! Do you have the cut sheet for the headboard and any instructions for that? Thank you!
Dan
Tuesday 26th of September 2023
@Rachelle Hill, Did Natalie get back to you with the Queen size measurements? I too was interested in building the Queen size. Thank you so much.
Rachelle Hill
Tuesday 19th of September 2023
@Natalie Zurfluh, did you end up doing this? If so do you have a cut list for a Queen size?
Amy
Sunday 17th of March 2019
I'd love to see the results! Yes, here is the headboard: https://diycandy.com/mid-century-modern-diy-headboard/