DIY Moon Sand Recipe (2 Ingredients, Fun Sensory Play)
Create your own moon sand with this easy DIY recipe! Perfect for sensory play, it’s soft, moldable, and safe for kids. This is one of those projects that feels a little magical – and once you try it, you’ll see why it’s everywhere.
Skills Required: None. This project is ideal for children of any age, from toddlers to older kids, and no crafting experience is needed.

Today I’m so excited to share one of my favorite “science-meets-play” activities: diy moon sand. If you’ve never made it before, you’re in for something seriously fun.
What is Moon Sand?
This isn’t your typical play sand. It has a soft, fluffy texture that almost feels like the surface of the moon – light, moldable, and just a little bit mesmerizing. Unlike real sand, it holds its shape when you mold it, which makes it perfect for creating all kinds of different shapes.
The best part? You only need a few simple ingredients to make it happen.

There’s something about this project that instantly clicks with kids. Maybe it’s the way the texture shifts in your hands, or how easily it forms into shapes. Maybe it’s the colors, especially when you add food coloring for a swirled effect.
Whatever it is, this activity delivers a truly fun sensory experience.
This kind of sensory play is more than just fun – it’s incredibly beneficial. It helps develop coordination, creativity, and problem-solving skills. Even better, it encourages independent play, which means kids can stay engaged for longer stretches of time.
For toddlers, especially, this is a great introduction to hands-on exploration. Watching them use their little hands to scoop, press, and shape the sand is half the fun.

What Makes This Recipe Different
This easy moon sand recipe keeps things simple, but you can easily customize it depending on what you have at home.
The base uses cornstarch and coconut oil, but you’re not limited to just one type of oil. You can swap in vegetable oil, canola oil, or even baby oil depending on what you have on hand.
Each option creates slightly different results:
- Vegetable oil gives a smooth, classic feel
- Canola oil works similarly with a lighter finish
- Baby oil adds a soft scent (just be mindful with younger kids)
If you want to get creative, you can even add a tiny bit of scent—think of it like crafting your own version of moon dough.

Color + Creativity
Adding food coloring is where things get really fun.
Because food coloring is water-based, it won’t fully blend with the oil. Instead, it creates a marbled effect with darker and lighter patches throughout the moon sand mixture. The result? A super cool, galaxy-like look that kids love.
You can mix colors, create themes (think ocean blues or sandy neutrals), or even divide the batch into sections for experimenting.
How to Play with Moon Sand
Once your diy moon sand is ready, it’s time to play.
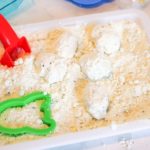
Set everything up in a bin or a shallow tray to contain the activity. This makes cleanup easier and keeps everything in one place.
Add some toys, spoons, or even baking tools. You can also use different molds to create shapes—anything from simple domes to more detailed designs. The sand holds its form beautifully when you mold it, making it perfect for experimenting with different shapes.
You can even create themed setups like an ocean scene with shells and cups, or a mini construction zone with scoops and containers.

Tips for the Best Texture
Getting the right texture is key. If your sand feels too dry, add a small amount of oil and mix again. Start with just a few drops of oil, because a little goes a long way.
If it feels too wet, add more cornstarch or adjust your ratio of flour if you’re using an alternative base like cups of flour instead.
The goal is a soft, crumbly consistency that holds its shape without being sticky.
Store your sand in an air-tight container to prevent it from drying out. Mason jars, plastic storage containers with tight-fitting lids, or resealable ziplock bags work well.
Storage + Cleanup
One of the best parts of this project? Easy cleanup. When you’re done, store your sand in an airtight container to keep it fresh. You can also use an airtight container like a resealable bag or jar.
Avoid adding water – it will break down the sand and ruin the texture.
For playing, using a pan or tray underneath can help catch stray bits. It keeps things tidy and makes transferring everything back to storage quick and simple.

Scroll down for the full instructions and exact measurements. You’ll be amazed at how quickly this comes together.
DIY Moon Sand
Equipment
- Medium bowl
- Spoon
Materials
- 16 oz cornstarch or all purpose flour
- 3/4 C coconut oil melted – or baby, canola, vegetable
- 4-5 drops food coloring optional
Instructions
- Place the coconut oil in a microwave-safe bowl or measuring cup. Microwave for 30 seconds to melt.

- In a medium size bowl add all the ingredients (including food coloring if using).

- Carefully mix the ingredients. If it becomes too difficult to mix with the spoon, knead with your hands until all the ingredients are well incorporated.

- If too dry, add a small amount of oil and continue to mix. If too wet, add more cornstarch and mix until the desired texture is met.

Notes
Extra Tips + Variations
- Want a gluten-free moon sand option? Stick with cornstarch instead of flour
- You can find supplies like containers or tools at the dollar store
- Add themed toys to match seasons or holidays
- Try mixing in a tiny bit of baking soda for a slightly different feel
- Use a baking pan to create a contained play area
If you enjoyed making this, let me know in the comments! Plus I’d love for you to check out these other related posts:
Blow Painting • Borax Crystals • Bubble Wrap Painting • Cloud Dough • Coffee Filter Flowers • Food Coloring Art • Glow in the Dark Playdough • Homemade Playdough • Magic Hydrophobic Sand • Jello Play Dough • Kinetic Sand • Moon Sand • Sand Slime • Silly Putty • Spin Art