Popsicle Stick Bracelets That Are Surprisingly Stylish
Learn how to make popsicle stick bracelets with paint, beads, paper, and more. Plus get tips for bending craft sticks without breaking them.
Popsicle sticks might be one of the most underrated craft supplies on the planet.
Most of us know them from childhood. They held our favorite frozen treats in the summer, filled countless classroom bins, and somehow ended up glued into everything from birdhouses to picture frames.
But jewelry?
That’s probably not the first thing that comes to mind.
Which is exactly why I love these popsicle stick bracelets.
There’s something delightfully unexpected about taking a boring birch wood stick and turning it into something stylish enough to wear. In fact, if I handed one of these bracelets to someone before telling them what it was made from, I doubt they’d guess correctly.
The transformation is that good.
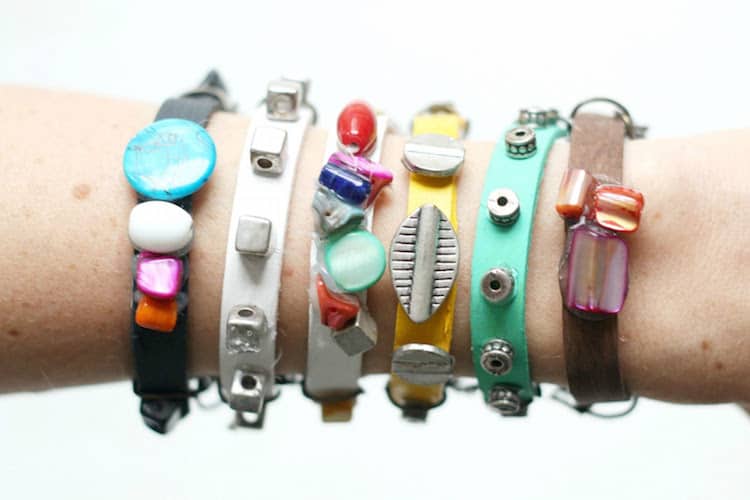
What I especially love about this project is that it works for almost everyone. Kids love decorating them with bright colors and embellishments. Tweens can personalize them to match their style. And adults can create surprisingly sophisticated versions using paint, beads, chain, and decorative finishes.
I’ve seen popsicle stick bracelets wrapped with embroidery floss, covered with patterned paper, painted with modern geometric designs, decorated with buttons, and even embellished with jewelry findings. The possibilities are endless.
They’re also one of those projects that feel a little bit magical.
You start with a flat stick and somehow end up with a bracelet that curves perfectly around your wrist.
The first time I made one, I was convinced I’d snap every stick in half.
Thankfully, there’s a trick to it.
How to Bend Popsicle Sticks Without Breaking Them
Let’s address the part everyone worries about first.
Yes, popsicle sticks break.
No, you’re probably not doing anything wrong.
Wood naturally wants to stay flat. Asking it to curve into a bracelet shape takes a little patience.
The biggest mistake people make is trying to bend dry sticks.
That almost never ends well.
To make the wood flexible, you’ll need to boil the sticks in a pot of water. The combination of heat and moisture softens the fibers and makes them much easier to shape. Most tutorials recommend letting the sticks boil for around 30 minutes, and honestly, that’s a good place to start.
After you boil them, leave the sticks sitting in the hot water for a little longer. This extra soaking time helps the moisture penetrate more deeply into the wood.
Another tip? Use jumbo craft sticks whenever possible.
The thin, narrow sticks tend to crack more easily when bent. Larger craft sticks are generally sturdier and much more forgiving.
When it’s time to shape the bracelet, don’t force it.
The sticks are most flexible during that brief window when they’re no longer scalding hot but still warm and pliable. Gently work the wood into a curve rather than trying to bend it all at once.

If a stick feels stiff, stop. Seriously.
It’s much better to return it to the hot water than to hear that heartbreaking snapping sound.
You’ll also want to make extras. Even experienced crafters lose a few sticks along the way. Fortunately, craft sticks are inexpensive, so it’s worth preparing more than you think you’ll need.
Choosing the Right Jars for Shaping
Once the sticks are flexible, you’ll place them inside jars or glasses to hold their shape while drying.
This step matters more than you might think.
The size of the jars directly affects the size of the finished bracelets. Smaller jars create smaller bracelets. Use larger for larger bracelets. If you’re making bracelets for kids, choose narrower containers. For adults, you’ll usually want something slightly larger.
Don’t worry if the sticks don’t form a perfect circle.
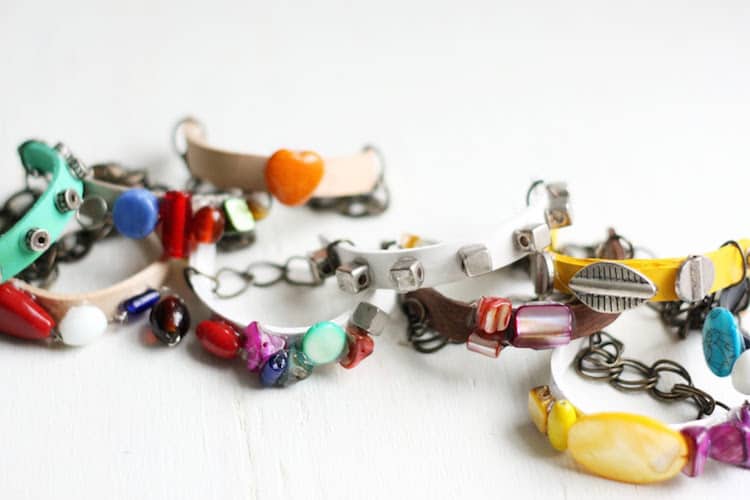
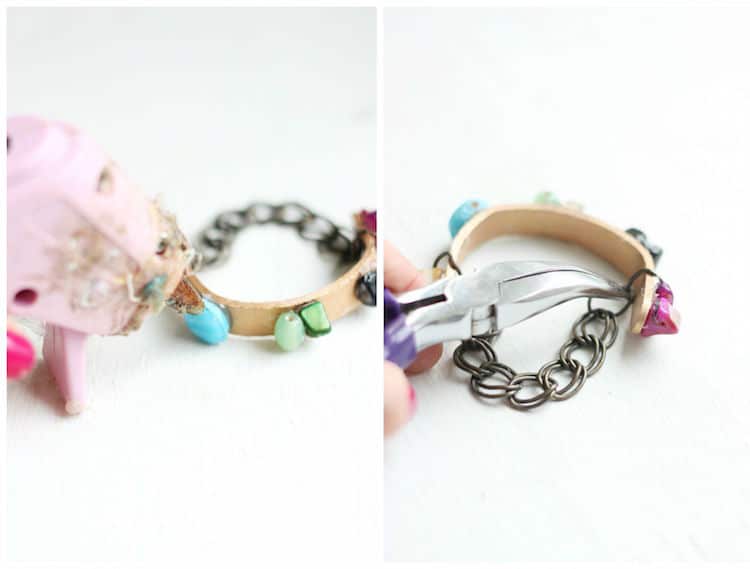
Many popsicle stick bracelets are designed as cuffs, leaving a small opening rather than wrapping completely around the wrists. Some versions (like ours) even add a closure using ribbon, chain, or cord to make the fit adjustable.
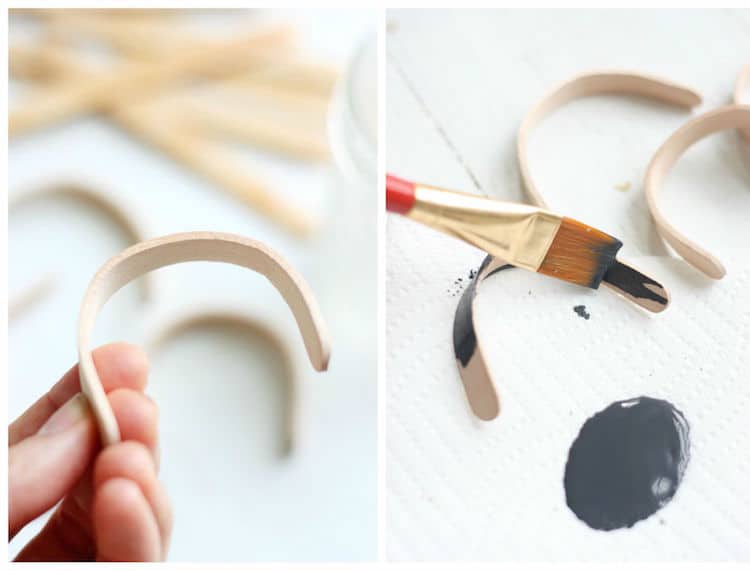
Allow the bracelets to dry completely before decorating them. Overnight is ideal.
I know waiting isn’t fun, but neither is watching your bracelet flatten back out because you got impatient.

Fun Ways to Decorate Your Bracelets
This is where the real fun begins.
Once your bracelets are dry, they’re basically a blank canvas waiting for creativity.
Paint is the obvious starting point. Acrylic paint works beautifully and allows you to create everything from simple solid colors to intricate patterns.
Want something more sophisticated?
Try decoupage.
Decorative paper combined with Mod Podge creates gorgeous bracelets that look surprisingly high-end. Vintage florals, maps, sheet music, geometric prints, and botanical illustrations all work beautifully. Several of the top tutorials use this technique because it completely transforms the look of the wood.
If you prefer a softer look, wrap the bracelets with embroidery floss or yarn. This approach creates colorful designs and is especially popular for friendship bracelet-inspired crafts.
You can also embellish with:
- Beads
- Rhinestones
- Buttons
- Ribbon
- Jewelry chain
- Stick-on gems
For a modern finish, seal your bracelet with Matte Mod Podge. It protects the design without creating a glossy surface.
Tips and Tricks for Success
A few final tips can make this tutorial much easier.
First, don’t skip the soaking and boiling process. Some crafters simply soak their sticks overnight, but boiling generally produces better results and fewer broken sticks.
Second, remember that wood is unpredictable. Some sticks naturally have weak spots. If one breaks, don’t take it personally.
Third, if your bracelets seem too large, try reshaping them with smaller containers during the drying process.
And finally, if you’re making this project with kids, adults should always handle the boiling water portion of the tutorial.
The decorating is the fun part anyway.
These popsicle stick bracelets are proof that the best projects start with the simplest supplies. With a little patience, a few craft sticks, and some creativity, you can transform an ordinary childhood staple into wearable art.

Ice Cream Stick Bracelets
Equipment
- Jewelry pliers
- Jewelry cutters
- Saucepan
- Glass jars or other glass containers
Materials
- 6 Popsicle sticks
- Beads
- Jewelry chain
- Acrylic paint
- Craft glue or E-6000
Video
Instructions
- Fill a pot with water and toss in the popsicle sticks. Place on the stove and let boil for 30 minutes. Boiling the sticks will make them very pliable.
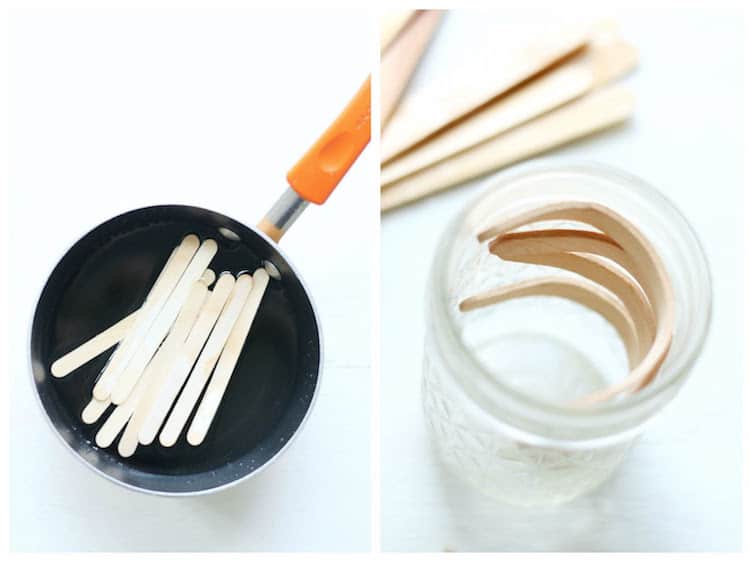
- Remove sticks from water and let them cool for a minute or two, then very carefully bend the sticks into a half circle and slide into a glass or jar.
- Set oven to 200 degrees and place jars in the oven, baking for another 30 minutes. Baking them will dry them out and help them to keep their shape. Carefully remove from oven after 30 minutes.
- Paint the popsicle sticks, if desired, and allow to dry.
- Attach beads using a glue gun. Attach jewelry chain to finish.
Notes
Be sure to come visit my sister and me as we blog about fashion, food, and the things we love over at The Pretty Life Girls. Check these other cute posts out before you go:
Air Dry Clay Ring Holder • Bracelets with Perler Beads • DIY Hair Clips • Duct Tape Bracelets • Marbled Mugs • Photo Holders • Polymer Clay Necklace Ideas • Skull Earrings • Stamped Tea Towels • Weaving for Kids


For the bracelets you could maybe punch the holes in the sticks when you take them out of the water before putting them in the oven. Also you could use ribbon or cording instead of chain. I don’t know if this would work but it’s an idea anyway.
The pretty life girls do it again! I love these bracelets! They’re such a fun and unique idea!
Paige
https://www.thehappyflammily.com/
They are so amazing, right?? I don’t know how they do it – making popsicle sticks look glamorous. I bow to them.