DIY Mid Century Headboard Made from Solid Wood
Why buy when you can DIY it? Build this DIY mid century headboard using our easy-to-follow tutorial. Do it cheaper, better (higher quality), and make it any color you like.
Skills Required: Intermediate. You have to be able to use a miter saw, table saw, sander, drill, planer, and possibly a router. You’ll be doing some gluing and screwing and lots of measuring. This is not a hard project, but it can take time.

If you saw our DIY platform bed frame, you might be wondering how to make a headboard that goes with it. Well today is your lucky day – this is the tutorial! This king headboard can obviously be modified to any size. We’ll leave that up to you.
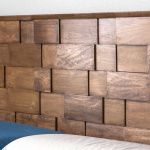
Our inspiration for this DIY wood headboard was mid-century modern design. We love original pieces like this one that are made with various sizes and layers of awesome teak.
While we didn’t use teak for this project, we did use the mid-century modern era for our king headboard inspiration. The different layers and thicknesses of wood give this project a really unique look.

Just to give you a preview of how this project comes together, you’ll start by making support pieces for the bed. You might have to alter these a bit depending on what you’re attaching the headboard to.
Then you’ll make a frame out of popular, and cut plywood that you’ll glue within the frame as your backer. That all gets glued together and then wood pieces are cut and glued to make your mosaic on the front. There are also support pieces made of oak.
Tools and Hardware
- Compound miter saw with laser
- Table saw
- Belt sander
- Router with bits (optional, see step 4)
- Drill with bits
- Planer
- Wood – as specified on cut list below
- Wood glue – we recommend Titebond III
- Wood screws – 1 1/4″ length (about 24 – 30)
- Clamps
- Measuring tape
Cut List*
- Support pieces (see step 1; you may be able to use scraps)
- 1 – 1″ x 6″ x 8′ board trimmed to two 1” x 5 ½” x 37” lengths (mounting boards)
- 2 – 1″ x 2″ x 8′ boards trimmed to 1″ x 1/2″ x 84 3/8″ each
- 1 – 1″ x 2″ x 8″ board trimmed to two 1″ x 1/2″ x 25 1/4″ lengths
- 2 – 1/4″ x 2′ x 4′ oak plywood pieces trimmed to 41 ⅜” x 23 ¾”
- Boards to use for the mosaic area (see steps 11 & 12) – we used six (5) 1″ x 4″ x 8′ boards
- 3 – 2 ½” x ¼” x 24” pieces of finished oak trimmed to 2 ½” x ¼” x 23 ½” (1/2″ cut off one end)
*if you are a newbie woodworker, remember that wood sizes are given as the cut from a log. For example, a 2″ x 4″ is cut that size, from a rough log but then it dries smaller (around 1.5″ x 3.5″). So your EXACT measurements may vary, though they will be close.
Wood and Where to Purchase
We purchased poplar from Home Depot. We wanted a hard wood that was easy to work with, and we like the grain. Our cost for this DIY mcm headboard was about $200, but you could reduce the cost by using a less expensive wood.
Note: this original project was done in 2018, so project costs are going to be higher! If you try it, I’d love to know how much you spent to buy the wood.

Tips and Thoughts for This Project
Don’t get frustrated if your wood mosaic doesn’t fit the first time you lay it out. Lay out the remaining rows, and then do your adjusting (cutting) on the final row. If it’s just a little bit of width here and there on a few pieces, no one is going to notice they are slightly smaller.

Important Note: stain will not stick to any areas of the headboard where you have left glue to dry. Try to sand away any areas like this if you are staining. If you happen upon these areas WHILE you are staining, let the stain dry, sand away the area and blend in.

Get the printable how to card for this DIY below!
DIY Modern Headboard
Equipment
- 1 Compound Miter Saw with Laser
- Belt sander
- Router and bit(s) optional, see step 4
- Planer
Materials
- Poplar wood as specified on cut list in Notes
- Wood glue we recommend Titebond III
- 30 Wood screws 1 1/4" length, about 24 – 30
Instructions
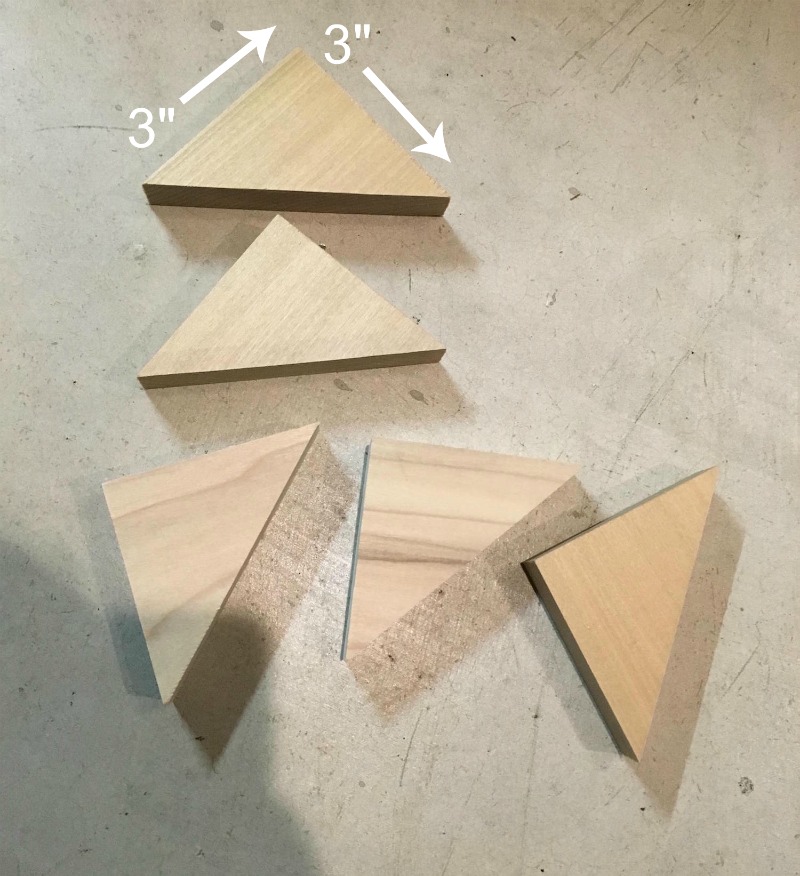
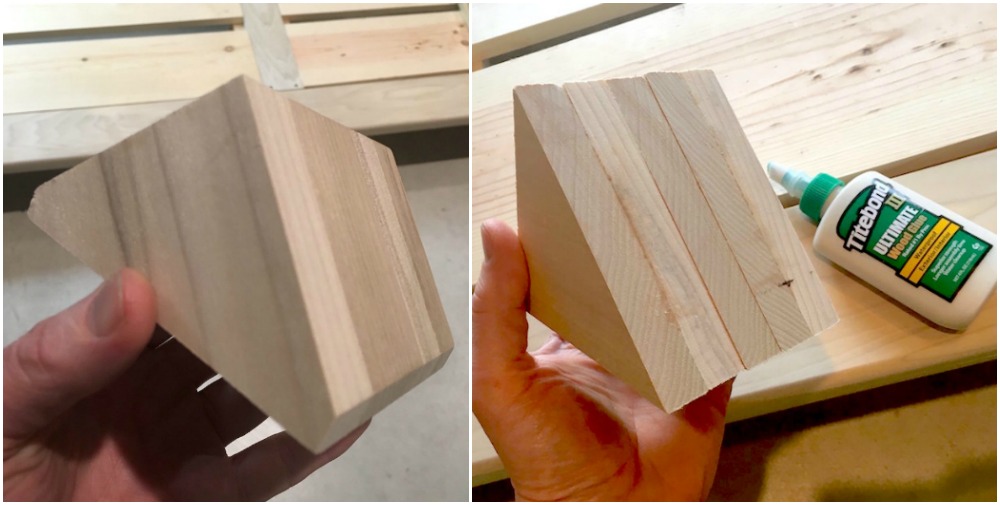
- Fashion mounting pieces using this method or a similar method IF your bed frame requires them. Mine were cut (using a miter saw) from a 1″ x 4″ x 8′ board – they have 3" sides and were all cut a 45º angle.

- Glue five (5) triangles together to make one support piece, then repeat to make two. Sand the mounting pieces smooth and trim the ends off square.

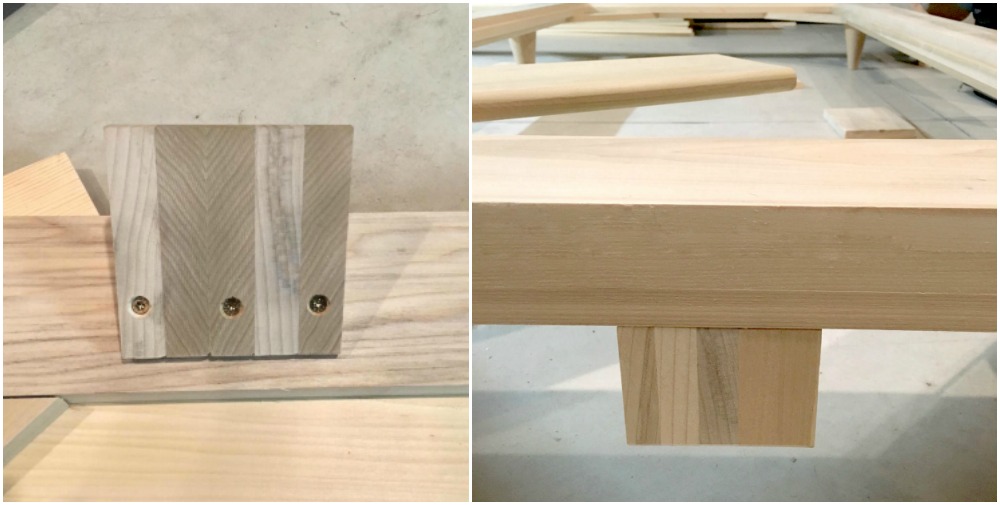
- Mount these support pieces on the underside of the head rail of the bed frame. The outside edge of each support piece should be 15" from the outside of the frame. Using (3) screws to mount each piece to the underside of the head rail as shown.
- Cut one piece of 1”x 6” x 8' wood to two (2) 37" lengths. These will be your headboard support rails. Using a round-over router bit, round over the top and bottom edges of the headboard mounting pieces. You don't HAVE to do the rounding over, but we just though it looked nice so we took the extra step.

- Using six (6) screws on each side, mount the headboard boards to the outside edge of the head rail with them touching the ground. Four screws will go into the bed frame and two will go into the supports as shown.

- Cut trim pieces using a miter saw. Cut two (2) 1" x 2" x 8' boards into 1" x 1 1/2" x 84 3/8" length pieces. Then cut one (1) 1" x 2" x 8" board into two (2) 1" x 1/2" x 25 1/4" pieces.
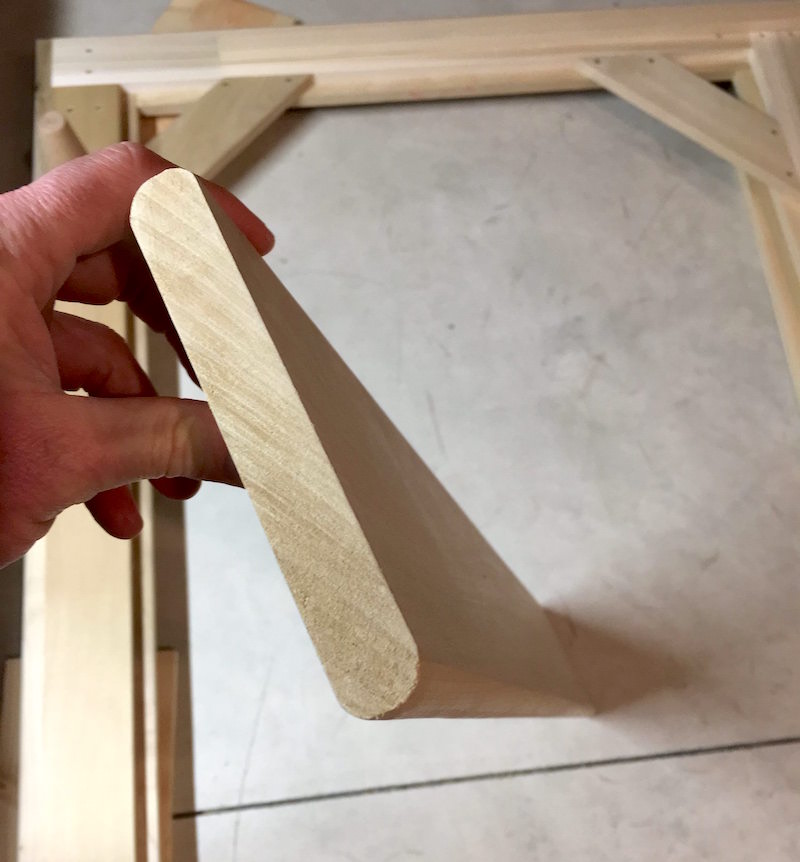
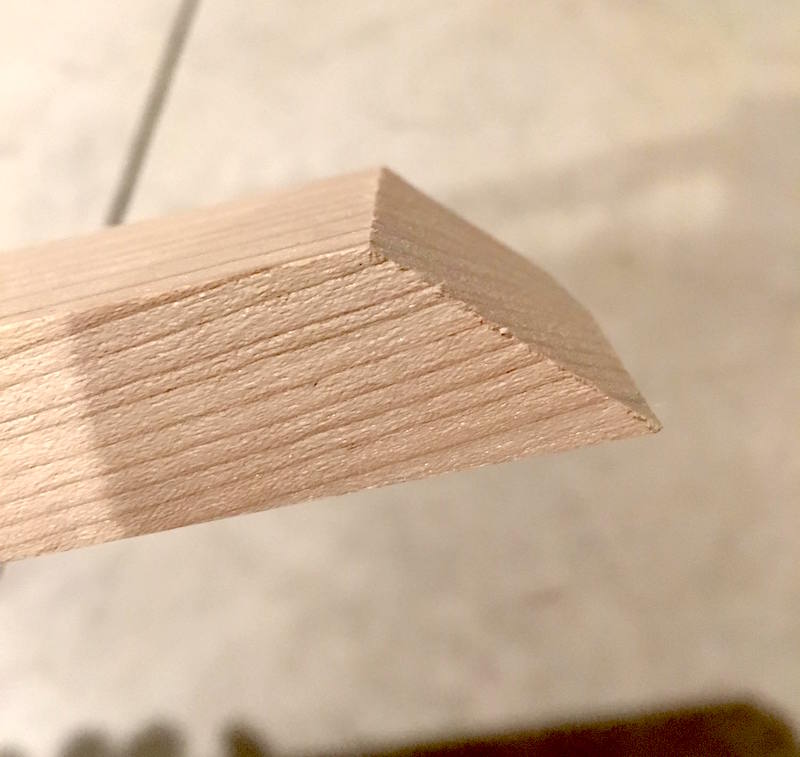
- Using the miter saw, cut an inward-leaning 45º angle cut on each end of each 1" x 2" – so you'll be making eight cuts total.

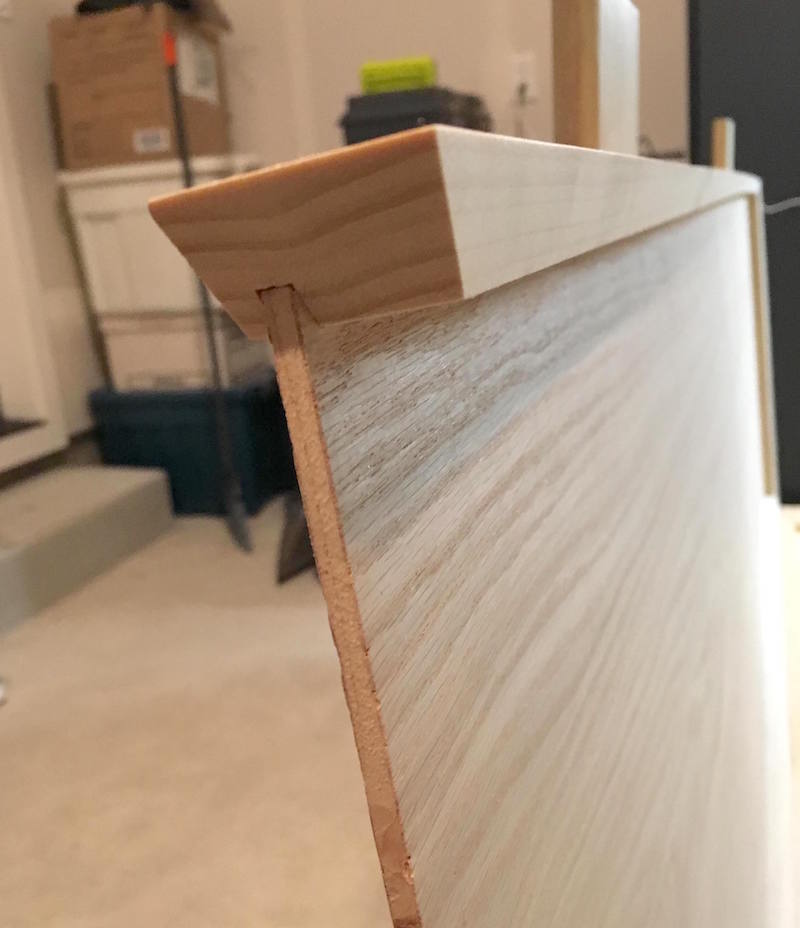
- Using a table saw, angle the blade to 15 degrees. do a 15º bevel cut all the way down the length of one edge of each of the frame pieces.

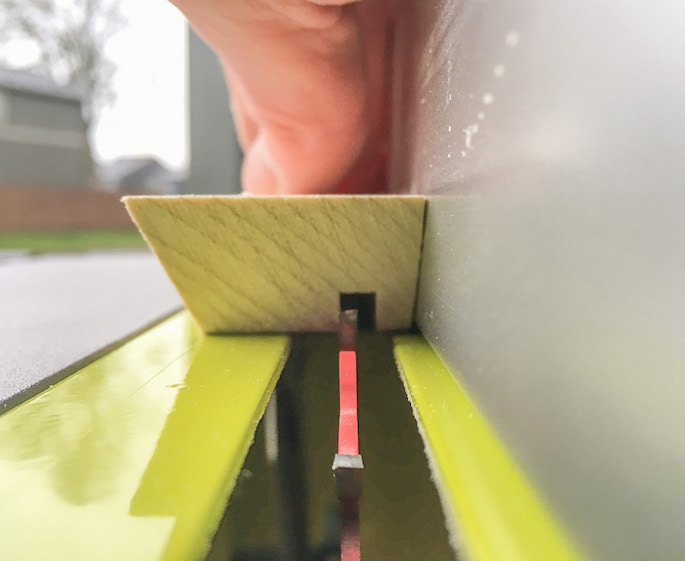
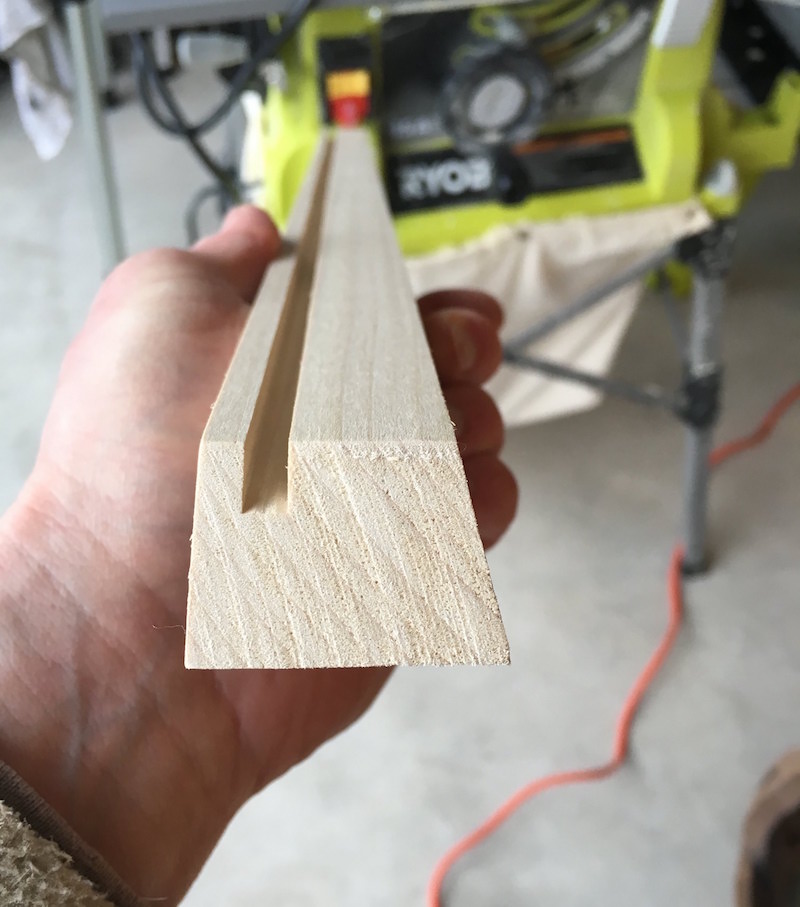
- Reset the table saw from Step 8. Set the blade to a 1/4” cutting depth and move the gate 1/4” away from the blade. Flip the frame pieces over and cut a 1/4” deep groove the length of each frame piece. NOTE: this groove needs to be cut on the OPPOSITE side from the bevel cut – see the picture. You want the groove to be on the flat side of the wood.

- Move the gate 1/8” (or a blade’s width) further from the blade and cut another groove. This should make one 1/4” inch groove (that you see in the picture).

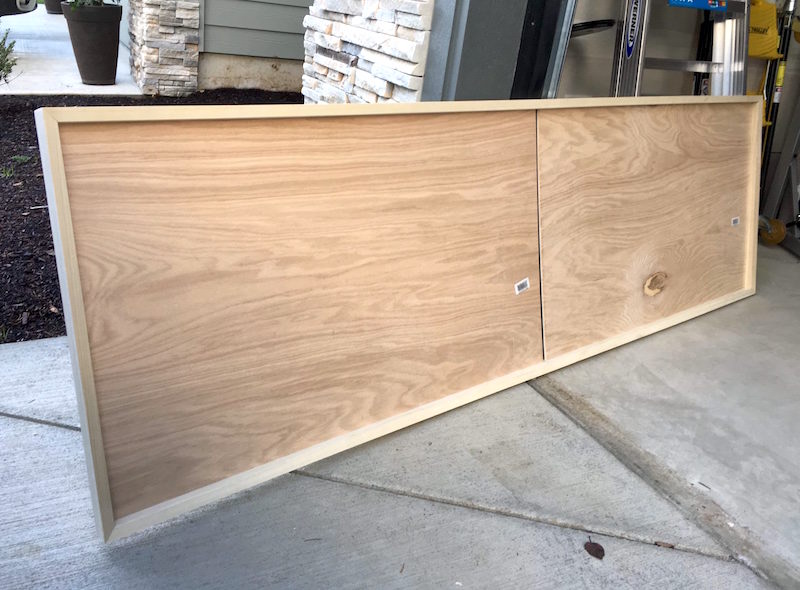
- Take two (2) pieces of 1/4” thick x 2’ x 4’ oak plywood and, using a table saw, cut both pieces of plywood to a 41 3/8” x 23 3/4” size. These will be the back of your headboard.
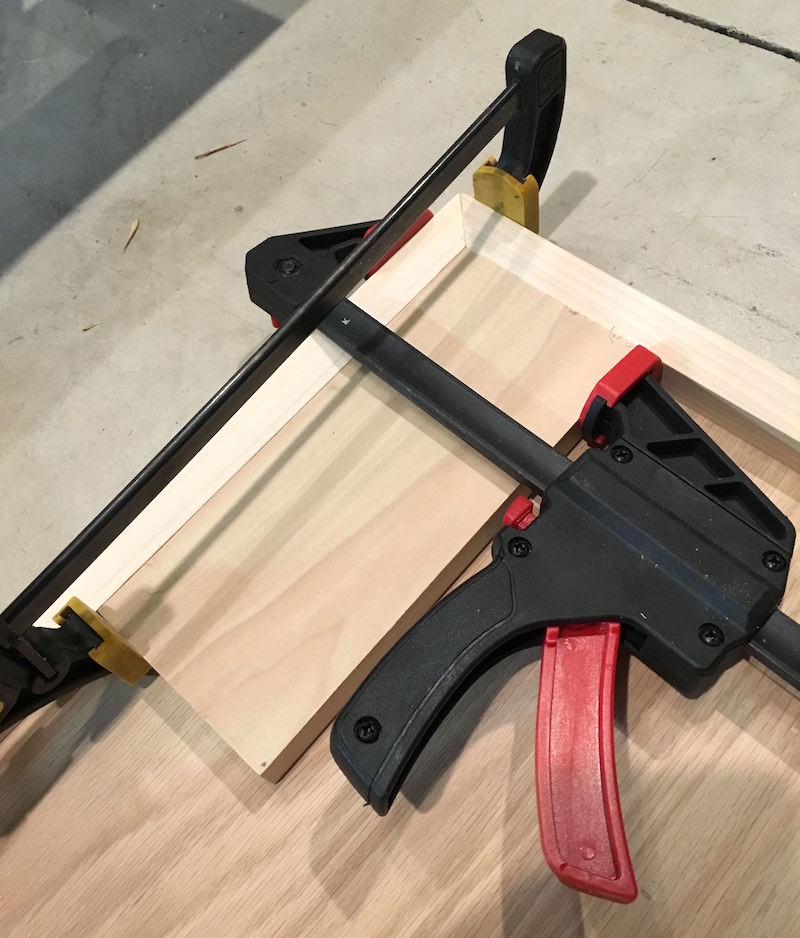
- You might need help with this step since this is a king size! Take both pieces of cut plywood and slide them end to end down into the groove of one of the 1" x 2" x 84 3/8" pieces. You're going to test the fitment to make sure that all the pieces will fit together before adding any glue.

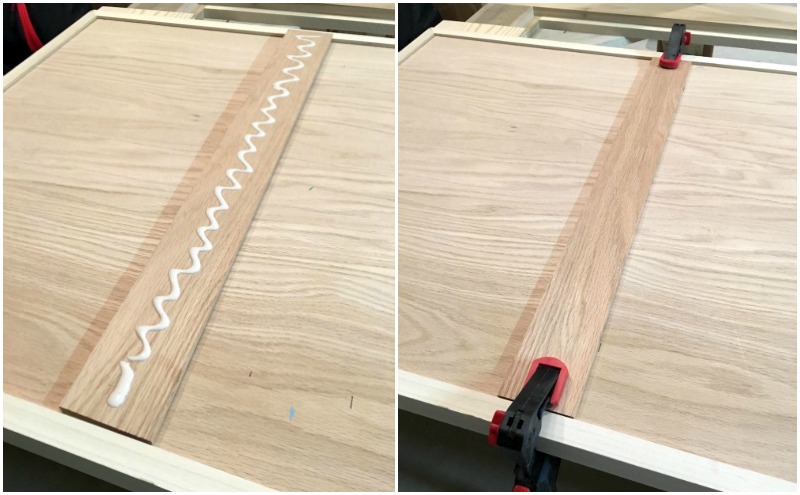
- Separate the pieces, then reassemble – this time gluing them together. Clamping and glue with scrap wood in the edges to keep everything square and tight.

- After the glue has set up, measure the inside area you will be covering with blocks. The inside dimensions should be approximately 23 1/2” x 82 3/4”. It's fine if they're not exact – you can make the blocks fit. The corners are only tacked in place at this point and you will be glueing in cut block pieces to reinforce the frame and create the design.

- You're going to create the wood mosaic on top of the plywood, so you need to determine your design. First, determine how many horizontal rows you want in your mosaic. We used six rows, and we recommend picking a number of rows that is divisible by 3 (ie. 6, 9, 12) as you are going to be using three thicknesses of wood to create your mosaic.
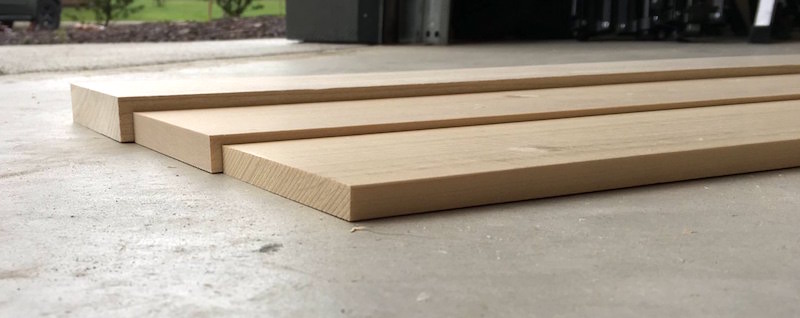
- Using a planer, you are going to create three thicknesses of wood boards, so you’ll have two boards of each thickness (if you do it the same way we did it). Keep one board at 3/4" thick. Run two boards through the planer and remove 3/16". Run those same board through the second time. Then pick two additional boards and run them through, removing 3/16". You'll then have six boards of three varying thicknesses.

- You'll know how wide your wood needs to be by taking the vertical measurement (top to bottom) of the headboard. For example, the inner area of our king headboard is 23 1/2” x 82 3/4”. So each board needs to be about 3 7/8" inches wide (23 1/2" divided by six rows). Use a table saw to cut the boards to the width you like, if you need to. We didn't need to trim much at all.
- Using a miter saw to cut each board into lengths of 2”, 4”, and 6”. Try and cut an equal amount of each length from each board as you are going to make a random mosaic.
- Take your mosaic wood pieces and lay them out in the headboard frame to make sure you get a nice mosaic pattern using the different thicknesses and lengths. When you get the pattern the way you like it, glue all the pieces in place and clamp the frame. Try really hard not to get any excess glue on the surface of the wood if you are staining as it acts as a resist (so wipe it up immediately). Let dry overnight.

- Cut three 2 1/2” x 1/4” x 24” pieces of finished oak down by 1/2" inches on one end to 2 1/2” x 1/4” x 23 1/2”. Flip the headboard over and measure 18" from each end. Glue the support pieces of oak in place at those points. Then place your third piece of oak in the middle and glue. Clamp everything as shown above.

- I mounted the headboard 7” above the bed frame at this time. I raised it up on some wood to hold it in place for mounting. When you get it into place, use 1 1/2” wood screws to mount the headboard to the frame – the holes should match the support piece holes. You might need assistance for this step – someone to hold up the headboard so that it's even while you screw it in.

- Decide whether you are going to stain or paint your headboard! I used Minwax waterbase stain (a custom color to match the existing furniture). Then coated with a Minwax waterbase polycrylic and let dry for 24 hours.


Notes
Cut List*
- Support pieces (see step 1; you may be able to use scraps)
- 1 – 1″ x 6″ x 8′ board trimmed to two 1” x 5 ½” x 37” lengths (mounting boards)
- 2 – 1″ x 2″ x 8′ boards trimmed to 1" x 1/2" x 84 3/8" each
- 1 – 1" x 2" x 8" board trimmed to two 1" x 1/2" x 25 1/4" lengths
- 2 – 1/4" x 2' x 4' oak plywood pieces trimmed to 41 ⅜” x 23 ¾”
- Boards to use for the mosaic area (see steps 11 & 12) – we used six (5) 1" x 4" x 8' boards
- 3 – 2 ½” x ¼” x 24” pieces of finished oak trimmed to 2 ½” x ¼” x 23 ½” (1/2" cut off one end)
If you like this DIY MCM headboard project, let me know in the comments! Plus please check out our other popular furniture tutorials:
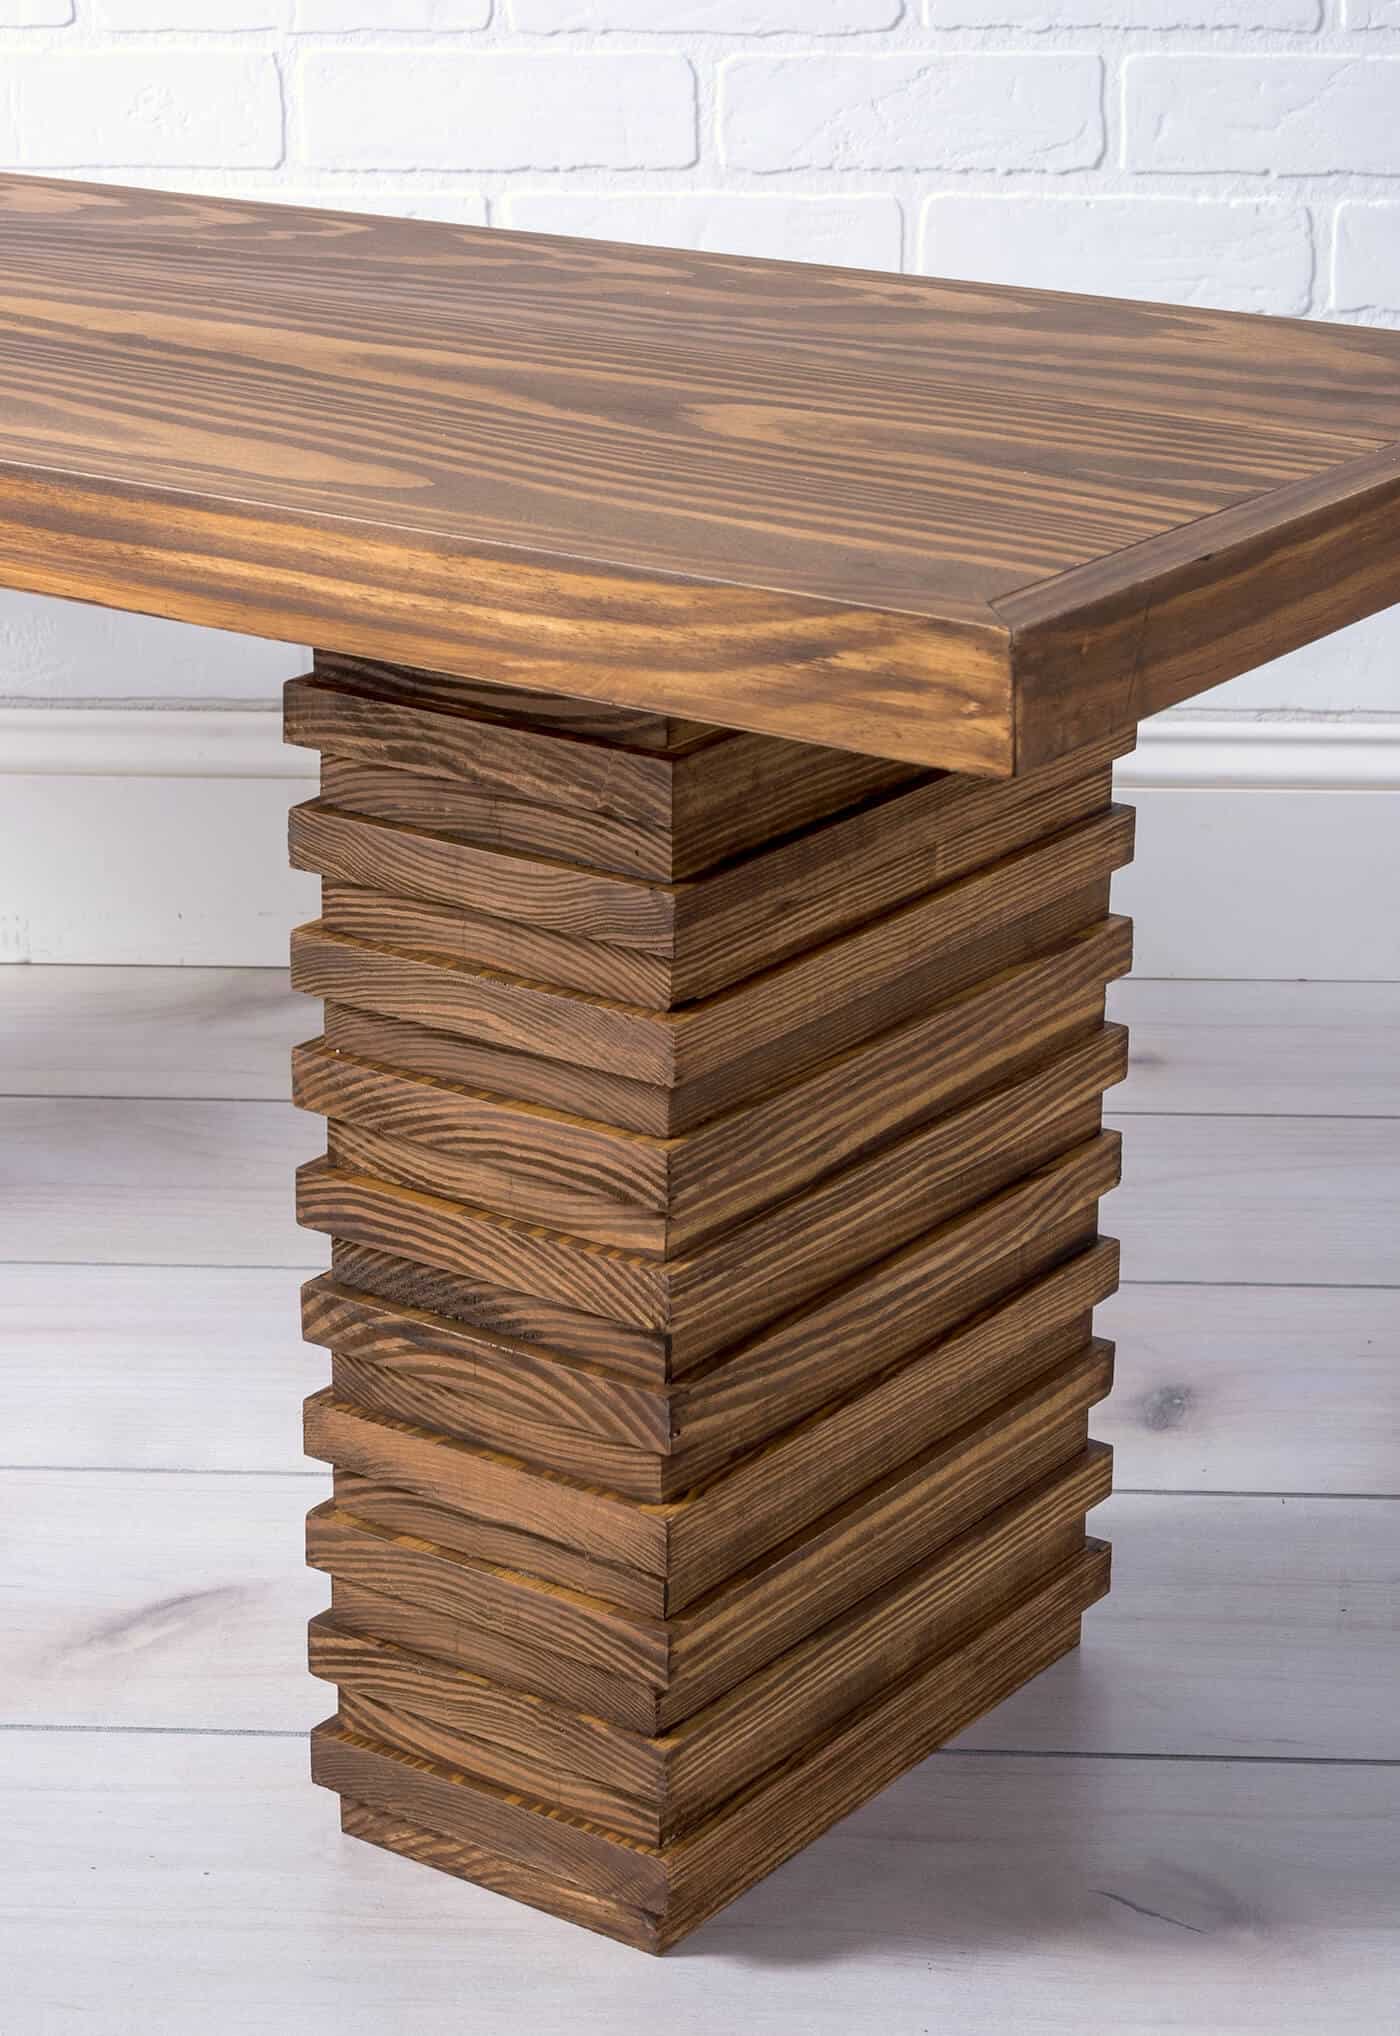
Coffee Table • Coffee Table with Storage • Industrial Pipe Shelving • Lack Endtable Hack • Nolmyra Chair Hack • Outdoor Bench • Outdoor Table • Pallet Shelf • Platform Bed • Stacked Wood Bench • Table Revamp with Vinyl • Wood Step Stool Chair

Oh my gosh I love this headboard and your bed platform. It gives a nod to mid-century modern but still has a contemporary flare.
Thank you Toni!!
This is beautiful. I wish I had the tools and skills 🙂
Currently working on building this, Ive come to an issue with the trim pieces of the headboard being too long to fit. Maybe there was a typo on the instructions. Would appreciate some help.