Blow Painting with Straws: Easy Art for Kids to Make
Try blow painting with straws for a colorful, messy art activity kids and adults will love. Easy, creative, and surprisingly relaxing.
Skills Required: None. Even if you’ve never crafted before, you’ll be able to accomplish this project. The overlapping colors and “chaos” of the finished piece are absolutely part of the charm.

If you’ve never tried blow painting before, prepare to become completely invested in watching paint shoot wildly across the page.
This is one of those projects that somehow feels equal parts art activity, science experiment, and chaos. You start with a few paint drops, grab some straws, and suddenly you’re creating colorful designs that look surprisingly cool without even trying.
Honestly, that’s part of the appeal.
There’s no pressure to make everything look perfect. The random splatters, branching lines, and swirling colors are what make the finished artwork interesting. Every piece of paper turns out differently, which makes this activity especially fun for kids and adults alike.
One of my favorite things about blow painting is how easy it is to customize. Use bright rainbow colors, stick to softer shades, or let colors collide into dramatic splashes that almost resemble abstract art.
And if you want to get extra creative afterward, you can transform the dried paint into flowers, creatures, or silly monsters with a marker and a few googly eyes.
Why Everyone Loves Blow Painting
There’s something ridiculously satisfying about watching paint move across paper using nothing but air.
Unlike more structured painting activities, blow painting focuses more on experimentation than perfection. You don’t need artistic skills, fancy tools, or even a steady hand to create something fun.
This activity is especially popular with preschool and elementary-age kids because it feels playful from start to finish. The blowing action alone usually turns into a whole event.
It also encourages creativity in a low-pressure way. Some people create delicate branch-like designs while others cover the entire page in colorful splatters.
Either way, it’s almost impossible to mess up.

Fun Ways to Use Finished Paintings
Once the paint dries, there are a lot of ways to use your finished designs.
Some people frame their favorite pages as colorful artwork, while others cut sections apart for homemade cards or do large prints for wrapping paper. You can also turn smaller sections into bookmarks, gift tags, or scrapbook backgrounds.
If you’re crafting with kids, adding doodles afterward is especially fun. Use a marker to outline funny shapes, add eyes, or turn random splatters into creatures and monsters.
The unpredictable shapes make this surprisingly entertaining.
Tips for Better Results
A few simple tricks can make the process easier and help create even cooler designs.
- Use slow, steady deep breaths instead of quick bursts
- Keep each small puddle manageable so colors don’t become muddy
- Rotate the paper while blowing through the straws for different effects
- Layer colors gradually instead of adding everything at once
- Try using liquid watercolor paint or drops of paint mixed with water for brighter results
You can also experiment with different tools. A paintbrush works well for larger puddles, while a dropper gives you more control over placement.
If you want thinner lines and more movement, use watered-down paint. Slightly thicker mixtures tend to create bolder shapes that spread less dramatically.

Creative Variations to Try
Once you’ve tried the classic version, there are plenty of ways to change things up.
Try using metallic colors for shimmer or neon shades for brighter designs. You can even start with a small puddle of one color, then blow another shade into it to create blended effects.
Another fun idea is drawing simple outlines first with a marker or paint brush, then filling the design using blown color.
Seasonal themes work really well too. Turn splatters into fireworks for summer, spooky creatures for Halloween, or snowy scenes during winter.
And honestly? Sometimes the random versions end up looking the coolest.
Why This Activity Is Surprisingly Relaxing
There’s something oddly calming about focusing on slow, deep breaths while guiding paint across the page.
The movement feels playful, but it also slows everything down for a few minutes in the best possible way. Instead of worrying about making perfect lines or carefully painting details, you’re just experimenting and seeing what happens.
That’s probably why blow painting never really gets old.

Every page turns out different, every color combination creates new effects, and somehow even the messiest attempts still look interesting in the end.
Blow Painting
Equipment
- Small dishes one per color
- Spoon
- Frame optional
- Scissors optional
- Tray to protect surface
Materials
- 1 piece Cardstock white
- Food coloring multiple colors
- Straw
- Water
Instructions
- Place the cardstock down on your work surface. You’ll want to use a thicker paper like cardstock or watercolor paper so that the food coloring and water don’t bleed through and create a mess.
- Grab a small dish and add a little bit of water. Add ten drops of food coloring and stir with a spoon until combined.

- Repeat with other colors in separate dishes until you have the desired amount of colors you’d like to use for your art.
- Use the spoon to place some of the food coloring mixture onto the paper in one area – around 4 to 5 drops to make one big drop.

- Grab the straw and blow directly into the color gently, watching it spread across the paper. Continue applying dots around the paper, blowing into them with the straw to make them spread. Do this a few times and let dry.
- Repeat with as many colors as you like, feeling free to layer colors. Let dry between colors.

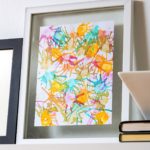
- When the piece is finished, let it dry completely. If desired, place in a frame to finish – or tack onto the fridge with a magnet as an alternative.
Notes
If you enjoyed this idea, let me know in the comments! I’d also love for you to check out these other unique ideas for kids:
Beaded Suncatchers • Bean Art Mosaics • Borax Crystals • Bubble Wrap Painting • Cloud Dough • Coffee Filter Flowers • Duct Tape Bracelets • Food Coloring Art • Homemade Playdough • Magic Hydrophobic Sand • Jello Play Dough • Kinetic Sand • Moon Sand • Paper Chain • Pencil Toppers • Perler Beads • Sidewalk Chalk Paint • Silly Putty • Spin Art • Weaving for Kids • Wine Cork Stamps