How to Make Borax Crystals (Easy DIY Science Project)
Create stunning borax crystals at home with this easy recipe! Perfect for kids’ science projects or unique decorations. Learn step-by-step instructions and tips for success.
Note: This is a fun activity for children but needs to be supervised by parents. Borax is not safe for ingestion.

Create dazzling Borax crystals at home with a project that feels equal parts science experiment and magic trick. If you’ve never watched crystals grow overnight, you’re in for a treat.
This is one of those activities where simple supplies turn into something surprisingly beautiful. With just a jar, a pipe cleaner, and a few pantry staples, you can grow sparkling formations that look like they came from a science museum.
The real fun? Customizing your own crystals. Twist each chenille stem into different shapes—hearts, stars, spirals—and watch them transform as the mixture works its magic.

Why You’ll Love This Project
Making Borax crystals isn’t just pretty—it’s fascinating. As the solution cools, dissolved minerals start forming solid structures right before your eyes. When the solution cools slowly, the crystals grow larger and more defined.
You’ll start by mixing a Borax solution using hot water and powder, then carefully suspend your shape inside a container using a pencil or even a dowel. That’s when the waiting game begins—and trust me, it’s worth it.
Want to make them even more eye-catching? Add color to the mix. A few drops of food coloring can completely change the look, and experimenting with color is half the fun. Try multiple colors to create a vibrant display.
What’s Happening (The Cool Science Part)
When you combine Borax with a cup of water and stir until dissolved, you create a supersaturated mixture. As it sits undisturbed in the container, crystals begin attaching to your pipe cleaner and growing outward.
The key is keeping everything still while the crystals form. Whether you’re using a dowel or balancing a popsicle stick across the top of the jar, make sure nothing touches the sides or bottom.

Tips for Better Results
- Use very hot water so more Borax dissolves, leading to better crystal growth
- Make sure your pipe cleaner is compact—loose shapes won’t grow as evenly
- Keep your vessel in a quiet spot where it won’t be bumped
- For safety, wear gloves when handling the mixture
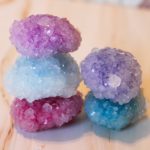
By the next day, your chenille stems will be covered in shimmering formations. It’s incredibly satisfying to lift them out and see your finished Borax crystals in all their sparkly glory.
Whether you’re doing this with kids or just want a relaxing, creative experiment, growing your own crystals is one of those projects that never gets old.

How Long Do the Crystals Take to Grow?
Most start forming within a few hours, but you’ll get the best results if you leave them undisturbed overnight. For larger, more defined crystals, let them sit for 24 hours or longer.
Why Aren’t My Crystals Growing?
If your Borax crystals aren’t forming well, it’s usually one of these issues:
- The water wasn’t hot enough to fully dissolve the Borax
- The mixture wasn’t saturated (not enough Borax added)
- The container was moved while crystals were forming
- The pipe cleaner was touching the sides or bottom
Fixing just one of these can dramatically improve your results.

Can You Add Color?
Yes! Food coloring works great and is the easiest way to customize your crystals. Add it after mixing your solution for the most even color distribution. You can also try different shades in separate containers for a fun experiment.
Are Borax Crystals Safe?
They are safe to make with supervision, but Borax should not be ingested or handled excessively. Always supervise kids, avoid contact with eyes, and consider wearing gloves during preparation.

Are you ready? Watch as your kids’ eyes light up with wonder and excitement, and maybe even feel a bit of that childlike curiosity yourself. Happy crystal making!
Borax Crystals
Equipment
- Spoon
- Measuring cup(s) 2 cups minimum
- Saucepan
Materials
- 2 pipe cleaners for each color crystal you want
- 24 oz Mason jar(s) or other glass container, for each crystal you are making
- Popsicle sticks
- Twine or thread
- 3/4 cup Borax for each container
Instructions
- Take two pipe cleaners together and fold them onto themselves to create a (somewhat) round crystal shape. Try not to leave any openings or gaps.

- Cut 6-8 inches of twine or thread. Tie twine to the pipe cleaner. In a clean and dry glass jar, measure how long the twine should be suspended. Nothing should touch the bottom of the container.

- Once the twine is measured attach the other end to a popsicle stick. Double-check that the length of the twine (or thread) is good. If it’s too long or too short, adjust accordingly.

- Repeat steps 1-3 for each pipe cleaner.

- In a small saucepan boil 2 cups of water per glass container. Add 3/4 cups (12 tablespoons of Borax) to each jar, then carefully add the boiling water. Stir until all the Borax is dissolved.

- Carefully lower the pipe cleaner into the borax water with the popsicle stick resting on the mouth of the vessel. Repeat with all jars.

- Let everything sit and crystallize for at least 24 hours.

- Carefully remove the stick and twine from the Borax solution. Lay on a paper towel to remove excess liquid. Cut off the twine or thread as close to the crystal as you can to finish.

Notes
If you enjoyed growing crystals, let me know in the comments! I’d also love for you to check out these other fun science-y projects and recipes for kids:
Blow Painting • Cloud Dough • Food Coloring Art • Glow in the Dark Playdough • Homemade Playdough • Kinetic Sand • Magic Hydrophobic Sand • Moon Sand • Silly Putty