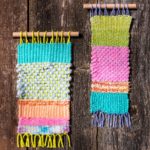
Easy Weaving for Kids on a Cardboard Loom
Teach kids weaving with a simple wall hanging project! Easy, fun, and perfect for beginners. Get creative and start weaving today!

Hey there, craft enthusiasts and super parents! Are you ready to try a fun and exciting weaving adventure with your little ones?
Today, we’re all about weaving for kids, a fantastic activity that will not only keep your younger children entertained but also help them create beautiful pieces of art.
We’re going to show you how to make a simple-yet-fabulous wall hanging using just a piece of cardboard, colorful leftover yarn, and a plastic needle. Let’s get started!
Weaving projects for kids are a brilliant way to encourage creativity and fine motor skills. Whether you’ve got younger children eager to play with colors, or older kids looking for a more intricate weaving activity, this project is perfect for all ages.

This project uses supplies you’ve probably already got at home. To start, you’ll need a piece of cardboard to create your loom, some scraps of yarn, and a plastic needle to act as a shuttle.
Weaving on a cardboard loom is not just about teaching kids to craft without needing any fancy equipment.
This part of the process is where the magic happens. As they weave, they’ll be playing with color, creating patterns, and watching their piece of art come to life. Yarn weaving is such a versatile activity, allowing kids to explore their creativity and produce something unique and beautiful every time.
One of the best things about this weaving project is how it caters to all skill levels. Younger children will love the simple over-and-under motion of the weaving activity. Older kids can experiment with different patterns and designs. The result is a gorgeous wall hanging that you can proudly display at home.

Benefits of Weaving for Children
If you need more reasons to try this . . . here are the benefits of weaving for the littles.
- Fine motor skills: Requires strong finger muscles and coordination.
- Eye-hand coordination: Weaving in and out in a pattern helps children coordinate their eyes, hands, and minds.
- Brain coordination: Repeatedly winding your hands and arms across your midline helps the two hemispheres of your brain work together.
- Problem-solving skills: Children need to consider and work through any problems they encounter as they weave.
- Critical thinking skills: Can help children learn to think in three dimensions.
- Patience and perseverance: It takes more than just a few minutes, and potentially more than one sitting, to complete a project.
Ready to try it? Scroll down for the detailed step-by-step instructions and let the fun begin! Happy crafting!
Gather These Supplies
- Cardboard – stiff, like from a shipping box
- Twig or dowel rod
- Yarn (variety of colors and thicknesses)
- Scissors
- Hot glue gun
Tips and Thoughts for This Project
The loom size in this tutorial will result in a finished piece about 3 inches by 8 inches. To adjust the size of your wall hanging, cut the cardboard larger or smaller.
We tried using a popsicle stick or something simple as a shuttle – it turned out the needle worked the best!

Get the printable how to card for this project below:
Weaving for Kids
Equipment
- Hot glue gun and glue sticks or craft glue (optional)
Materials
- Cardboard piece for loom
- Dowel rod(s) or twig/other stick
- Yarn variety of colors and thicknesses
Instructions
- Begin by cutting a piece of cardboard to act as your loom. Cut one large piece approximately 6 1/2" by 11" long.
- Cut two additional strips of cardboard approximately 1" long and the width of the larger piece, or 6 1/2".
- Hot glue the strips to the top and bottom of the cardboard, leaving 1/2" at either end.

- Cut slits in both ends of the cardboard, about 1/4" apart. This is your finished loom.
- Choose your first yarn color. Hold on to the back of the loom in the top left and place the yarn between two slits of the loom. String down across the front.

- Slide the yarn down in between two slits of the bottom of the loom, bring to the back and over to the right one slit. Bring the string through to the front and string up across the front. Repeat until the loom is strung.

- To start weaving, choose a different color yarn. Starting from the right, begin weaving the yarn. Go over and under the strung yarn and repeat until you are to the end of the row.

- At the end of each row, wrap the yarn over the last strand to the left, come under, and back up around that last strand. And then begin weaving the next row.
- When you’re ready to start a new color, simply end the previous color and weave in a new one. You can weave in the ends of the yarn on the back (or glue them if desired).

- Continue weaving until all the desired rows are completed. Secure the end of the weaving yarn with glue or by weaving it back in.
- Remove the loops from the bottom of the loom. Cut and knot them close to the weaving.

- Remove the loops from the top of the loom and slide onto a dowel or twig for hanging. Use additional yarn to create a hanger. Cut a length about 12” long and tie to the end of the dowel or twig (at each end) and hang.
If you enjoyed this fun project and your kids did too, let me know in the comments! I’d also love for you to check out the following easy kids’ craft ideas:
Beaded Suncatchers • Bean Art Mosaics • Blow Painting • Borax Crystals • Cloud Dough • Coffee Filter Flowers • Food Coloring Art • Homemade Playdough • Moon Sand • Paper Chain • Pencil Toppers • Perler Beads • Sidewalk Chalk Paint • Spin Art


I work at a public library and we are going to be running a workshop on this craft – would you be okay with us sharing some of your photos to advertise the program?
Of course! All you need to do is give credit in the caption!