DIY Outdoor Bench: Stylish and Simple on a Budget
Build a stylish DIY outdoor bench with this easy tutorial! Perfect for your garden, patio, or backyard, and budget-friendly too. No nails or screws required!
Skills Required: Beginner. You’ll learn how to make a bench the easiest way possible. I believe the most difficult part of this DIY project is using a table saw, which isn’t really hard (take your time!).
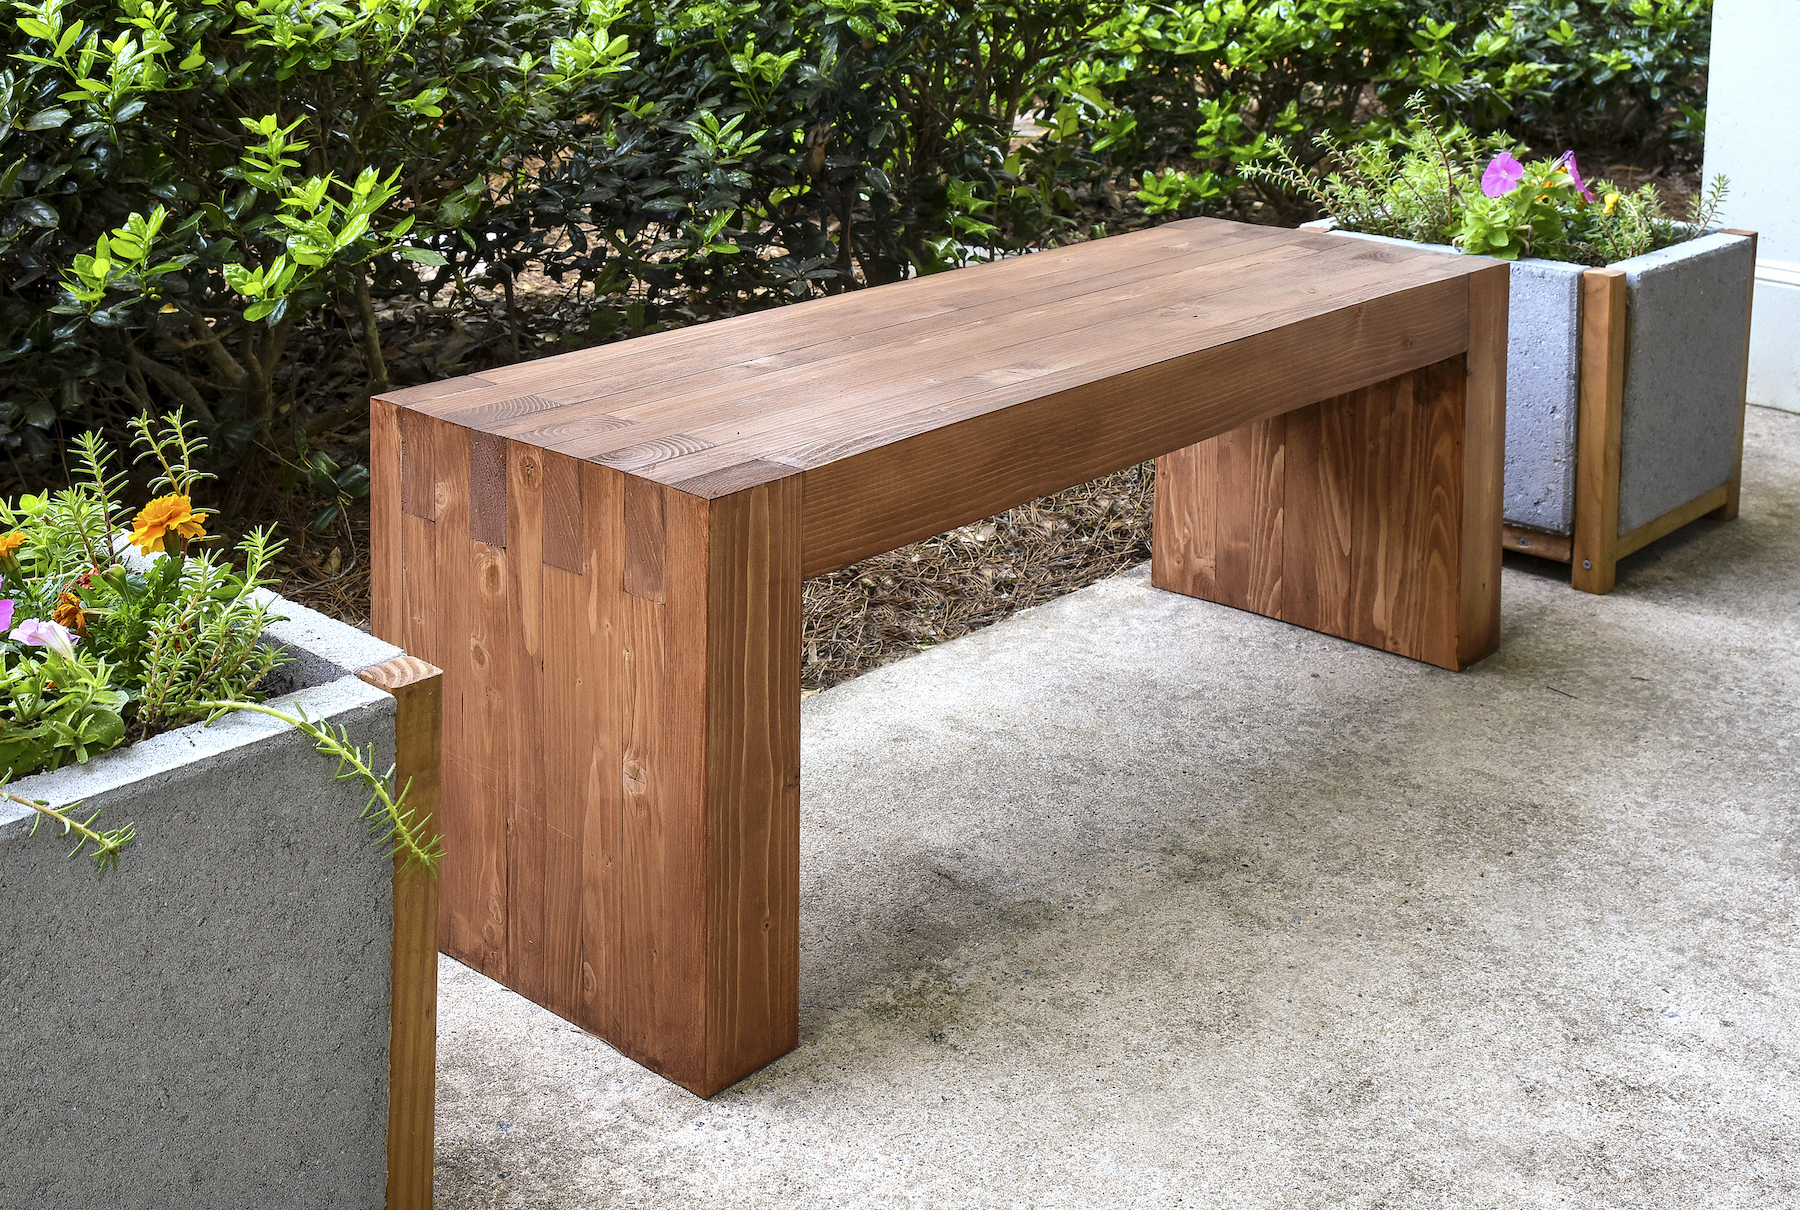
Every porch or outdoor space needs a bench, at least that’s what Steve and I decided the other day. Actually Steve has had the concept for this beautiful bench in his head for a while.
He had looked around at garden benches and wanted to make something without screws and hardware . . . completely with adhesive.
Yet he had some other qualifications as well – the bench had to be modern, inexpensive, load bearing (no falling apart please), and look great. We also wanted it to be an easy woodworking project so anyone could do it.
This DIY outdoor bench project meets all those qualifications and more!
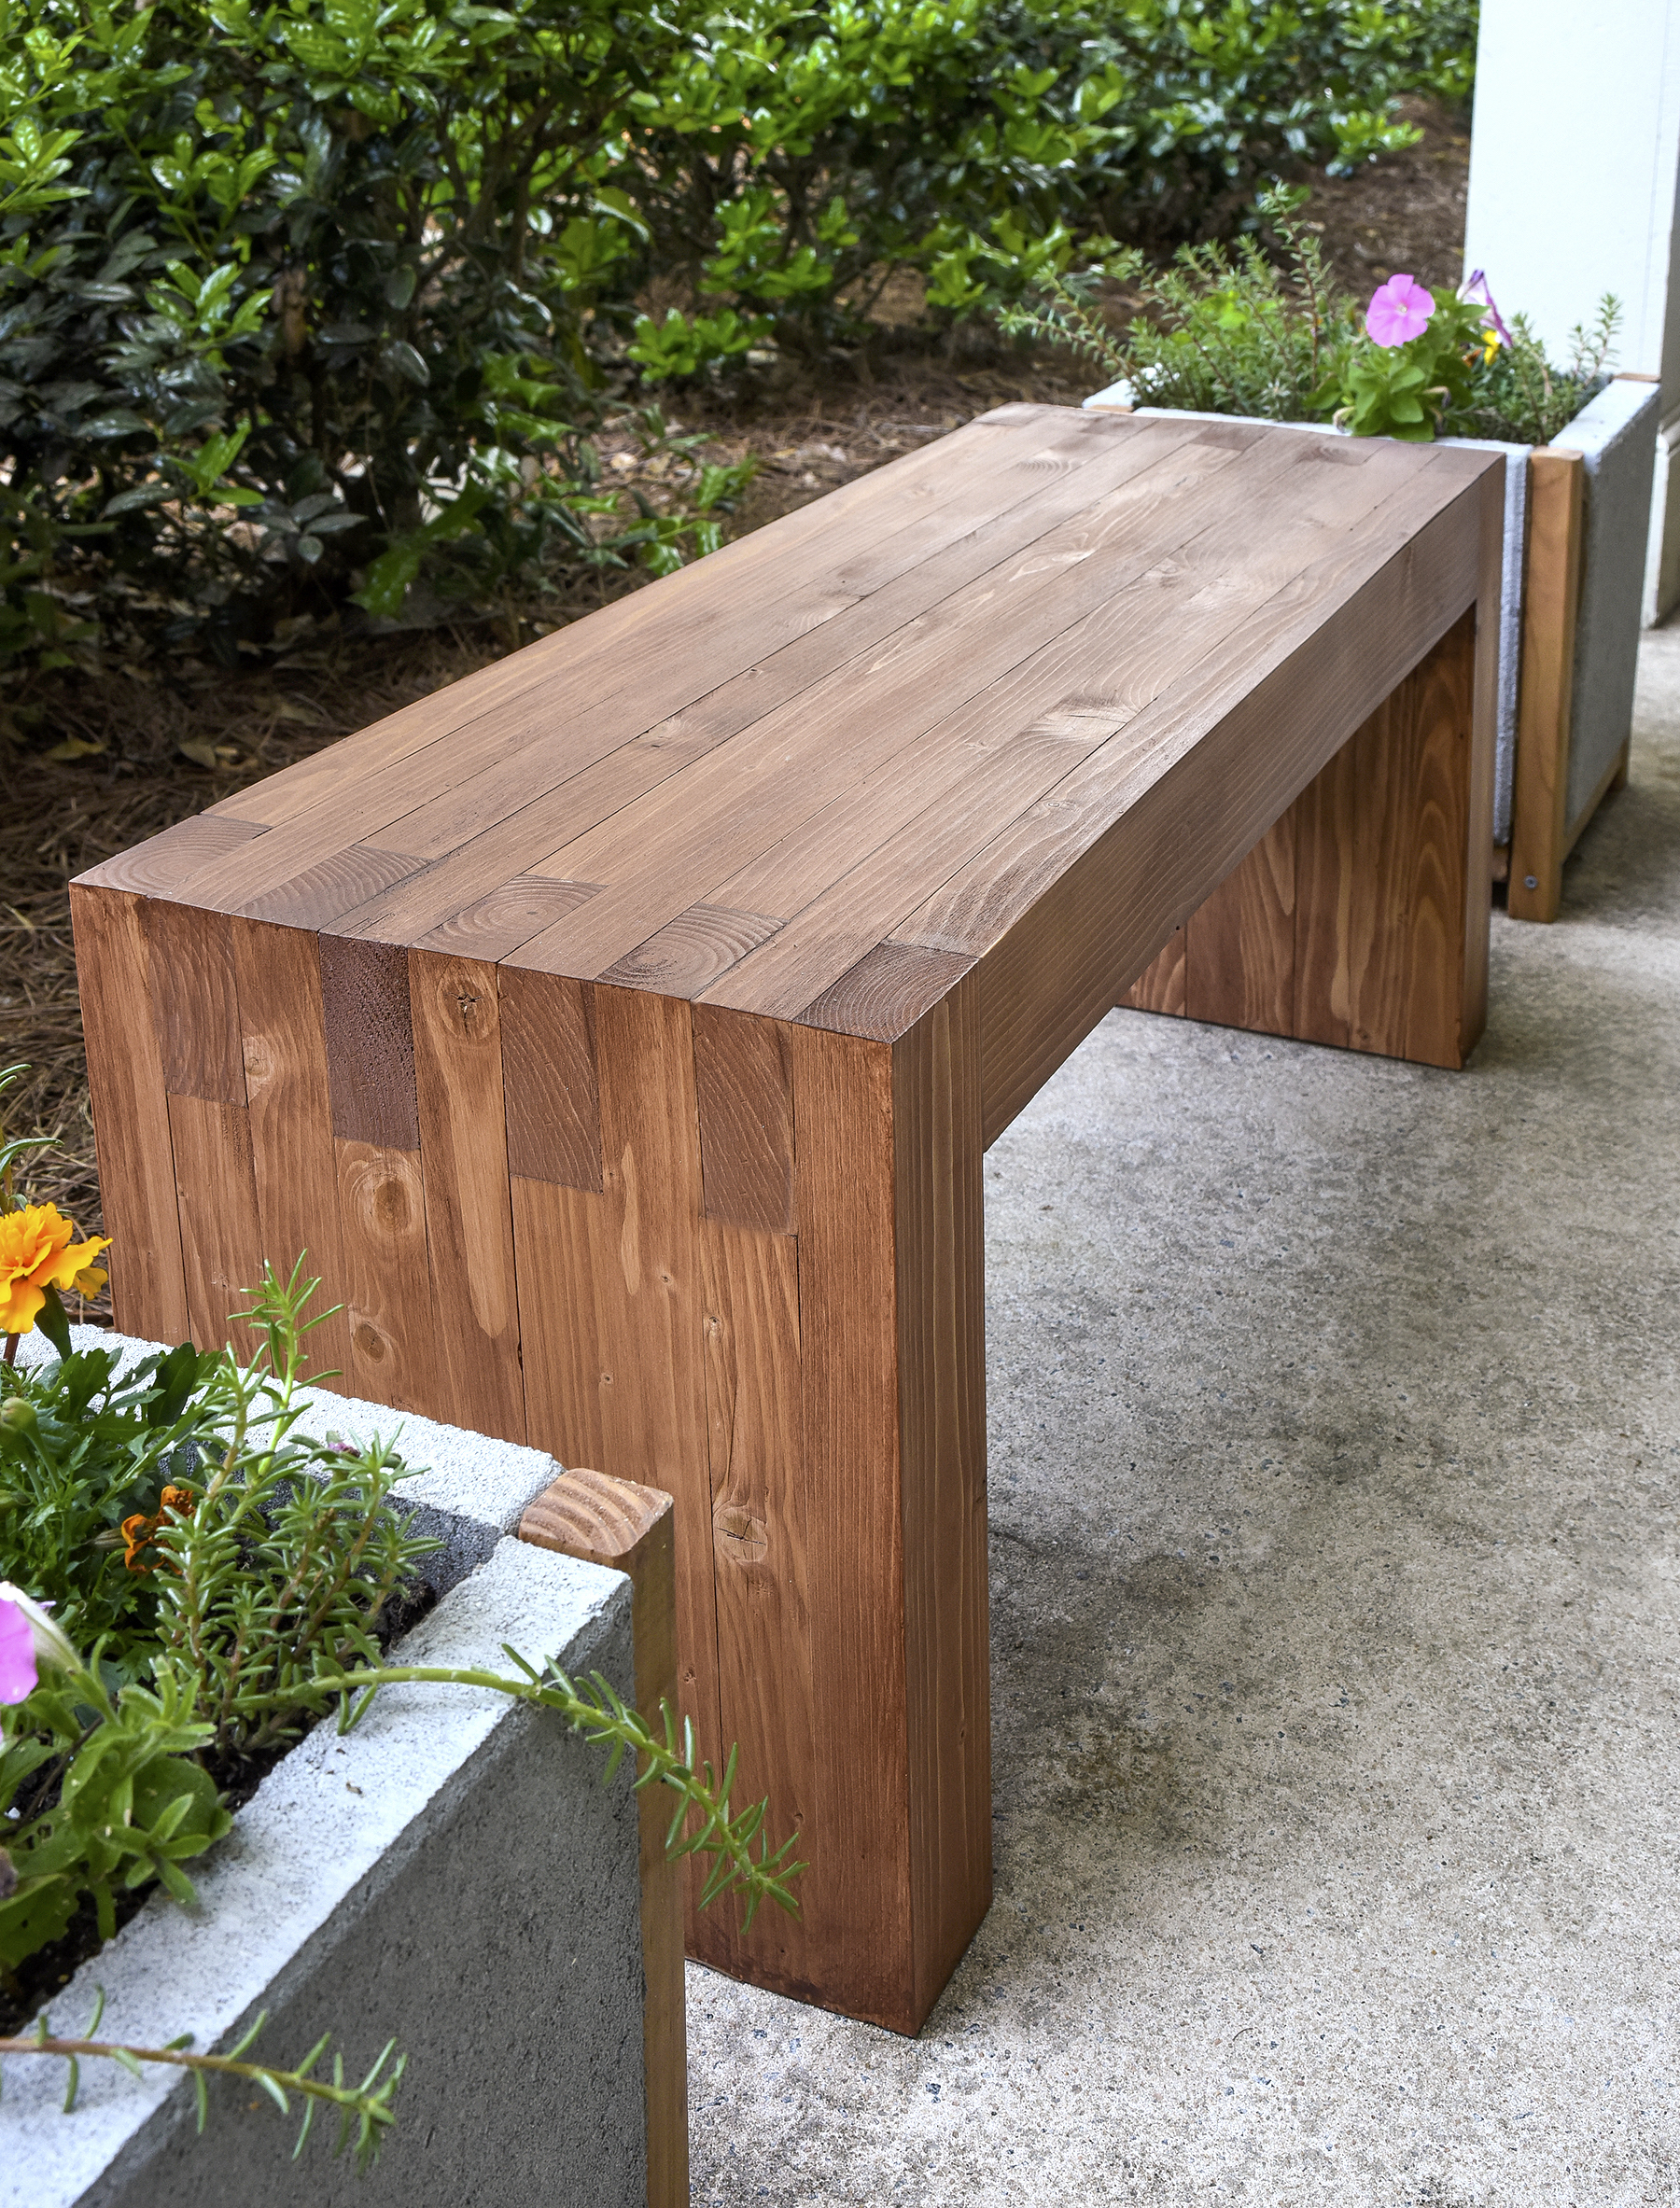
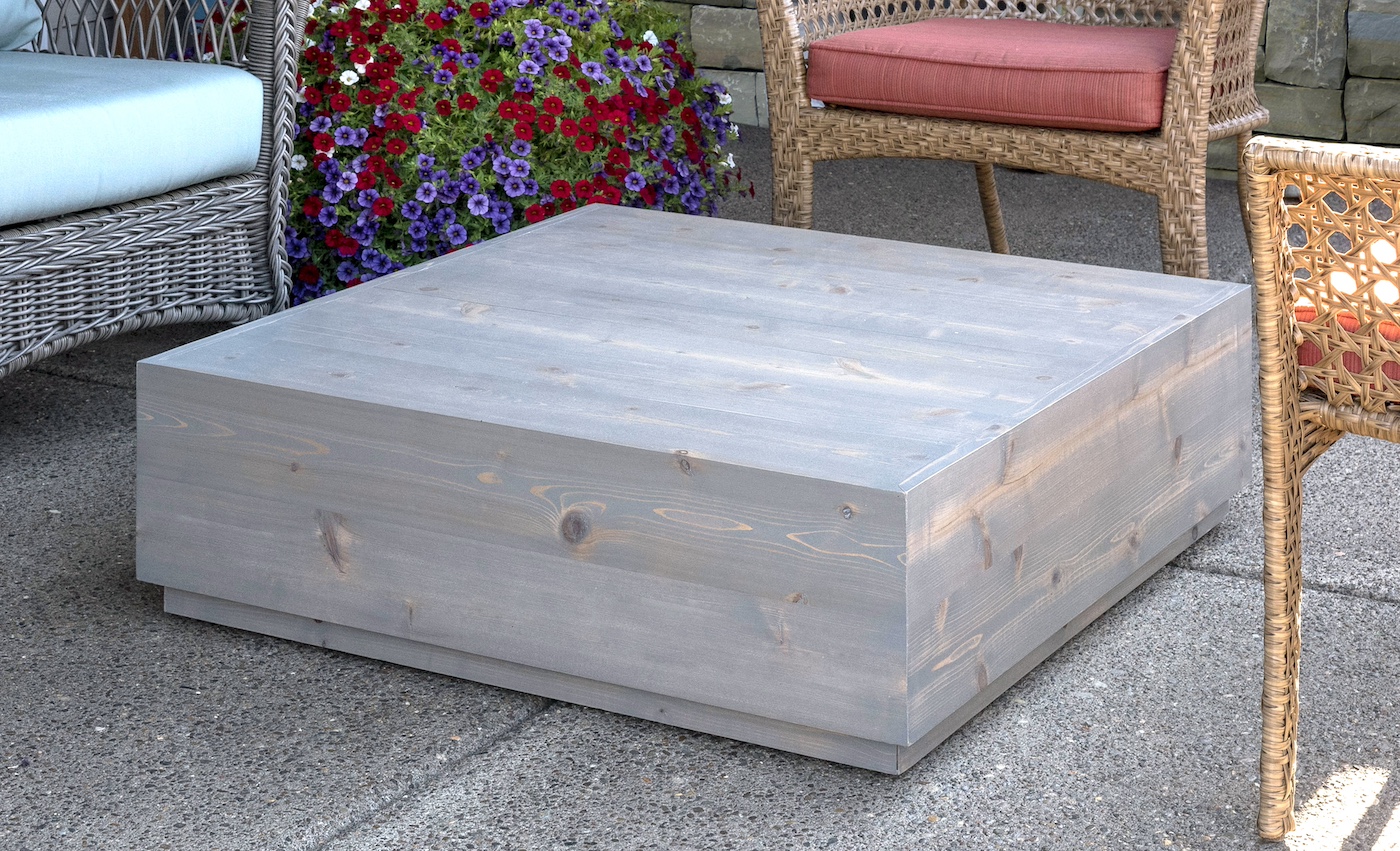
Here’s how this bench came about. It was quite a coincidence that we were flipping through a Williams Sonoma Home catalog the other day and found this Larnaca Outdoor Coffee Table that looks somewhat similar . .
yet has one BIG difference. The Larnaca coffee table costs $1,295, while Steve’s version is $35. Now, ours is outdoor seating while the Larnaca is technically a coffee table, but the idea is the same. You can always modify the size of this DIY outdoor bench to fit your desired specifications.
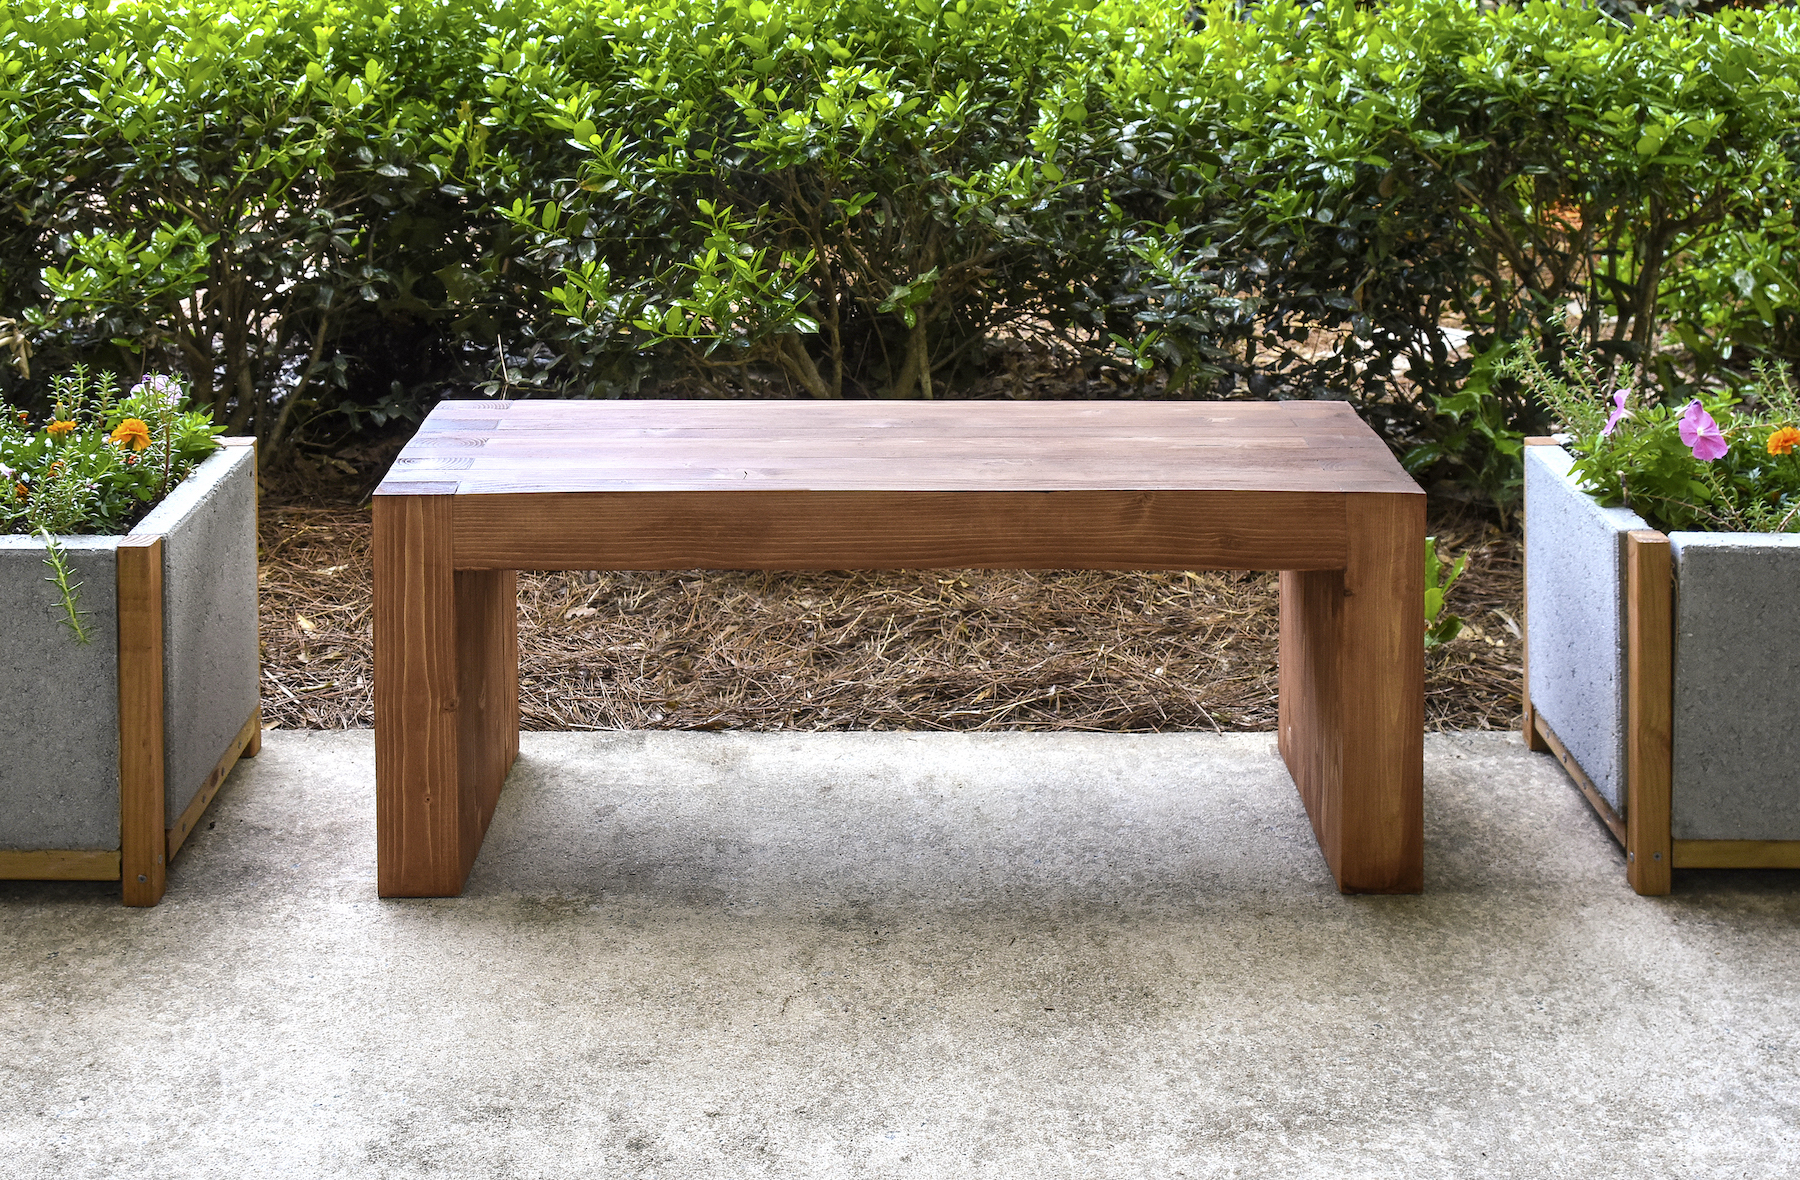
So here’s how to build this bench, with a finished size of 16″ high x 40″ long x 13.5″ deep. You’ll find that building a bench is much easier than you think! Here’s how we built this piece of furniture.
Gather These Supplies
- Regular 2 x 4s – pine, not pressure treated (see Cut List below; also you may want to use pressure treated wood if your bench is going to be exposed to the elements, though it is more expensive)
- Exterior grade Liquid Nails or Titebond III (or other construction adhesive made for wood)
- Bar clamps
- Thompson’s WaterSeal and Stain (Nutmeg)
- Paintbrush
- Rag
- Table saw
- T-square – or something to make sure edges are square
- Hand held belt sander with a 80-grit and 120-grit
- Sanding blocks – 80-grit and 120-grit
- Surface protection – cardboard box, tarp, etc
- Optional – drill and four feet if you don’t want the bench to touch the patio or ground directly
Cut List – you might notice that the measurements don’t quite add up – this is because the ends were milled off and sanded to get the resulting finished size bench.
- 33.5″ long (five pieces)
- 40″ long (four pieces)
- 16″ long (ten pieces)
- 12.75″ long (eight pieces)
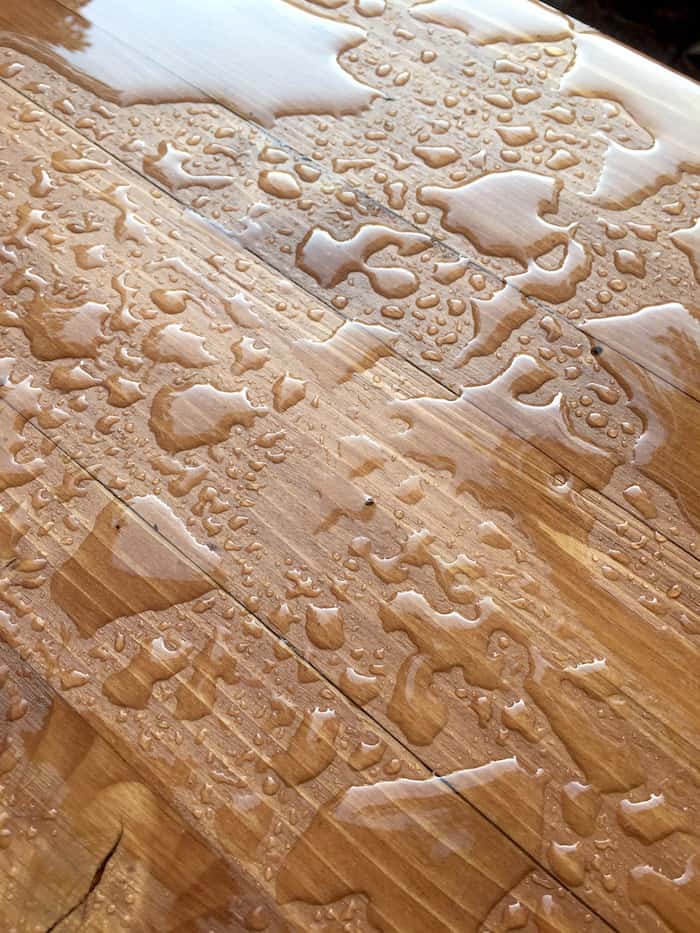
We already had a rain here so I also wanted to show you how well the stain works – the water just pools on top and comes right off . . . no soaking into the wood!
We hope you enjoy our DIY outdoor bench! The printable tutorial is below. Also I keep getting questions about the planters – I did make those as well! Find them here.
DIY Bench
Equipment
- Bar clamps
- 1 Belt sander
- 1 T-Square
Materials
- Regular 2 x 4s – pine see cut list in notes
- Wood glue we used Titebond III
- Thompson's WaterSeal
- Rag(s)
- Sanding block 80-grit and 120-grit
- Cardboard box or other surface protection
Video
Instructions
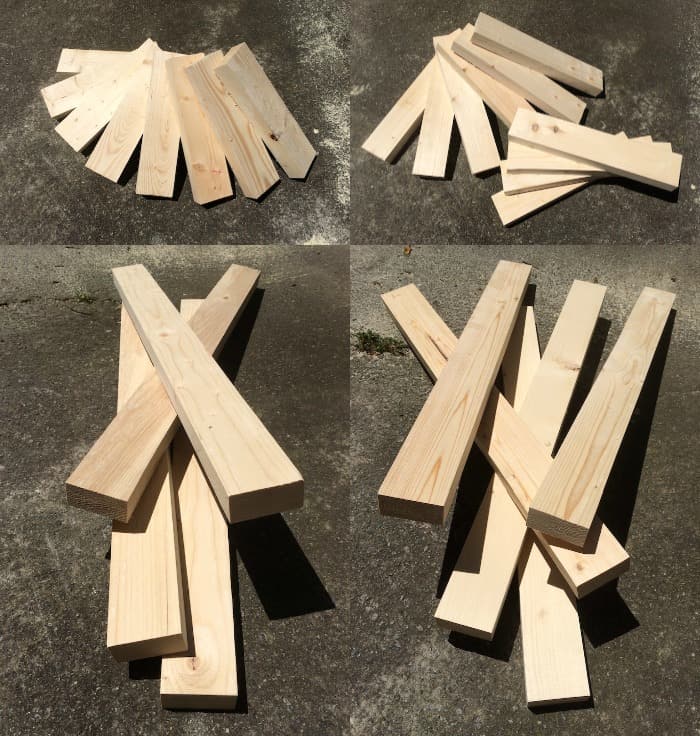
- Using the table saw, “mill” the 2″ edges of every piece of wood so that you get a very square edge (as opposed to the rounded edges that come on a 2×4). This will give your bench a more modern look.

- Cut the pieces of wood according to the cut list in the notes. Keep in mind, these measurements produced a finished bench that is 16″ high x 40″ long x 13.5″ deep . . . AND a little extra was left for the milling and sanding process. If you want to customize the size of your bench, you’ll need to adjust these cut lengths.
- Use your pieces to create a box joint. Place a 40″ piece of wood on the ground, with a 33.5″ piece in the center. On each end, you’ll place a 16″ long piece perpendicular to the other two pieces, as shown in the photo above. Make sure everything is even and as flush as possible (and use a t-square or other item if necessary to for a right angle), then glue into place and clamp.

- Add Liquid Nails to the wood, setting it up in your pattern as shown in the final image then adding clamps to hold it together. Remember that you’re doing a modified box joint, so you’ll have one long piece of wood, then one short piece, then long, then short, and so on.
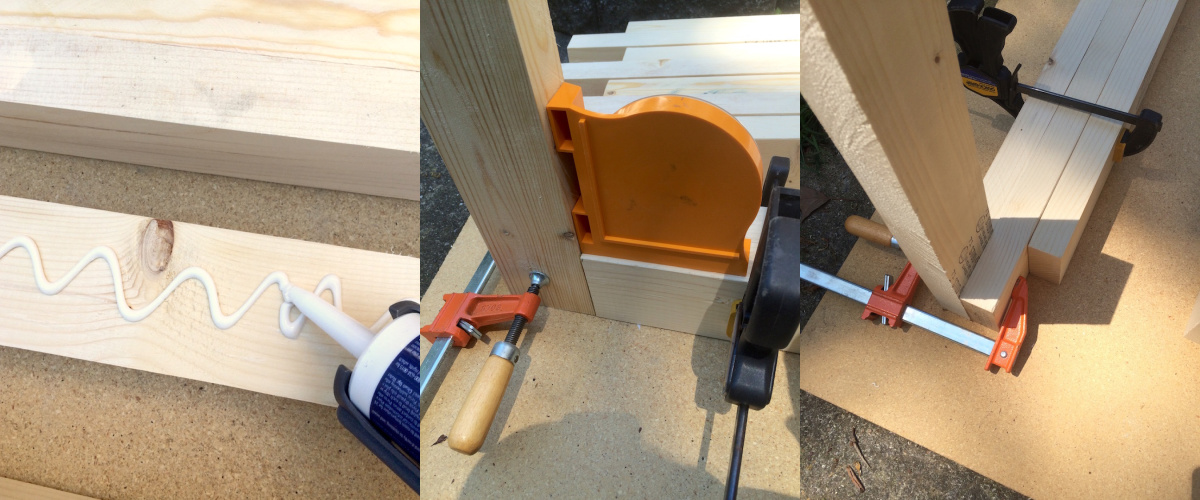
- Once your bench is full assembled, keep it clamped and let it dry overnight.

- Undo the clamps and sand with the belt sander to get everything even. Don’t forget to sand with the grain! Sand until it’s completely smooth and flat. Do this on the legs, too. Then wipe away all of the sanding dust.

- Use stain to paint the bench. Applying stain is relatively easy. You can use a brush, paint it on, then wipe it off. Seal with Thompson's Water Seal.

- Add furniture feet to keep your bench off of the ground. Drill a hole, insert the foot, and repeat on all four corners of the bench bottom.

Notes
- 33.5″ long (five pieces)
- 40″ long (four pieces)
- 16″ long (ten pieces)
- 12.75″ long (eight pieces)
- organize the pieces of wood without gluing FIRST so that you understand how the bench goes together;
- begin at one end of your bench and start assembling with the Liquid Nails, using the clamps as placeholders as you go along;
- continue add Liquid Nails, wood, and increase the size of your box clamps until the bench is fully assembled
What do you think? If you have any similar projects or if you’ve done something like this and would like to share your tips, we’d love to hear them in the comments! Thank you!
If you love DIY benches, I’ve got another one you’re going to want to check out: Crate and Barrel Inspired Entry Bench. AND if you want to see another inspired knockoff we did – check out our West Elm DIY coffee table. We made it for $45 . . . original price of $999!




This bench is gorgeous. Thanks for the detailed tutorial.
Gorgeous bench!! Love how it turned out. Great tutorial too!
Great bench. I will try to copy Your project as soon as I will come back home…
Wow! He did an awesome job. It turned out amazing!
No way this amazing bench was $35! Love it! I’d love to try to make one!
This is absolutely amazing! Just bought a console table that has this exact same look for much more than $35. Such a great diy!
It’s Gorgeous! Your man friend is super talented just like his lady!
This is beautiful and now I want to go buy a belt sander and make one! This needs to be in my backyard…
LOL – THATS the ticket. every time you come up with a project, its a reason to go buy a tool.
@Paul, 🙂
Amy your bench is gorgeous-what craaftsmanship and the instructions are perfect. Love it!
Wow! Totally impressive – not only for the cost difference, but for the end result too! I’ts a gorgeous piece of furniture ANd I love it much better than the Williams-Sonoma piece!
This looks great! i’d love to try making this. Thanks for the easy tutorial too!
What a keeper! (the man and the bench…) It looks awesome sauce fabulous.
This. Is. Awesome!!!! It fits my decor perfectly too.
Oh my gosh – I LOVE it! WHat a great project – I want one! Pinned!
Oh my goodness! I love this bench! I’m going to save this so that my hubby can build a couple for my outdoor space. Great tutorial. Thank you! 😉
Wow it’s gorgeous!!! And I love that it is just glued together. I don’t have a ton of experience with power tools and I think I might possibly be able to pull this off. It really does look like a very expensive piece of furniture!
This bench is awesome and for only $35.00??!!! Wow!
That looks amazing!!! I have been wanting to build a bench for our {will-be} rose garden. I’m pinning this for later!
Gorgeous, clean lines!
i CANNOT TELL YOU HOW MUCH i LIKE THE CLEAN LINES OF YOUR BENCH. i NEED TO BUILD NEW FURNITURE FOR MY PORCH AND YOUR BENCH IN DEFINITELY IN THE idea pool!
This is just what I needed. THank you for the great tutorial. It’s gorgeous and I can’t wait to make it.
What a gorgeous bench! I love the look and you can’t beat the price!
I am seriously in love with this bench! I really think I need to make one for our home. It looks amazing.
Whoa! That’s beautiful. I want one! My very favorite DIY projects are the ones that look handmade and not homemade, and this nailed it!
Gorgeous bench and great tutorial – I’d love to try my hand at making this!
This looks incredible! I think I just found a new project for my neverending to-do list! 😉
I love this! I might just need to make one now!
This bench is lovely!
Gah, this is absolutely beautiful!!! Thanks for the great tutorial, definitely pinning for future use!
Looks gorgeous!
Love the planters – did you DIY those as well? Is there a tutorial somewhere? Thanks!
Thank you so much – and yes, those were DIY’d – check them out here:
https://diycandy.com/paver-planter/
Has the bench held up? Really like the look.
Hi Steve! Yes it has. It would have been better to use something pre-treated (which I mention in the post) if it’s going to be just sitting outside.
It”s a great bench, And even with the added purchase of a table saw and clamps it would still be a better deal than the williams sonoma item. I’ve been wanting a table saw for a while now…
wow this is truly gorgeous. why am i yelling?
Fantastic. Great how-to pics. One word of caution, regarding your suggestion to use pressure treated wood. It is a wood saturated with arsenic and is considered a product that can cause cancer. It’s not ideal for a furniture item people would be touching.
They quit using arsenic years ago. The new treated wood is safe. Naders raiders or one of them groups successfully campaigned against the old treatment of the wood. don’t understand why this site is typing in caps. the caps lock is off.
I love this bench!!! I was wondering if it would be strong still if it was 65-70 inches in length? Thanks 🙂
Yes, we think 70″ would work just fine! Thank you 😀
That is great. I am going to make one. the planters are like wow also. Search the web for the coffee table made by the 10th grade first year wood shop student using mirrored glass &led lighting inside. it will make you want to build one. totally amazed me but I am going to try it first with a picture frame sized build.
killer bench.. I’m gonna make two for the back patio out of redwood instead of pressure treated. looks better, doesn’t cost that much more, you don’t have to deal with the warping as bad, and i wont have to stain it. I’m also thinking about screwing all of the inside pieces together to speed things along and saving the clamps for the outside layers.
I was thinking the same thing!
I was even picturing long threaded rods, through each end.
GREAT
This bench is gorgeous! You did an amazing job!
Paige
https://www.thehappyflammily.com/
this is so great! thanks for the amazing tutorial, featured on Ana-white.com today!
Thank you so MUCH! What an honor!!
This looks great! What’s that orange thing you used to make sure your joints were square? Looks a little more handy than using my speed square.
It was an angle locator! http://www.homedepot.com/p/Johnson-Magnetic-Angle-Locator-700/100161689
It was all he had to ensure a perfect 90 degree angle . . . but something with a square edge might work. 😀
Very attractive bench. Can i ask how many 2X4 boards Did you purchase?
Thank you so much – Steve says 4!
Perfect was just going to ask this question. Figured I would scroll through the comments before I doubled down.
4 8 ft. 2x4s???
I used a little over 6 2x4s with the same dimensions as the project
WHat a beautiful bench! Can you please provide the link to the furniture feet you used? I searched lowes site and could not find them. It is exactly what we’ve been looking for. THanks!
They have such a weird name – but I found them http://www.lowes.com/pd/Waxman-Steel-Non-Swivel-Furniture-Furniture-Glides/3043916 (and thank you!)
Thanks so much for the link!
This will be my next project. The design is simple and elegant. Thank you for sharing the details.
Thanks for sharing. Did Steve run the 2X4s thru a plainer or joiner first to get them so square? Normally the corners are more rounded..
Great job.
Andrew, he used a table saw. But we JUST purchased a planer and are very excited about it 😀
How many 2 x 4’s did you buy?
nevermind, saw the answer in an earlier post! love this bench!
If you use polyurethane, do you need to stain first?
Salman, you don’t HAVE to stain. You can simply seal the wood as is if you like the color 😀
I am currently building this bench (not sure why all caps is on thought I turned it off) but anyway, how long do you clamp between adding new layers? A few minutes, a couple hours..cause the clamps are in the way of adding more..
Steve only clamped it long enough to hold it together to add new pieces – so I’d say about 10 minutes. 😀
You said he used 4 2×4’s but at what length?
Hi Tim! They were 8′ 2x4s 😀
Nice looking bench. Curious about the planters though, did you make those as well?
Hi Danny! Yes – that tutorial is here! https://diycandy.com/paver-planter/
Just commenting about the picture of cutting the wood on the table saw. The way shown is incorrect and dangerous. You always want the small cut to be on the open side of the blad, not trapped between the blade and fence.
Thank you for the tip!
I made something very similar out of strips cut from some reclaimed birch plywood, with the edge boards made from walnut. Pic – https://i726.photobucket.com/albums/ww269/Waldo56/5e12a57a-d1f7-4485-b472-650b7c1d9e07_zpsqo6mba1j.jpg
A couple points:
– a type 3 wood glue like Titebond 3 would be a lot stronger than construction adhesive. Type 3 glues are waterproof and are suitable for outdoor use.
– PolyUrethane would be a very poor choice for a finish. UV rays break it down quickly, it is not made for exterior exposure. Use a marine (spar) varnish instead or even better, untinted base 4/5 oil based siding paint, which dries clear and is incredibly durable outside. Spar varnish should be right next to the poly; it isn’t quite as durable as the paint, but it is at least made for exterior exposure.
– A hand plane, if you have access to a decent one (not a block plane), will do a better job than a belt sander, it’ll leave a better finish and make the surface flatter.
Thanks for the tips Jay! We’re going to look into both the Titebond 3 and the 4/5 oil based siding paint. Do you use it for indoors too?
Use the paint on the interior? No. Each finish has its purpose, exterior finishes need to be flexible (wood expands/contracts A LOT outside), have strong UV inhibitors (sunlight will destroy interior finishes within weeks), and be waterproof. Most of these properties are useless indoors, where harder, abrasion resistant and wood enhancing finishes are preferred.
Wood glue should always be used for gluing wood to wood. Modern wood glues are incredibly strong once cured, stronger than the wood itself.. Titebond 3 is >10x stronger than liquid nails. Type 3 glues are a bit pricier than basic wood glues, but the waterproof property is needed outdoors.
I built the bench, it is currently clamped. I am very excited to see the finished product! This is the first I have made with glue alone (construction adhesive) so I am a little nervous about it staying together! Thanks for everything!
Clair
FIRST OF ALL THANKS FOR EVERYTHING – MY FIRST BENCH IS DRYING OUTSIDE RIGHT NOW AND ALTHOUGH I HAD MORE INCONSISTENCIES TO FIX THAN YOU DID DUE TO A LACK OF PROPER WOOD CUTTING EQUIPMENT (I’M USING POWER HAND EQUIPMENT FOR ALL THE 2X4 CUTTING SO IT CAN BE DICEY) IT STILL WORKED QUITE WELL.
MY QUESTION IS THIS, COULD’NT YOU HYPOTHETICALLY MAKES A TABLE USING THE EXACT SAME METHODS AS THIS BENCH TO GO ALONG WITH THE BENCH? I KNOW I’VE SEEN SIMILAR TABLES IN WEST ELM AND STORES OF THAT ILK WITH THIS COMPOSITION – AND THIS IS THE TABLE I WOULD LIKE TO MAKE FOR MY DESK. ANY ADVICE OR GUIDANCE? I KNOW ITS GOING TO NEED SOME ADDITIONAL SUPPORT AND A LOT MORE WOOD, BUT STILL, I THINK ITS GOING TO BE A GREAT TABLE. ALSO, WHY IS THIS ALL IN CAPS LOCK BY DEFAULT? ITS REALLY CONFUSING.
Hi Holden! I’m so excited that you made the bench! That’s awesome!
And yes, you can definitely make a table to go with the bench. What you might want to alter is 1) either actually screwing things together or 2) using braces underneath with screws that can’t be seen. So that it looks on top like it’s glued only, but underneath you have some support 😀
Thank you so much. I’ll let you know what I end up doing. This project has me investing in some additional power tools so I’ll get back on the project as soon as everything arrives from amazon.
Thanks!
Did you end up making a table to go with this??
You’ve done a lovely job on this one guys. I really like that chunky look. I’m often amazed & appaled at the prices some people / companies ask for furnishings like this. A very good tutorial & with the extra tips from your other readers anyone can safely make this. I’ve Pinned this for future reference as I make all sorts of wooden stuff myself, benches among them, just not so chunky looking…… not untill now that is. Wish you luck with all your future DIY’S & thanks for a great job 😉
Thanks for this post! My husband and I just made this as a console table behind our couch. Everything is clamped and ready for sanding tomorrow. May I ask what stain brand and color did you use? The color would be perfect for our family room.
Julia, I know it’s almost a yeah and a half later but I was also looking at using this for a console table behind the couch and had a couple of questions…
How tall did you make yours? Did you have to do anything extra to compensate for the added height or was it still stable?
Thank you!
I’m making this today and integrating some of jay’s suggestions. love it! I’m going to make a matching console table, both for our contemporary entryway. 🙂
Thanks for the information, my wife and built it with some left over cedar and pine, turned out pretty good. needed to let the liquid nails cure longer than overnight, as began sanding and it came part, so re-clapmed and let it set a few days and all was good. cutting the the ends of the boards with a chop saw would have been great, instead i used a hand circular saw, not so good. had to do some extra sanding as the cut not square. as usual the right tool for the job saves time and work. ripping the sides as seen in the pictures posted (blade close to guide) does seem akward and not as safe as one of the other readers pointed out. i read that after i already did it the way pictured. i hope those who try to build this can learn from a few of my mistakes. i finished with cabots natural color 3000 deck and siding stain. sanded with 220 and sttel wool between coats, applied 4 coats and really brings out the natural wood colors, great stuff. enjoy
just want to say this is ‘freakin’ awesome. And yours looks much better than the inspiration picture. Now if only I could get someone to make me one!
One of the pics below step six looks like there is some wood filler or putty being used at the joints on top. Is that correct? If so, did you stain the putty with the nutmeg stain? I did not see any listed in the supply list. Great job with simple materials!
Hi Scott – that was just to fill a few accidental boo-boos in the learning process . . . you shouldn’t need it! But if you do, yes, you can stain it 😀 Thank you!
The wood alone would cost around 360€ (402$) in Europe. And I did check the price for (cheap) pine wood. Wood seems incredibly cheap in America Oo
Hi D! Yes, it’s very inexpensive here. Sorry that it’s so expensive there! Is there another substitute you could use that would be cheaper? Another suggestion – recycled wood from pallets, etc. I don’t know how readily available that is there either :/
No way. Where do you live? In Denmark i Can buy The Wood for €27
Hello from Greece!!!
Very nice bench! I was wondering about the number of boards you said you used.
If i sum up the cuttings and if i’m correct…you used 6 2×4 8ft and not 4 as Steve said.
Correct me if i’m calculating something wrong cause we use metric system not inches and feet.
8ft=96inches?
How did you cut the boards? For example did you cut one board 33.5, 40 and 16?
Can you provide me with the exact cutting per board?
Thank you very much!!
Hi Giannis! I’ll double check the measurements but here’s the cut list:
33.5″ long (five pieces), 40″ long (four pieces) – for the top
16″ long (ten pieces), 12.75″ long (eight pieces) – for the legs
That’s exactly what we used and we confirmed it!
Hello again!
Maybe i didn’t make myself clear!
I see the cut list, but can you provide the cutting per board?
I mean the board is 96 inches, is this correct?
If i sum up all the pieces (one each) is 102.25 inches
So how did you cut each board?
Thank you one more time!
Hi Giannis! It’s hard to answer that question because depending on where you go, the boards come in different lengths. You need about 50ft of wood total. You can get 2 x 4s here in 8 foot, 10 foot, 12 foot, 16 foot lengths. Which does your store have? Honestly I’d take the cut list to the store with you and have someone there help you out based on the board lengths. If I give you the cuts for 8 foot boards, you could go to the store and only 10 foot boards are available and then it’s no help 😀
OK understood. BUT…if you’re saying about 50ft, then there is no way you used 4 8ft’ 2×4…this is 32ft correct?
Maybe you used 4 12ft?
Where exactly are the 12.75″ used? or is that just leftover?
This website should help you: https://jonathan.overholt.org/projects/cutlist
I got below after selecting all lumber upto 10feet.
Board Count:
1x 48″ (4′)
5x 120″ (10′)
120″ board = [2] 40″ + [1] 33.5″ + [2] 40″ + 0.375″ cut losses + 6.125″ excess
212
120″ board = [2] 40″ + [1] 33.5″ + [2] 40″ + 0.375″ cut losses + 6.125″ excess
212
120″ board = [1] 33.5″ + [1] 33.5″ + [3] 16″ + [1] 33.5″ + 0.5″ cut losses + 3″ excess
1131
120″ board = [3] 16″ + [3] 16″ + [3] 16″ + [3] 16″ + [3] 16″ + [3] 16″ + [3] 16″ + 0.875″ cut losses + 7.125″ excess
3333333
120″ board = [3] 16″ + [4] 12.75″ + [4] 12.75″ + [4] 12.75″ + [4] 12.75″ + [4] 12.75″ + [4] 12.75″ + [3] 16″ + 1″ cut losses + 10.5″ excess
34444443
48″ board = [4] 12.75″ + [4] 12.75″ + 0.25″ cut losses + 22.25″ excess
44
Never give this cut list to my wife or she will know I bought more lumber than I knew I needed again. One piece at at time and I’ll have that second garage before she knows it. 🙂
Love this! Hope to build it in the near future. Love the planters next it too! Are those diy too?
Hi Michelle! Thank you for the kind comment! Yes they are, that post is here:
https://diycandy.com/paver-planter/
The instructions were great; I applied the stain last night… I will give it a few days to dry before adding the sealer. Lots & lots of belt & orbital sanding.
Glad it worked – thank you for the kind words Floyd!
Absolutey spectacular! your pictures and step by step instructions are extremely well written. Be very proud of yourselves! Guarantee you could make a bunch of $ if you wish to make them for profit As not everyone has the space or tools required to make this. Again, fantastic job. Now, I am going to go look in my woid pile to see what I have on hand . . .:-)
You are too kind Naomie! Thank you so much!
Steve, as an architect and wood worker, I must say this bench is awesome. Its simplistic design makes it incredibly elegant. While it also seems relatively simple to build. I hate to steal other peoples designs but I’m going to have to this time. Thanks for posting!
Yours looks way better than Williams Sonoma. I dont care if theirs is teak. Yours is much nicer looking aNd way cool. Love it!
So you need about 50ft of wood in total for this project?
Yep! Exactly.
Did you guys use any kind or wood putty or gap filler to seal the gaps where the wood connects?
We did not as there are not really any gaps (maybe slight but barely noticeable?). However, you could do this. If you do, please share your results!
Consider pushing a mix of the Titebond glue with some of the fine sawdust into the small separations. Sand it down. This will help with the sealing and waterproofing.
Nice bench. It seems easy and quick to make. I can also see adjusting it for a coffee table. as a set.
the matching PLANTERS are great too!! do you have instructions for them as well?
(sorry….for some reason, I can’t type in u/L case)
Yes ma’am! They are here: https://diycandy.com/paver-planter/
Wonderful idea
What a great doable project! Can you tell me about the planters flanking the bench? Did you make those too? They are fabulous.
We did make those! The tutorial is here: https://diycandy.com/paver-planter/
Thank you!
Love this post, can not wait to get going on this project. Curious to know if you made those planters with the concrete inserts? Would love the instructions. Thanks!
Yes I did! https://diycandy.com/paver-planter/
Amy, great job on the bench and the tutorial. While the boards are drying, how do you stop the glue from leaking onto the bench surfaces?
Looks brilliant I’m going to try it, is it heavy can it be easily moved by 2 people?
Aaron it’s not heavy at all (well, I guess depending on the wood?). I can move it myself, but two people definitely can 😀
Great looking bench, well designed, I am going to build one. Only one thing i question is the use of construction liquid nails, rather than regular wood glue. Time to dry may be an issue, ?? but I think of the bench construction as basically furniture joints
I liked this bench well enough that I built one. The page was helpful but I used yellow glue and screws. All of that said when I got done the bench, I found that the 16″ height was a little too low to be comfortable to get up from and to sit down on (6’1″ tall and 70 years old). I built a couple of feet in a trestle table style by laminating up some pieces of 2 X 6 and making mortise and tenon joints between the bench and feet raising the level to 19″. This worked well enough and it looks OK but frankly I like the simple look of the original bench better. I suggest that if you build the bench make it 18″ high and proportion the length and width to preserve the proportions. That requires one more layer of 2Xs to get the width right.
Hi Cliff! This is a good tip for tall people – we’re short. Haha! Well not short, but I’m 5’6″ and my boyfriend is a little under 5’8″. So this is great information!
Cliff, I just made this and agree. The bench is a beautiful modern design but it would’ve hugely benifited from an 18″ length. Someone told me at the woodshop I go to that 18″ is the furniture makers go-to height. I’m debating on selling the one I’ve made to redo it again.
I made this bench and used 10 8 ft long. I made the bench 48″ long with 23″ tall feet. This makes the bench 15″ wide. The bench is now a table because I made it too tall. I will build another one 18″ tall. Use a chop saw with presets, for more accurate cuts. This greatly reduces sanding. Also I used 2.5″ square drive screws to put the inside pietces together and only glued on the outside pieces, The results are great just need to adjust the height.
So do you think your measurements make for a good sofa table? That’s what I want to create.
Hello so what will be good measurements if you want this exact look but for entryway table. I know taller for sure but not as wide.
The planters look pretty cool, too. Are there instructions for those?
Glad you like those too! They are here:
https://diycandy.com/paver-planter/
Great tutorial! Thank you so much!
Did you make the planter boxes in the picture??
Yes we did! Here’s the link to that too:
https://diycandy.com/paver-planter/
Love it. Wish it was video though for those new to wood working. This will be my summer project.
LaQuana that’s a great idea! We just started doing video actually. So let me ask Steve – hopefully that’s something we can tackle this summer 😀
This is amazing! I love your husbands thought process. It happens so often that I’m pretty specific about what I want. But then it’s too expensive sadly I don’t have the skills your husband has.
Anyone can tell me what 2 x 4s means in Europe?
From online: A “2×4” board starts out as something smaller than 2 inches by 4 inches and not specified by standards, and after drying and planing is reliably 1 1⁄2 by 3 1⁄2 inches (38 mm × 89 mm).
I was thinking, would you be able to use a jointer to square the edges of the 2x4s and just do 1 or 2 1/8 inch passes on each side if your table saw is broken and you don’t have a track saw?
Thanks
– Sam
Steve has never used a jointer; however, we looked at one and he said yes. As long as it takes off enough material to get rid of the rounded edges of the 2 x 4.
Hope it’s okay, I linked to your post on my blog post at
Great tutorial, thanks for sharing!
Great bench. Will certainly try this project. Question: did you also back the concrete/wood planter box? Seems a rather unique design. Would like to find out about that one if possible.
Hi Joshua! Those are on my other blog 😀
https://diycandy.com/paver-planter/
I have made to of these benches and absolutely love them. Great job on coming up with the design. I had to let you know that someone else has posted your work and had no given you any credit.
https://www.youtube.com/watch?v=Sk27faHa90w
I found this video on youtube and it contains all of your pictures along with a link to their site that contains all of your directions. I hate when people don’t give credit where credit is due.
Thank you so much Daniel! And I reported that person’s video and his blog post. I appreciate you letting me know . . . and so glad you love your benches!
Amazing, Thanks for this amazing project.
90x45mm DAR pine is about 25AUD for 2.4m and i think i need 11 of them which pushes the price up.
Any recommendations for cheaper material?
How many 2×4 do you need in total
Can you turn your bench into a counter top table for a kitchen…36Hx48Wx24D? How heavy would that be? Thank you.
Hi Jeannie! Honestly I have no idea! I’m sorry – we aren’t experts at woodworking so I don’t know how to answer your questions.
I love how you painted it darker. Great DIY project, thank you!
I just built a table version of this design and it turned out great. Super design and easy to follow instructions. I wish I could share a picture of my table. Thank you.
I’d love to see it!
Hi Jose, can you post pictures? What were the dimensions? I want to use this design to create tables as well!
Amazing!!! I will definitely gonna try this…
Thanks to this tutorial I build a pretty awesome desk that I’m very happy with. Just changed the dimensions a bit and did a bit more gluing / clamping. Final cost $70.
Can anyone tell me about how much weight this will hold ?
Hi Stephanie – I don’t know – but I know at least 325 pounds has been on it at one time and it’s been fine.
Ok thank you!
Can you tell me what stain you used (type, brand, color)? I built the bench and I agree with the previous comments……Excellent idea and tutorial! I like the color of yours and would like something similar.
I loved this design so I gave it a shot and it came out pretty nice! A few things that I would do if I built it again:
I would glue the top of the bench all together and then plane it one last time to make it flawlessly even so no belt sander is needed. Then I would insert the legs.
Also, the height is a little less than desired. After the fact, I have learned that standard benches are 18-18.5 inches tall and this one measures slightly under 16″ if you have to belt sand the legs to make them flat.
Lastly, I would use a stop on the chop saw to cut the materials, so that I don’t have varying lengths from human error on marking with a measuring tape.
Here is a pic of mine:
I just made this for a friend and now need to stain it. Is a pint of stain enough?
Hi Paula! Steve says absolutely yes! Thank you.
Great project did one today. Going to do another one and assemble glue legs and top separately. Then glue and attach legs. My boards were not even so I had to sand a lot. Thinking that it would be more manageable separate assembly
Hi I was going to try and make this using pallet wood do you think that would be a good idea?
Steve is thinking if you “butcher block” the pieces it would work. 😀
Great build! Can’t wait to try this! I also saw that Larnaca set and was inspired to try to build it. Any plans to possibly try to build the Larnaca sofa or club chair they sell? I am trying to figure out how to build those for our patio. Maybe a new idea for Steve? Thanks !
Stephan
That’s a great challenge Stephan! I’m going to ask him if he’ll do it!!
My version of the bench, extra long to fit more people. It is stained cherry and applied with several coats of polyacrylic.
https://www.instagram.com/p/BJdKAuZAEDH/
It looks AWESOME!
I really love the bench but I was wondering if at can to a desk for kids. If so how can it be adjusted
Hello, I felt in love with this bench and I want to make my own one!
Can you just send me the measures/sizes converted in cm?
Thank you,
Greetings form Belgium
Thank you for sharing! I used this technique, turned sideways to make a base for a fire pit with concrete top. It turned out beautifully. Thanks for the tips!!
Awesome Steven! Glad you enjoyed it!
Do you think this is viable as a desk by making the legs taller?
We don’t see why not! You may have to put some extra elbow grease into making the top perfectly smooth (if that’s what you want). So a lot more sanding. The bench is pretty smooth but not completely as smooth as a single piece of wood would be. 😀 If you do this project please share!
I thought I’d share the cut list I used.
7 – 8 footers
2 @ 40″+40″+12.75″
3 @ 33.5″+16″+16″+16″+12.75″
1 @ 33.5″+33.5″+12.75″+12.75″
1 @ 16″+12.75″
Probably could’ve used 4 – 8 footers and 2 – 10’s but I wanted to make sure I had extra in case I made a mistake.
what is the kb measurement
Hi Thomas!I’m not sure what that means?
Can’t wait to build one
Hi,
Just wondering how this bench has held up in the last 18 months considering you used adhesives only and left out in the weather.
Any chance you coud post an updated photo?
Cheers
Nathanael
Great post. I have been looking for this style forever. Thank God for Ana White, which directed me here. I want to do this style as a sofa table. How can I add a little height and width and get the correct measurements?
This is a great bench! The measurements are incorrect though. The 12 3/4 need to be 12 1/2 and the 33 1/2 need to be 33 to get the overall length and height right.
Height 16″ = 12.5+3.5
Length 40″ = 33 + 3.5 + 3.5
Great project guys!
I built this and like it a lot. That said the resulting bench is 16″ high which is awkwardly low for taller people or older people and is more comfortable at 17.5-18.5″. I actually made a pair of trestle style feet to raise the finished bench and the results are Ok but the basic look of this bench was not improved by this modification, if the function was. Suggestion – measure the height of a comfortable seat that you like and then ratio up the dimensions to preserve the proportions this will require longer material and result in more scrap but the end result is going to be more pleasing to use.
A second thing that I did was use pocket joinery to make each frame. Which allows this to be assembled more quickly. Note that the last frame needs to be made with the pockets on the opposite side so that they’re hidden. While I have a lot of clamps I also used wood screws when gluing the frames together. The resulting bench is very sturdy and a little heavy. It is strong enough that you might select 2X4s of lighter weight.
Great tips Cliff! We’re shorter so that totally make sense. 😀
I love this diy project , and I am going to try this bench and will let you know!
At the same time I would like to some more projects like this so I can try all . I am just a beginner but very much interested in diy projects like this and you have perfect instructions to do so .
Thanks a lot.
Thanks for the idea! We just made this bench for our newly built pond (we made that too). We had to make a few tweaks, but it looks almost identical to the picture. It’s awesome, thanks for the inspiration!
I’ve always thought that simplicity and minimalism are so elegant and modern, just like your bench. It seems easy to do, I think will try to make my own because I’m trying to some DIY projects for in my backyard. 🙂
Helpful tips Cliff… Can’t wait to build one… Thanks
This really is a nice project and I love your finishes. That nutmeg color is gorgeous!
I’m going to use this approach to make a suite of outdoor furniture – a side table, a bench and a bar (for my outdoor kitchen). Thanks for sharing it with us.
That sounds awesome Darren! We’d love to see pictures when you’re done. Thank you for your kind words!
The items made by nature are very wonderful. They look so beautiful.
I really like handmade things rather than machines. They look great!
Great stepping off point for a bench I wanted to make! As we didn’t have a table saw and we’re looking for a slightly different look I used 1×4 “common boards” from Home Depot which are already squared, thus removing the milling step- we changed our bench dimensions to make slightly taller and wider as well. Great diy instructions to follow or make your own modifications from! Thanks!
Great information thanks for sharing information.
What a great looking bench. I was just wondering if you or anyone else ever thought of how to integrate a back to the bench? It would be exactly what I’m looking to build for a little patio. Thanks and great work!
Love the rustic vibe
Table saws are dangerous but your first picture of shaving a thin piece off makes me shudder! Set the saw to 3-1/4″ first and then trim the round edge 🙂
Thanks for sharing!
Nice! Thanks for sharing this. Since this is soft wood, there’s also the option of treating it with wood conditioner before staining, to make the stain absorb more evenly. Wood conditioner is usually available wherever you buy finishes.
It’s a beautiful project!!can you make one for us? As you have the necessary tools?
This is a great bench. Gonna make one with my son for his first experience working with a larger project. Can’t wait to start. Could you tell me roughly how many 2X4’s you purchased. Thanks again for the project and plans. Keep um coming.
IKE.
Mine isn’t as neat as yours but it still turned out great! Thanks for the tutorial. I made mine about 7’ long.
How many 2 x 4s do you need to buy for this project?
I was looking at Home Depot and Lowes for 2 x 4’s to make this but the stuff they have is hot garbage compared to what you used. Looks great! I’ll be checking a real lumber yard soon.
Nice project. Sure would be a time saver if you’d show how to cut the pieces from a minimum number of 8′ 2x4s.
That is nice, but to be fair, the Williams Sanoma table is solid FSC teak — over ten times the cost of pine. To make the teak version you’re looking at at least $400 in lumber cost, before shipping charges.
But again, it is a very nice bench. You should try your hand at some router fluting for the top!
Awesome plan. It worked out as shown in your steps. I had this behr stain and sealer applied after sanding with which the surface has become little rough. I had 2 coatings done. What should I do to make it a soft finish. Do I need to sand it again and stain. I think that would make stain color more darker going to 3rd coat.
Update – After staining and drying the bench for more than 4 days straight finally moved it to my backyard exposing to sun. After 4 days the joints with the cross grain started to crack exposing the inner wood. Its 80-90 degrees in my area. Not sure what should i do to fix this. Does this mean this bench design should be in shade?
Hello! Thank you so much for this creative DIY. This bench is amazing and very stylish.I have already planned to make such a bench for my garden this weekend. I’ll take my son and do this craft.
Horrible explanation and pics.
Doesn’t add up right, way off. What a waste of time and materials…
I feel pretty confident in the explanation and pics given that I’ve received (since originally posted) hundreds of pictures of finished benches. Sounds like user error to me! But you’re welcome to ask questions instead of just assuming it’s someone else’s fault besides your own.
This is amazing! I’m adding this to my DIY list, but I’m going to adjust it slightly to be a coffee table instead. I can’t seem to find it in your post, but how many 2×4’s did you buy?
Instructions do not specify, but only rip 1/8” off each side of the 2×4 when squaring. If you rip a standard 1/4”, you will find quarter inch gaps in all your joints.
It seems like it might be a good idea to countersink and screw the boards together as you go(as well as glue). This will help with strength and provide clamping for the interior boards. The exterior could be doweled or just glued. Thoughts?
Hi Ric! I think that would work well. We challenged ourselves to do it without screws but I say make it your own!
Thanks for the reply. I’m about to make a couple of these. I think I’ll try the screw and glue technique and may also make a table saw jointer jig to get the boards as flush as possible. Really like the looks of these and should go well with table and chairs I just finished!
Thank you , I want to build something for my daughters salon to set outside in front under an awning. We put chairs at first but had to bring in at night scared someone would steal them. This is something that would last, but if stolen I would not worry to much about making another one.
How many and what length should I buy the 2×4’s to minimize waste?
I just calculated the lumber cost and it is about $100 with tax included. + the treatment and the feet if you don’t want it to sit on the ground. + the tools if you don’t have them.
Definitely not a $35 bench!
This post was originally written seven years ago. With the changing costs of lumber and inflation I’m not going to recalculate it for a minute. And I don’t count tools in project costs. I have no idea what tools people have, and a lot of the projects allow for wood to be cut at Home Depot, or people can borrow tools, and they don’t rebuy for every project (not to mention used vs. new tools, etc). A project costs what it costs and the tools will always be separate.
Admire it most the way it is constructed. i would like to see and get ideas on how it is made.
perfectly made and love it most
I LOVE that bench. I’m gonna get my husband to try it! We redid our yard this summer and it was a huge project! Bigger than we expected (to the point of needing a dumpster rental) and we’re finally at the point of decorating it. I've started putting in plants and vegetation, but this bench I think would look great on our little patio! Thank you for the tutorial!
So beautiful. Do you have any estimate of how much weight/ how many people it’s designed to hold?
Hi Hannah! Hmmm that’s a great question. I know that it’s at least 2 people and 300 lbs because we’ve done that before. It’s pretty sturdy!
This tutorial is excellent and I wouldn’t take anything away from the concept. However, I’ll attempt this project with one small change to simplify it a bit more. Instead of cutting two different lengths for the top, I’ll just cut 9 pieces all the same length and alternate which end sits on a leg. So instead of a 40″ long piece with both ends on a leg and then a 33.5″ long piece between legs, each top board would sit on a short leg at one end and butt up against a long leg at the other end. The next layer would be reversed. The end result is only very slightly different in appearance.
How many two by fours did you actually buy to build this?
Hello! How many 2 x 4s do I need to build this? Thanks 🙂
love it
$35, hardly. I realize this is an old article but even still. The lumber,glue and water seal might total $35 but once you add the cost of a table saw (which most homeowners don’t have nowadays),belt sander and bar clamps the cost goes way up in the hundreds. The table saw is the key to making this bench BTW, otherwise it will look as if it was a kids project.
Yes, the price is based on old information. I’m not going to add the price of table saws, belt sanders, and bar clamps into every project. That doesn’t make sense because it’s not the true cost of the project itself, and a person could buy a table saw for $100 or a $500 one. I could say this is a $2,000 project if you buy the most expensive tools out there. And plenty of homeowners have saws. I live in an average American neighborhood and lots of my neighbors have them.
love the bench but, does anyone know how many total 2×4’s and length please? I tried figure by dementions and now have a headache