Wood Burning for Beginners: Tips, Techniques, and a Project
Get beginner wood burning tips and learn how to use a wood burning tool safely and confidently. Perfect for first-timers with no experience!
Ready to try wood burning? Before you picture yourself accidentally branding the dining room table, let me reassure you: this craft is much easier than it looks.
Wood burning lets you create permanent designs using a heated tool instead of paint or ink. It takes a little patience, but you do not need drawing skills, expensive equipment, or years of experience.
You can trace a pattern, move slowly, and end up with something that looks impressively handmade – in a good way.
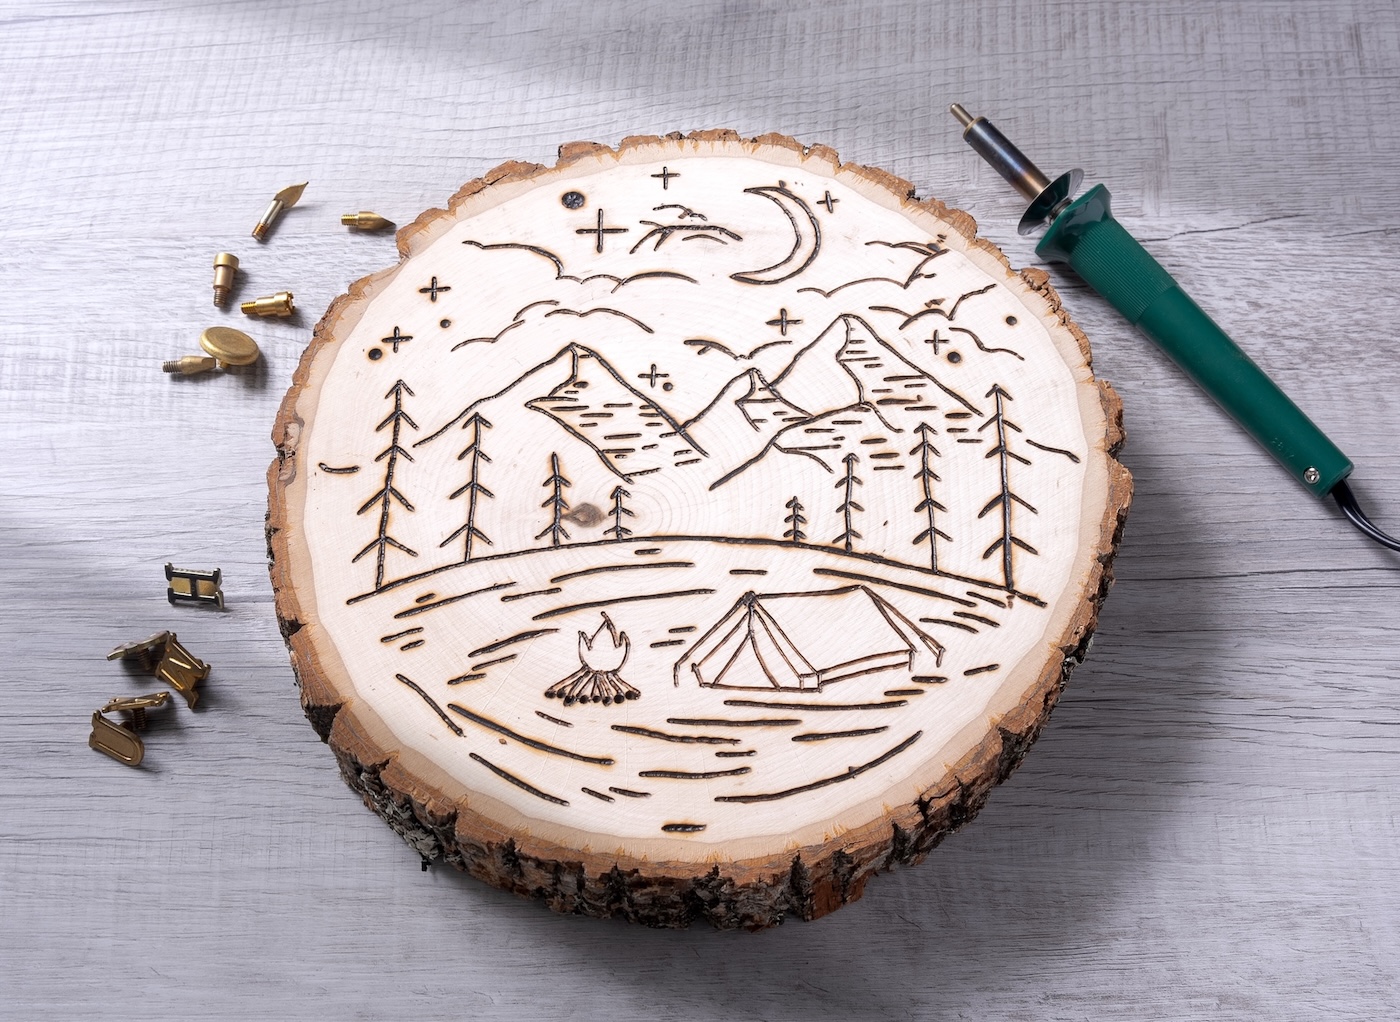
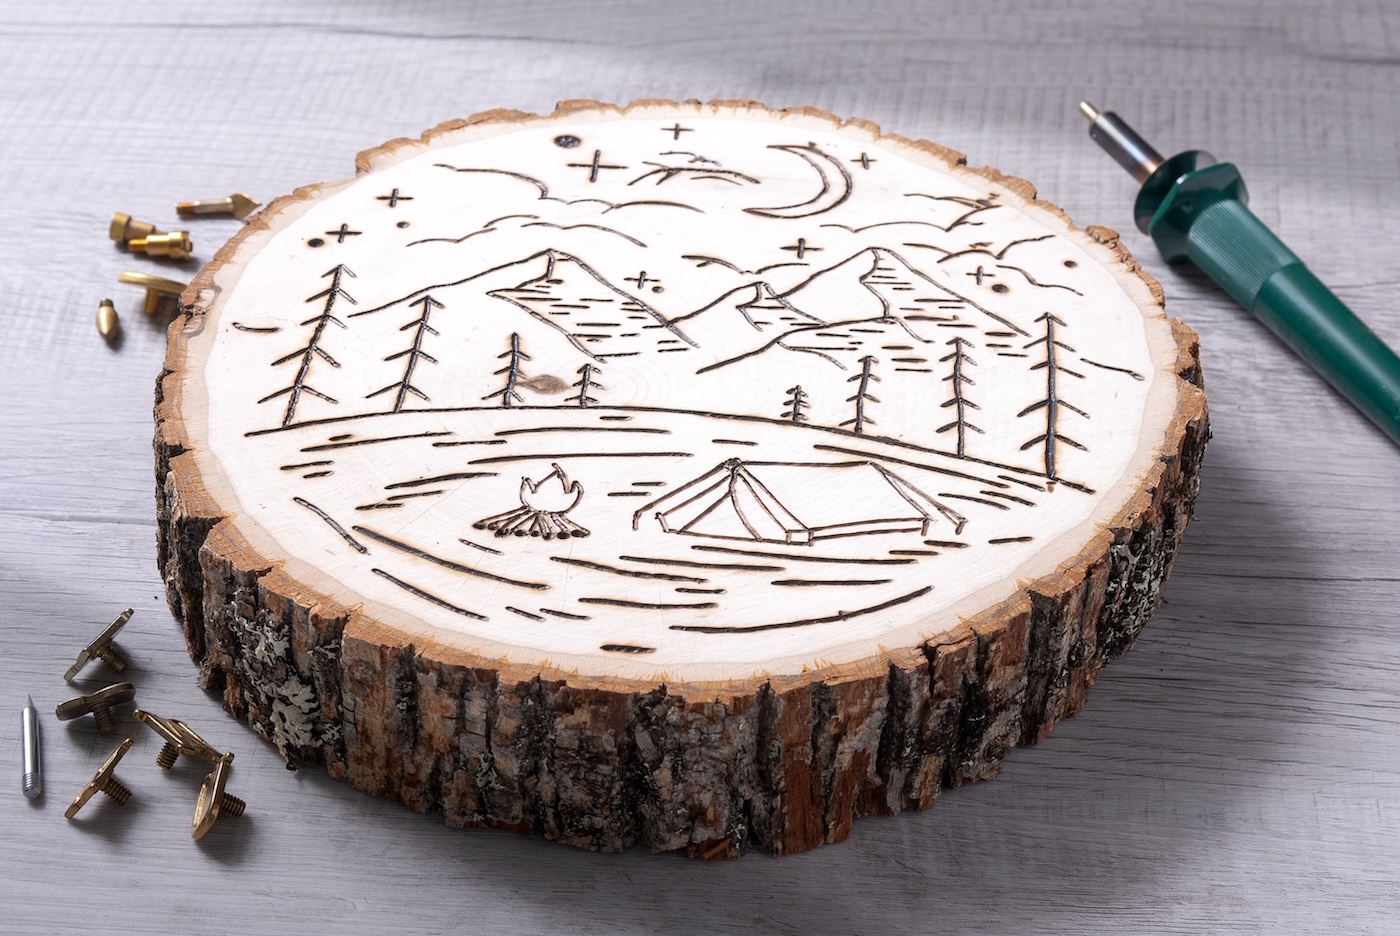
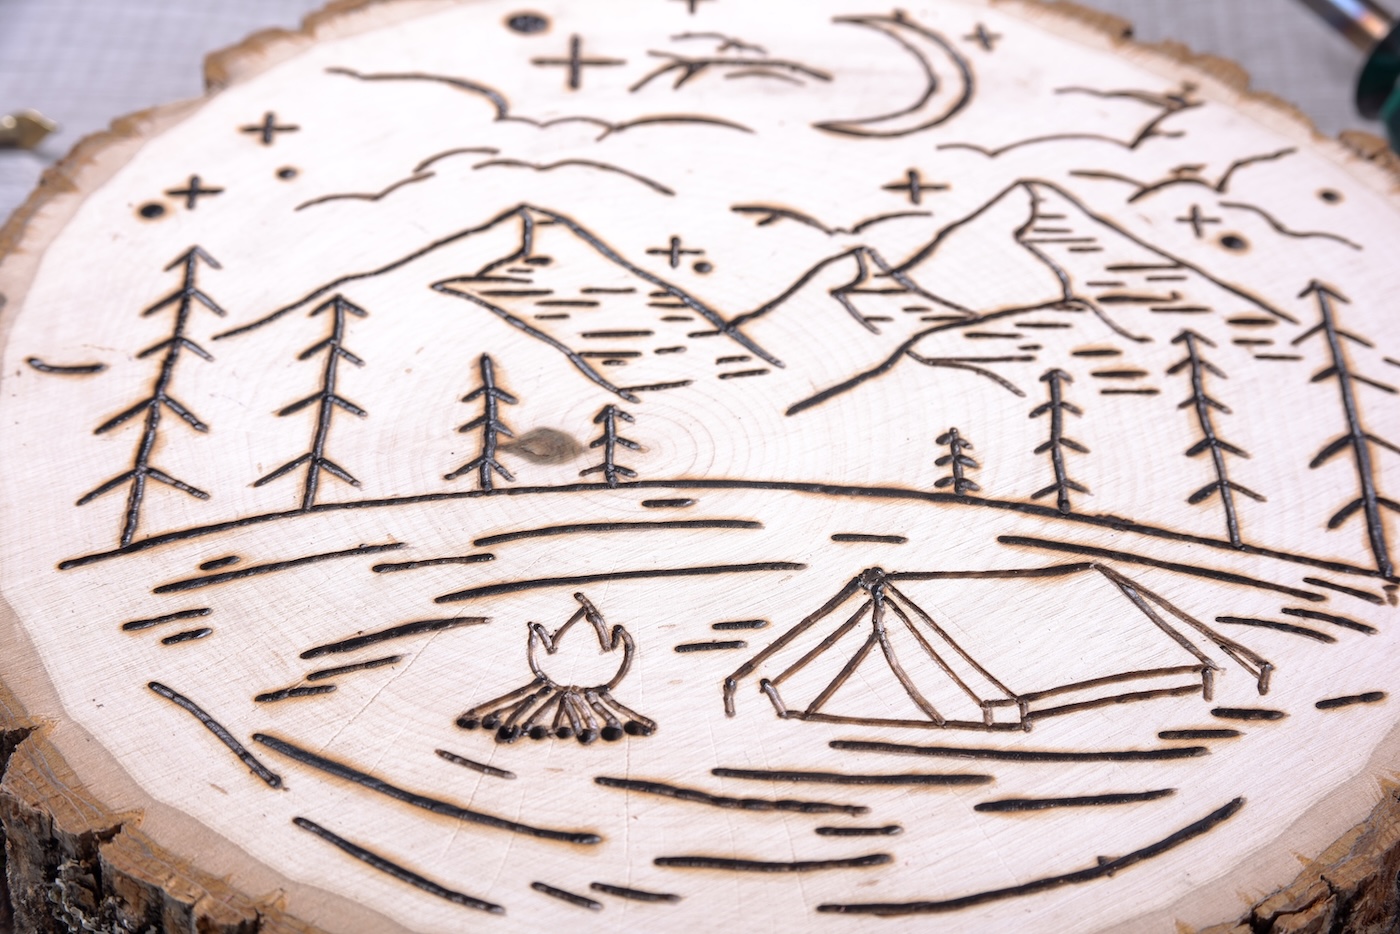
In this guide, I’m sharing the basics beginners need to know, including tools, safety, the best wood to use, and common mistakes. Then you can put everything into practice by making the outdoor scene shown here.
I even have a free pattern, so your first project does not have to begin with staring nervously at a blank piece of wood.
What Is Pyrography?
Pyrography is the official name for decorating wood or other materials with controlled heat. The word essentially means “writing with fire,” which sounds wildly dramatic for a craft you can do at your kitchen table.
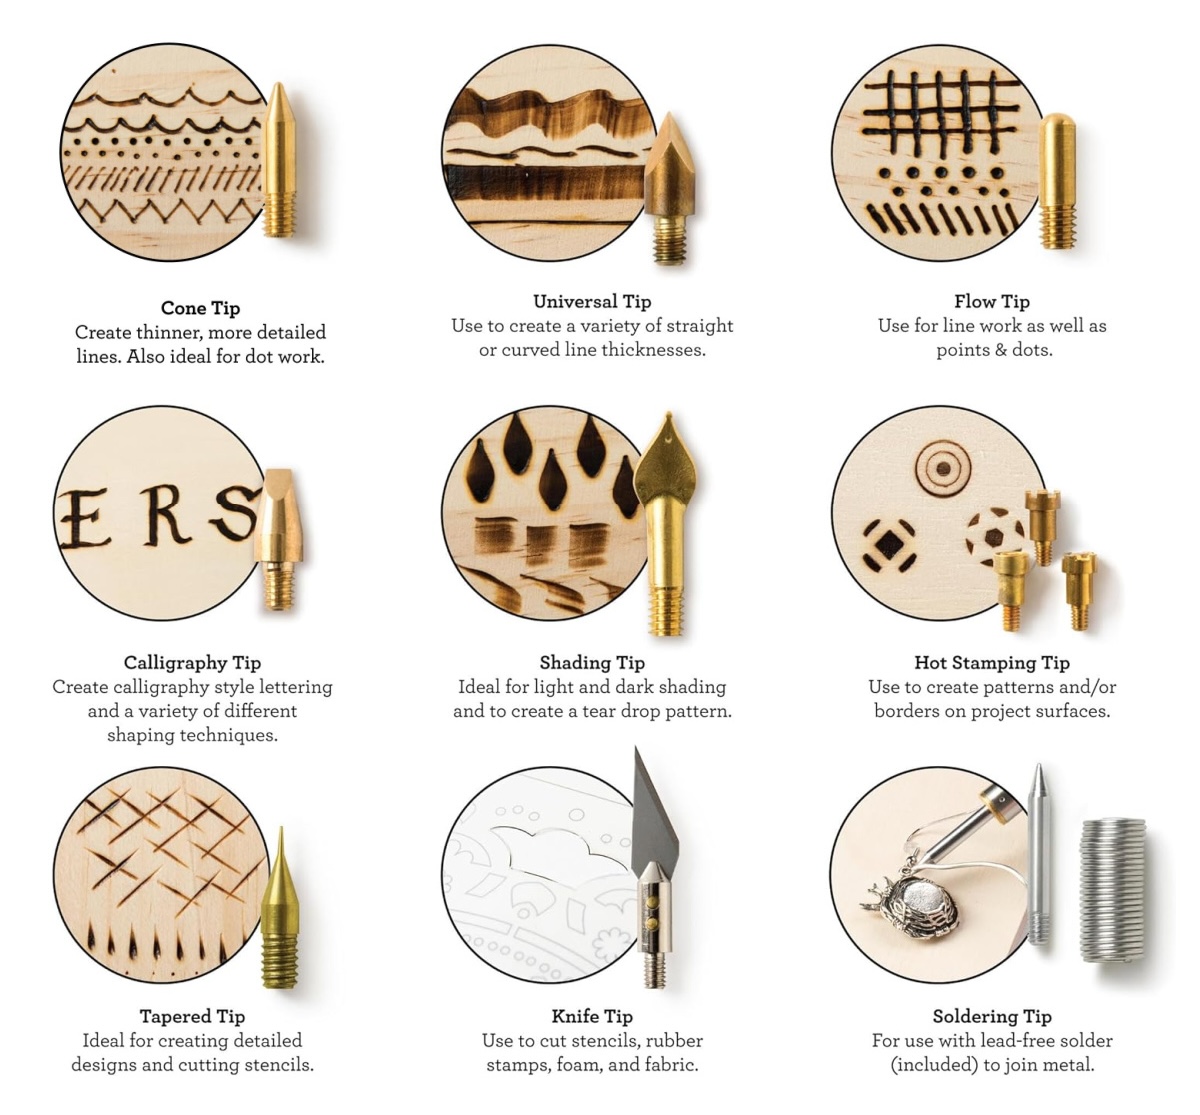
A heated pen creates marks by scorching the wood. Changing the tip, heat level, speed, and pressure allows you to make lines, dots, textures, and shaded areas.
Although advanced pyrography can be incredibly detailed, you can start with simple outlines. That is exactly what we are doing here.
Wood Burning Tools and Supplies
You do not need an elaborate setup for your first project. Gather:
- Wood burning tool with adjustable heat
- Basswood round or unfinished wood plaque
- Graphite transfer paper
- Printed pattern
- Pencil
- Tape and scissors
- Fine-grit sandpaper
- Heat-resistant work surface
- Tool stand
Make sure your wood is completely unfinished. Do not burn over paint, stain, sealer, glue, or mystery coatings.
Solid-Point Burner vs. Wire Nib Burner
There are two main tool styles.
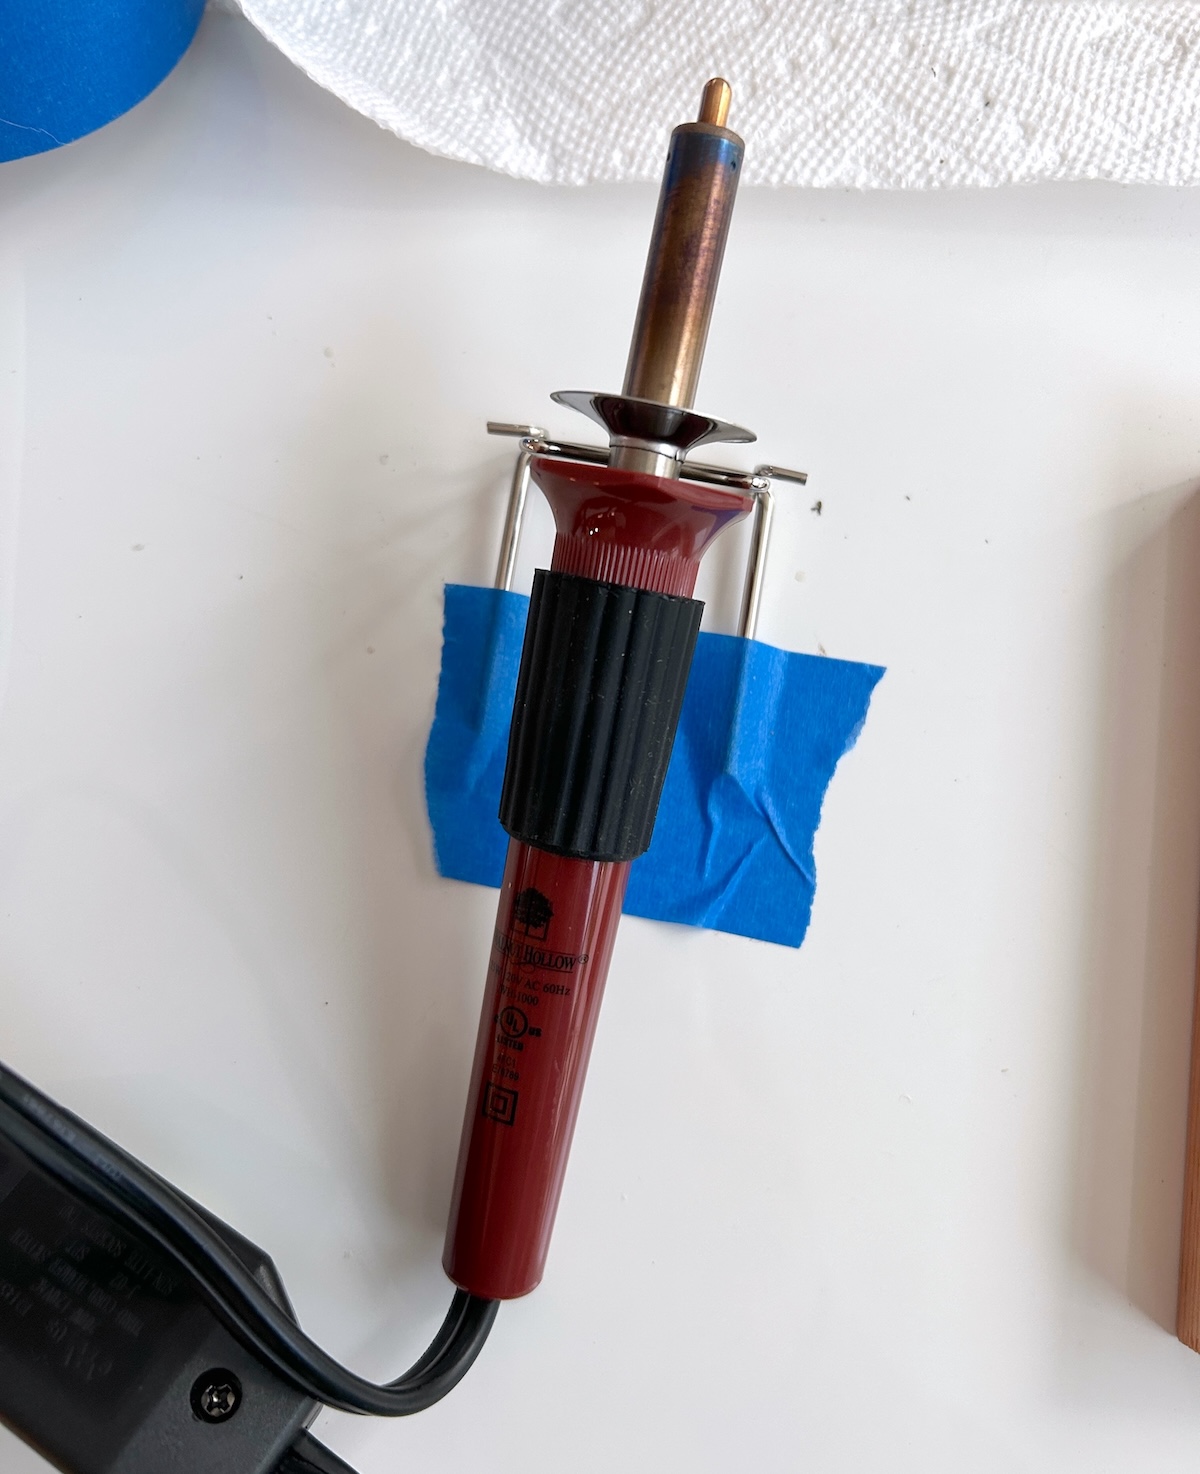
A solid-point burner looks a little like a soldering iron and uses interchangeable brass tips. It is affordable, durable, and perfectly suitable for beginner projects. The tips take longer to heat and cool, but the tool is easy to find at craft stores.
A wire nib burner uses thin wire tips and usually provides faster heating, better temperature control, and more precision. It is popular with serious pyrography artists, especially for fine details and shading.
For this project, a basic solid-point burner is all you need. You do not need professional equipment to wood burn a cute mountain scene.
What Is the Best Wood for Wood Burning?
The best surface is pale, smooth, unfinished, and fairly soft. A light surface gives your burned lines strong contrast, while an even grain helps the tool move predictably.
Good choices include:
- Basswood: Smooth, pale, and very beginner-friendly
- Birch: Fine-grained and excellent for crisp details
- Poplar: Affordable and relatively easy to burn
- Maple: Harder, but still workable
- Pine: Widely available, although sap and changing grain can cause uneven lines
Basswood is my first choice for beginners. Craft-store rounds are convenient, inexpensive, and ready for all sorts of projects.
Avoid pressure-treated lumber, MDF, plywood, painted wood, and stained surfaces. These may contain glue, preservatives, or other chemicals that can produce toxic fumes when heated.
Wood Burning Safety
Work in a well-ventilated area and position a fan so it moves any smoke (it’s just a little typically) away from your face. Even untreated wood can create smoke that irritates your eyes and lungs. This is true for more sensitive folks typically.
Keep the burner in its stand whenever you are not using it. Protect the table, secure loose cords, and keep children, pets, paper scraps, and flammable supplies away from the tool.
I also recommend taping the burner base to the table. Otherwise, catching the cord can zing the entire thing off your workspace. Ask me how I know.
Always turn the tool off, unplug it, and let it cool completely before changing tips.
My Best Tips for Beginners
Practice on scrap wood first. Make straight lines, curves, dots, and circles so you can see how the wood reacts.
Sand the surface until it feels smooth. A rough grain catches the tip and produces skips, blobs, and uneven marks.
Let the tool heat fully before beginning. Start around medium heat and increase it only when necessary.
Move slowly and allow the heat to do the work. Pressing harder will not create a better line; it can dig into the wood or damage the tip.
Pull the tool toward yourself when possible instead of pushing it away. The motion feels more like drawing and usually creates smoother lines.
Start light. You can always go over a pale mark again, but removing a dark scorch is much harder.
Common Mistakes to Avoid
Skipping the practice piece. Every wood species burns differently, so test your heat and speed first.
Pressing too hard. The burner is not a pencil. Use a light hand and let the hot tip glide.
Ignoring the grain. You may need to slow down when crossing harder sections of wood.
Trying to rush. Moving too quickly creates faint, broken lines. Pyrography rewards patience.
Burning coated wood. Paint, stain, sealers, and adhesives may release chemicals and toxic fumes.
Holding the tool in one place. Pausing can leave a dark dot or divot. Keep the tip moving.
Now that we have covered the important stuff, let’s make something!

Beginner Wood Burning Project
Equipment
- Wood burning tool with tips
- Pencil(s)
Materials
Instructions
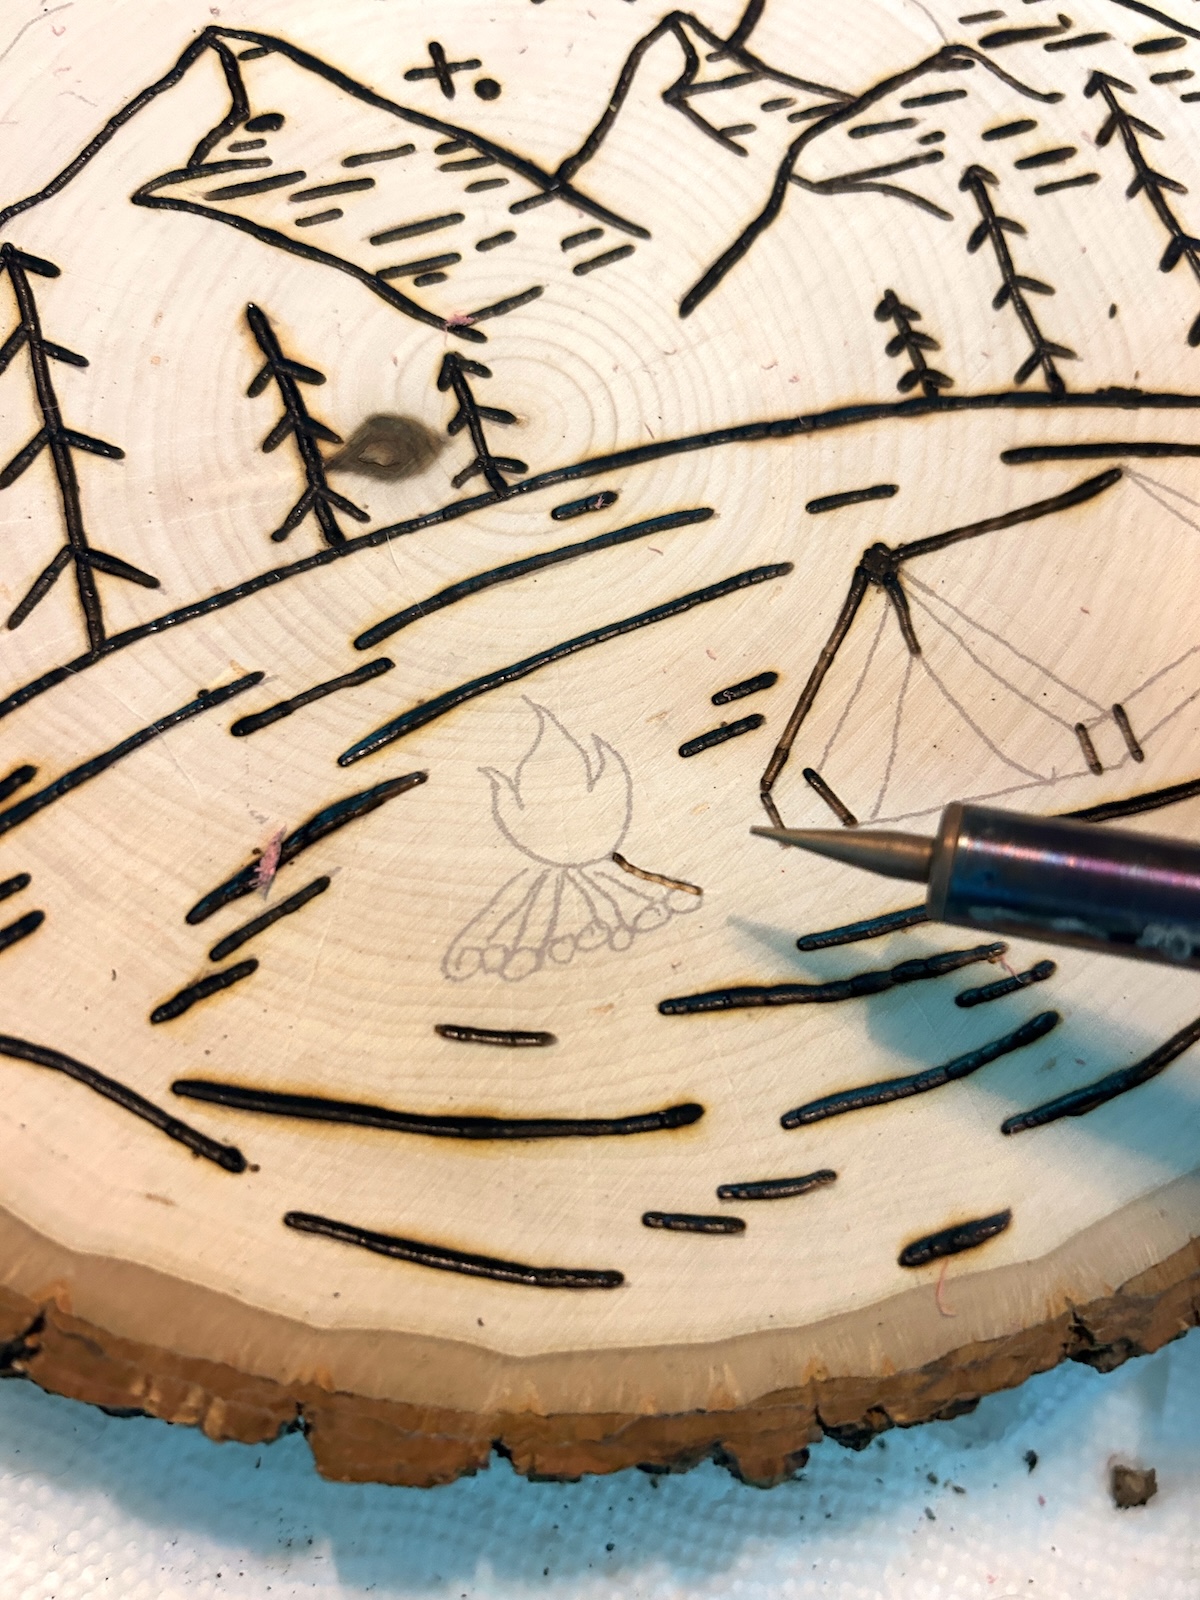
- Download and print my free outdoor scene pattern (or the artwork of your choice). For my size round wood, I had to print the pattern on two sheets and tape together.
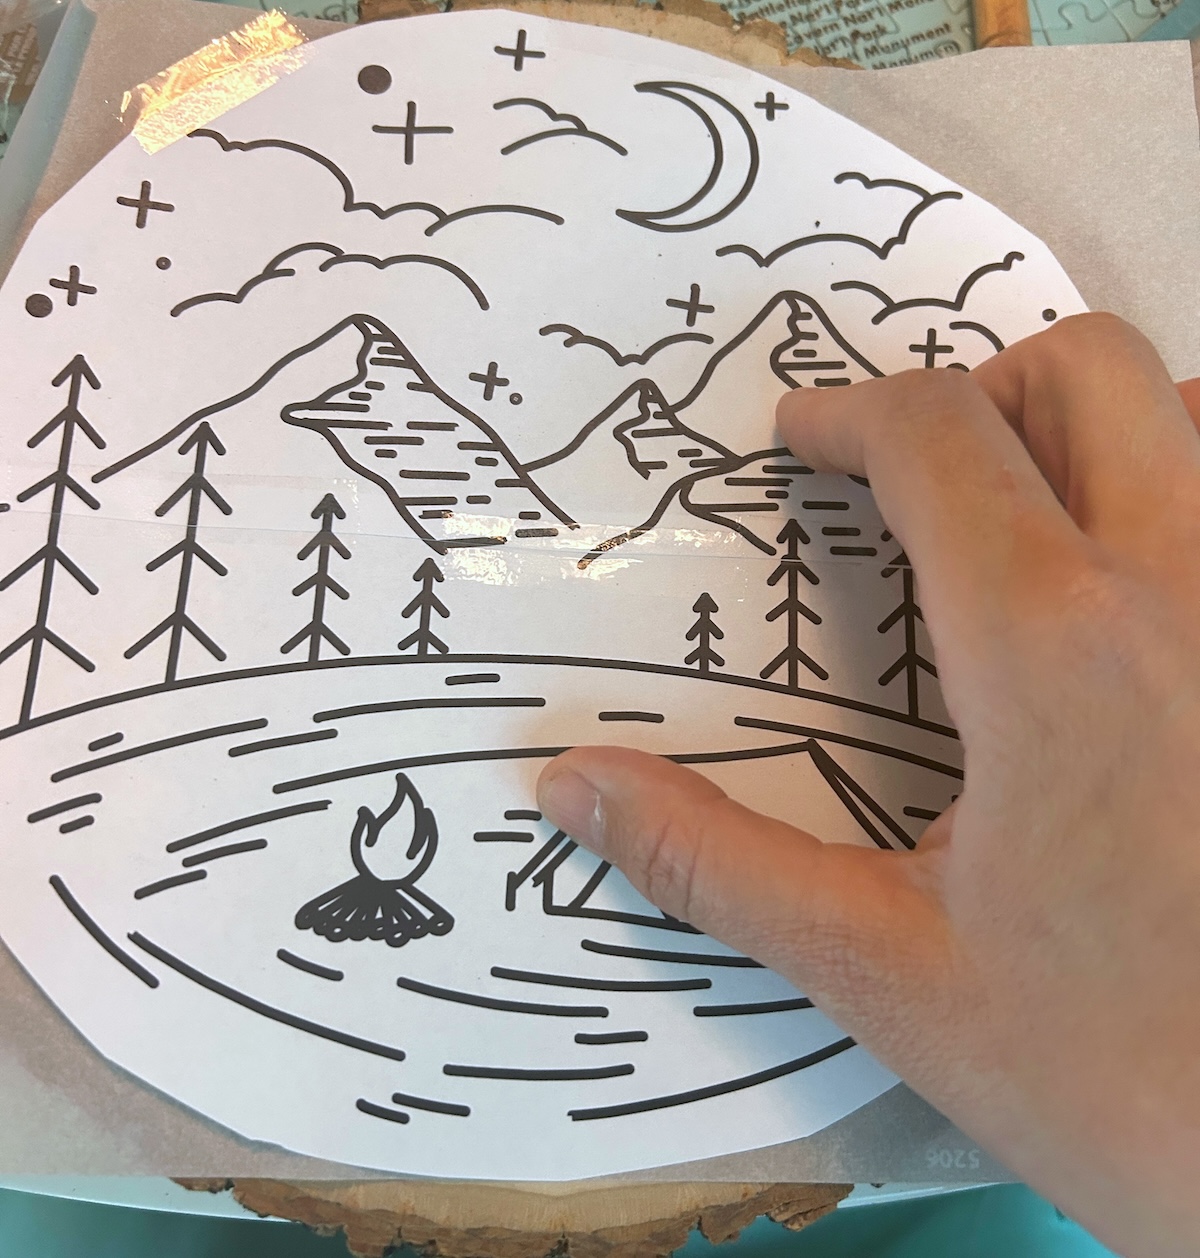
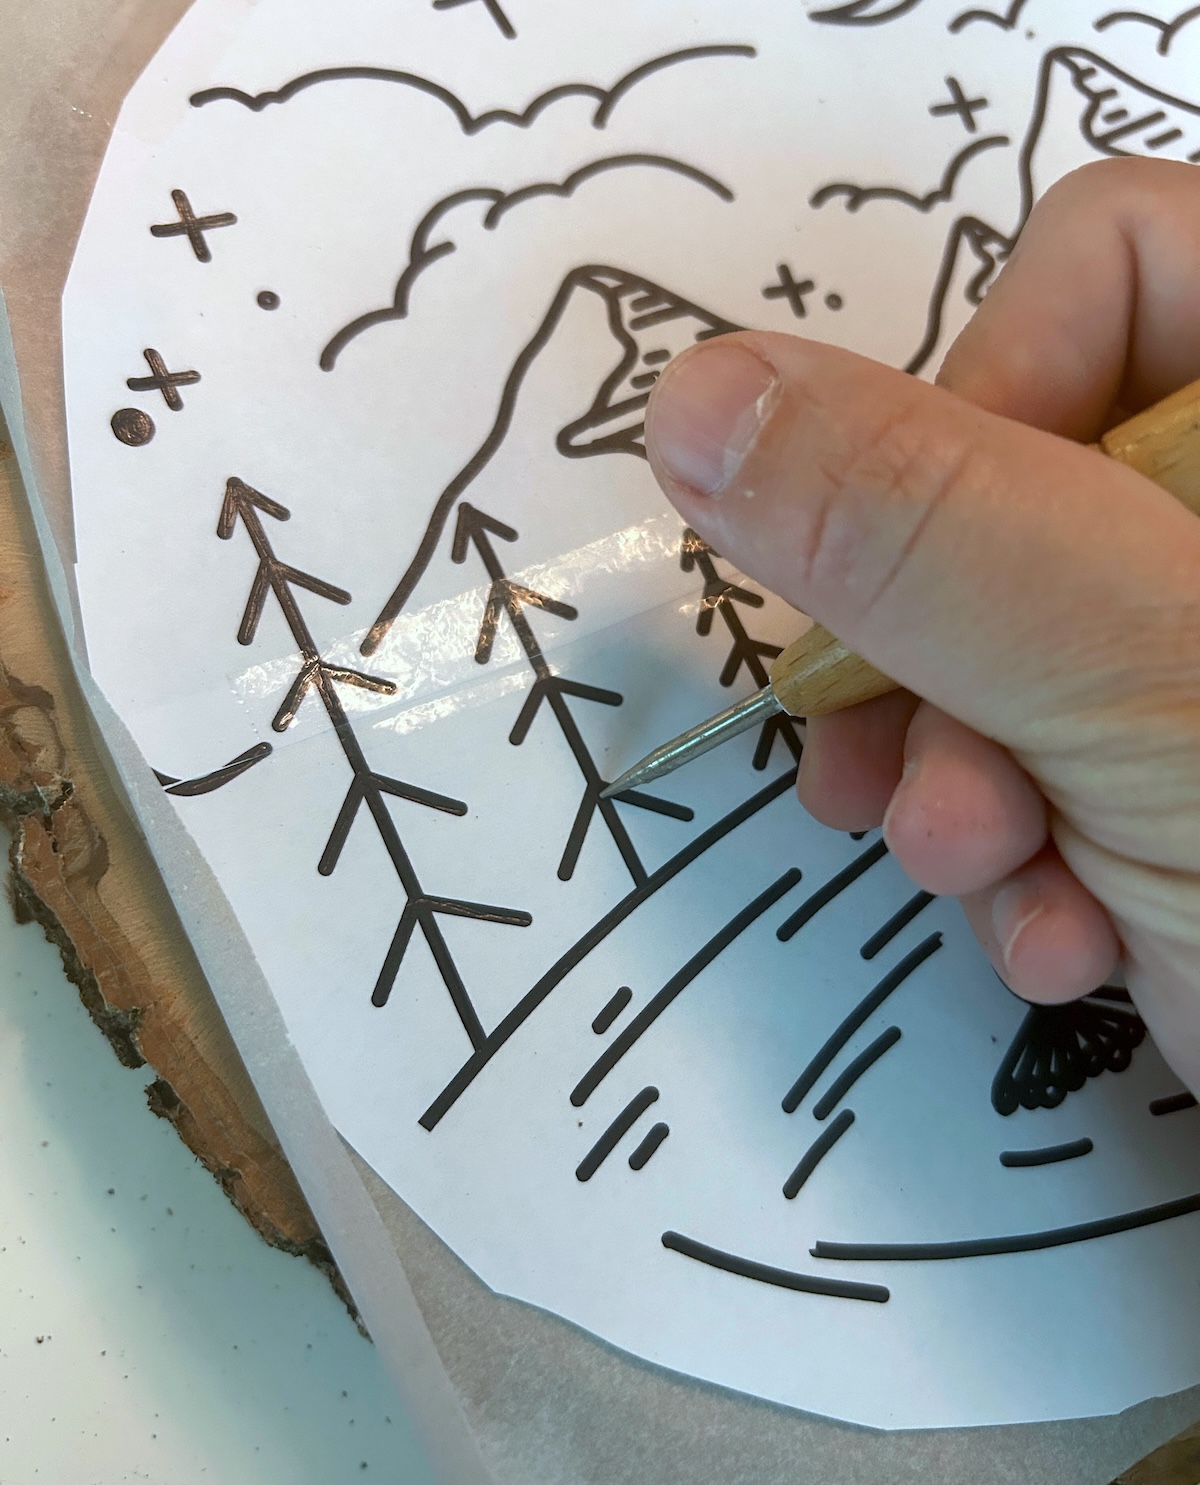
- Place transfer paper on your basswood round, then your printed design on top. Tape in place. Use a pencil or tool to trace over the lines.
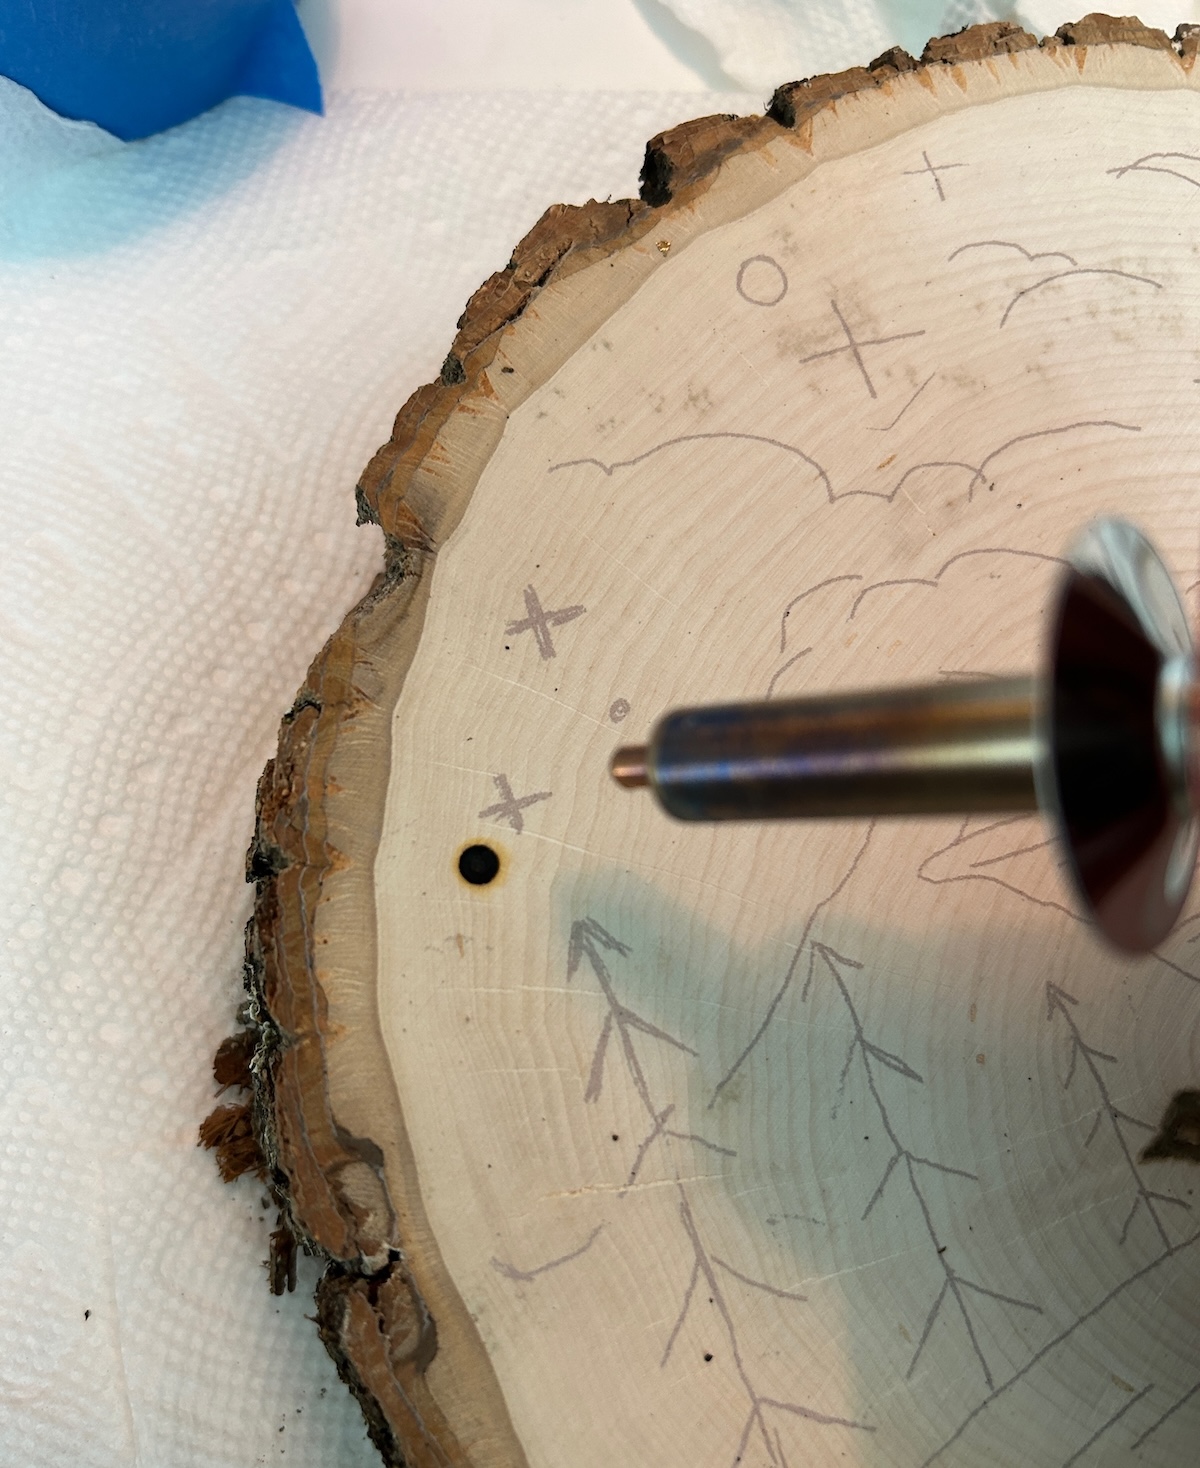
- Plug in your wood burning tool and let it heat up fully. I started with the largest tip I needed, which was the flow tip for the circles. Start with medium-high heat. You can always turn it up if you need to.
- Carefully trace over the transferred lines with your tool. Go slowly and evenly. Don't press too hard, as the wood will start burning away underneath the tip naturally.
- To change tips, you'll need to turn the tool off completely and let it cool. Then unplug to switch tips. Never touch the tips while the tool is plugged in.To do the medium details, I used the cone tip.

- Once the main lines are burned, add the detail lines. To do this, I switched to the tapered tip for the smallest areas.When you're done, let the wood cool before handling or hanging.
Notes
Your first project does not need to look machine-made. Slight variations give wood burning its charm, and every line helps you understand the tool a little better.
Once you get comfortable with outlines, you can try lettering, shading, ornaments, spoons, signs, and more. For now, download the pattern, grab a wood round, and give this outdoor scene a try. I think you are going to be pleasantly surprised by what you can make.
Ready to start burning? Download the pattern and let’s do this! And don’t forget to leave me a comment if you give it a try. I’d love to see your projects! Also check out these other ideas:
Make Cork Trivets • Glue Gun Crafts • House Number Plaque • Twig Candle Holder • Wood Slat Doormat • Wood Slice Coasters • Wood Slice Ornaments • Wood Wall Art

Is ventilation important?
I didn’t find it to be an issue at all in my home but if you are sensitive, you may want to keep the windows open and wear a mask. There is a teeny tiny bit of smoke.
Hi!!! I’m about to start woodburning and was wondering, is there a mat or something I can put underneath my tool to keep from accidentally damaging my work space?
Hi Sanya! Most of the tools comes with stands. They are a little janky but still work. You can also use a ceramic plate from the dollar store to put the stand on. You don’t want to leave the tool unattended at any point but it will protect your work surface 🙂
@Sanya, I use an ironing mat, the kind that’s meant to be put on something other than an ironing board. You could also use a trivet.
@Sanya, there are also soldering iron mats that are heat resistant, as that is basically the tool we are using
I broke the head of my tip off inside my pen. How do I get the piece out of my pen?
That’s a good question – I’m not sure. I’d try to unscrew the top somehow or go down in there with a needle. If it doesn’t work, you might have to buy a new one – I couldn’t find anything online :/
@Kaci, Try a self tapping screw & a pair of pliers
Hi there. Do you do any preparation to the wood itself? My husband cut down a tree, a Maple and we’re going to attempt some projects on them but as far as killing whatever might be living in there or anything, little eggs, etc, do you soak it in anything or clean it and anyway? thank you for your help
Liz Fleming ☺
Hi Liz! Not that I know of. Besides letting it dry inside for a while? Maybe a week? Just because I’m not sure what moisture in wood would do to the final “drawing.”
Liz, you should sand down the wood at minimum. I usually go with a rated sand paper between 400-600
@Liz Fleming, when making a Christmas tree star last year from small branches, the directions said to run through dishwasher with no detergent. It will take a few days to dry thoroughly but I felt nothing organic remained!
I love wood burning…..I did make a spacing mistake with my word spacing. Any ideas how to fix it so I can not mess it up.
Thanks.
Hi Linda! I’m not quite sure how to fix – have you already burned it? If so, I’d add a cute flower in or something! I’m not sure how else to fix 😀