Easter Mesh Wreath in Three Simple Steps!
Learn how to make an Easter mesh wreath for beginners. This spring decor is done in three steps, and you can customize the colors!
Skills Required: None. You’ll be cutting mesh, rolling it, and attaching it to a wire form with pipe cleaners. It’s easy to put this deco mesh wreath together because you’ll add the colors randomly.
I warned everyone a loonnngggg time ago that it was going to be the year of the mesh wreath. And what ended up being one year has suddenly become two.
Oopsie.
But also not really! The thing is, I did one for Halloween (actually multiple), Christmas (also multiple), Valentine’s Day, and St. Patrick’s Day.
I just couldn’t ignore Easter! I have to keep a good thing going, especially when my front door expects it now.
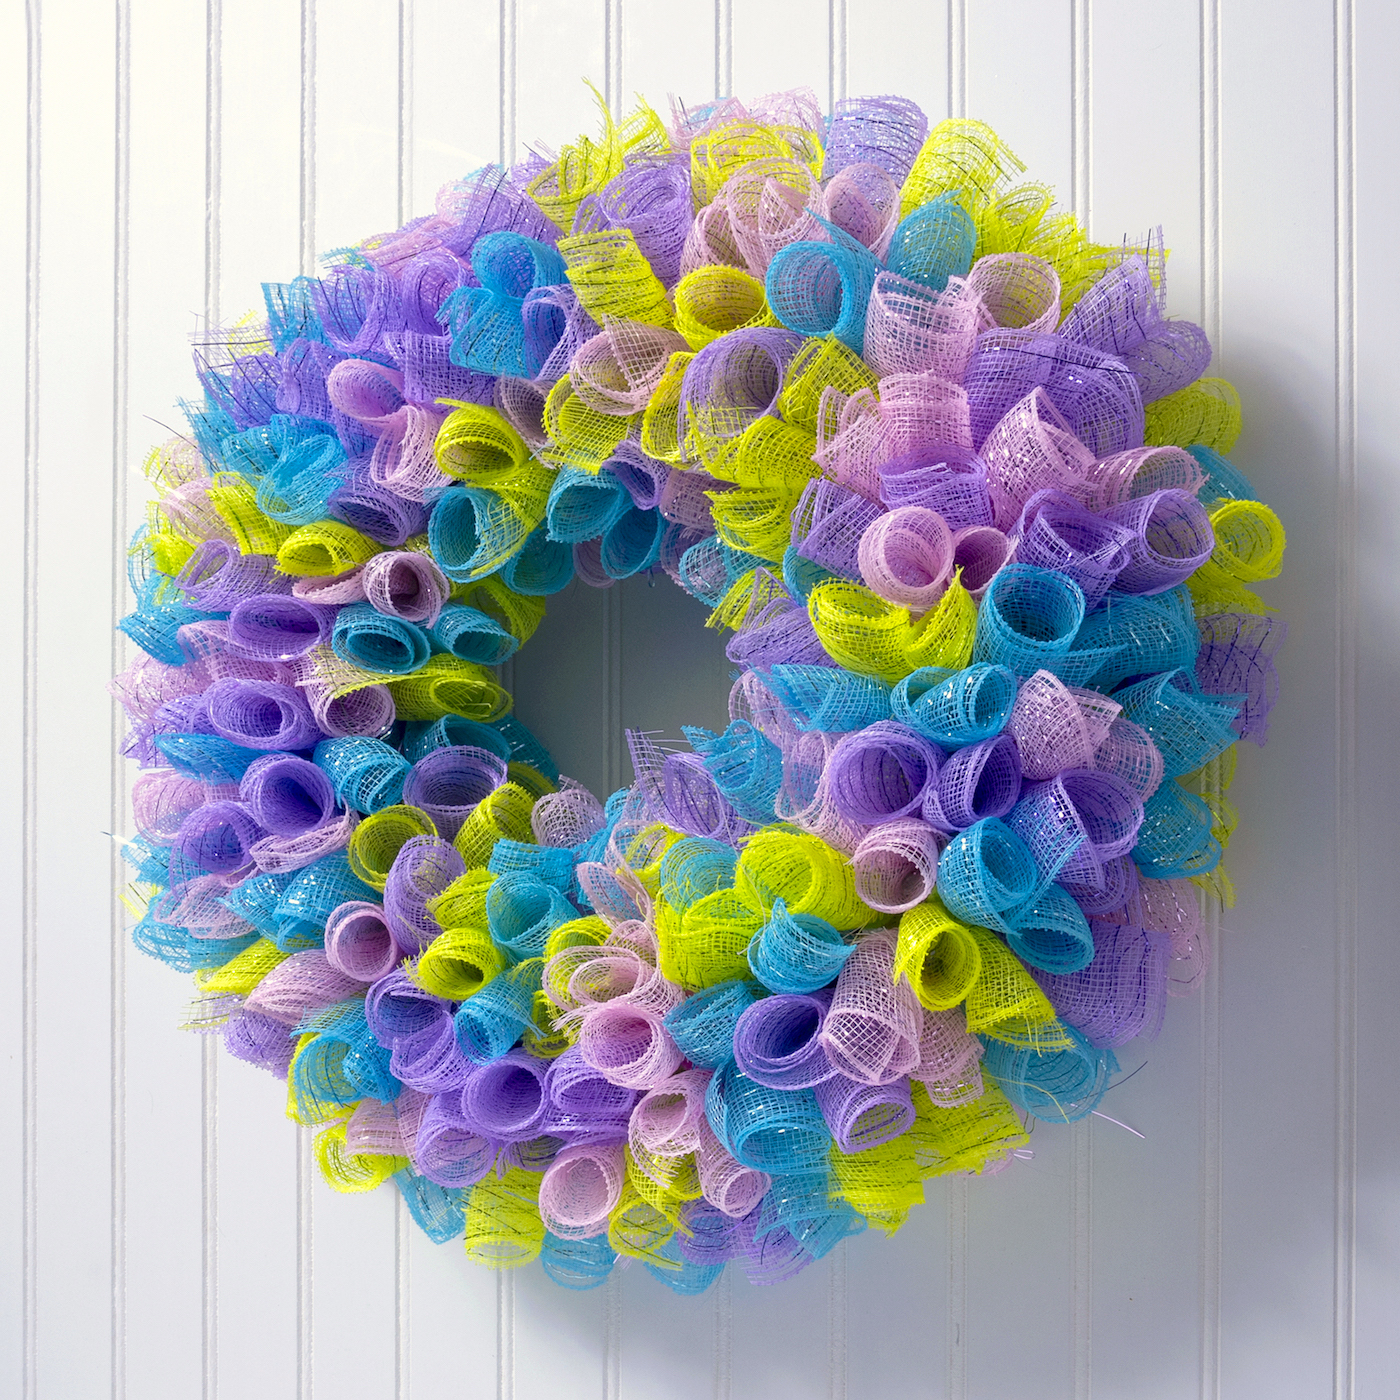
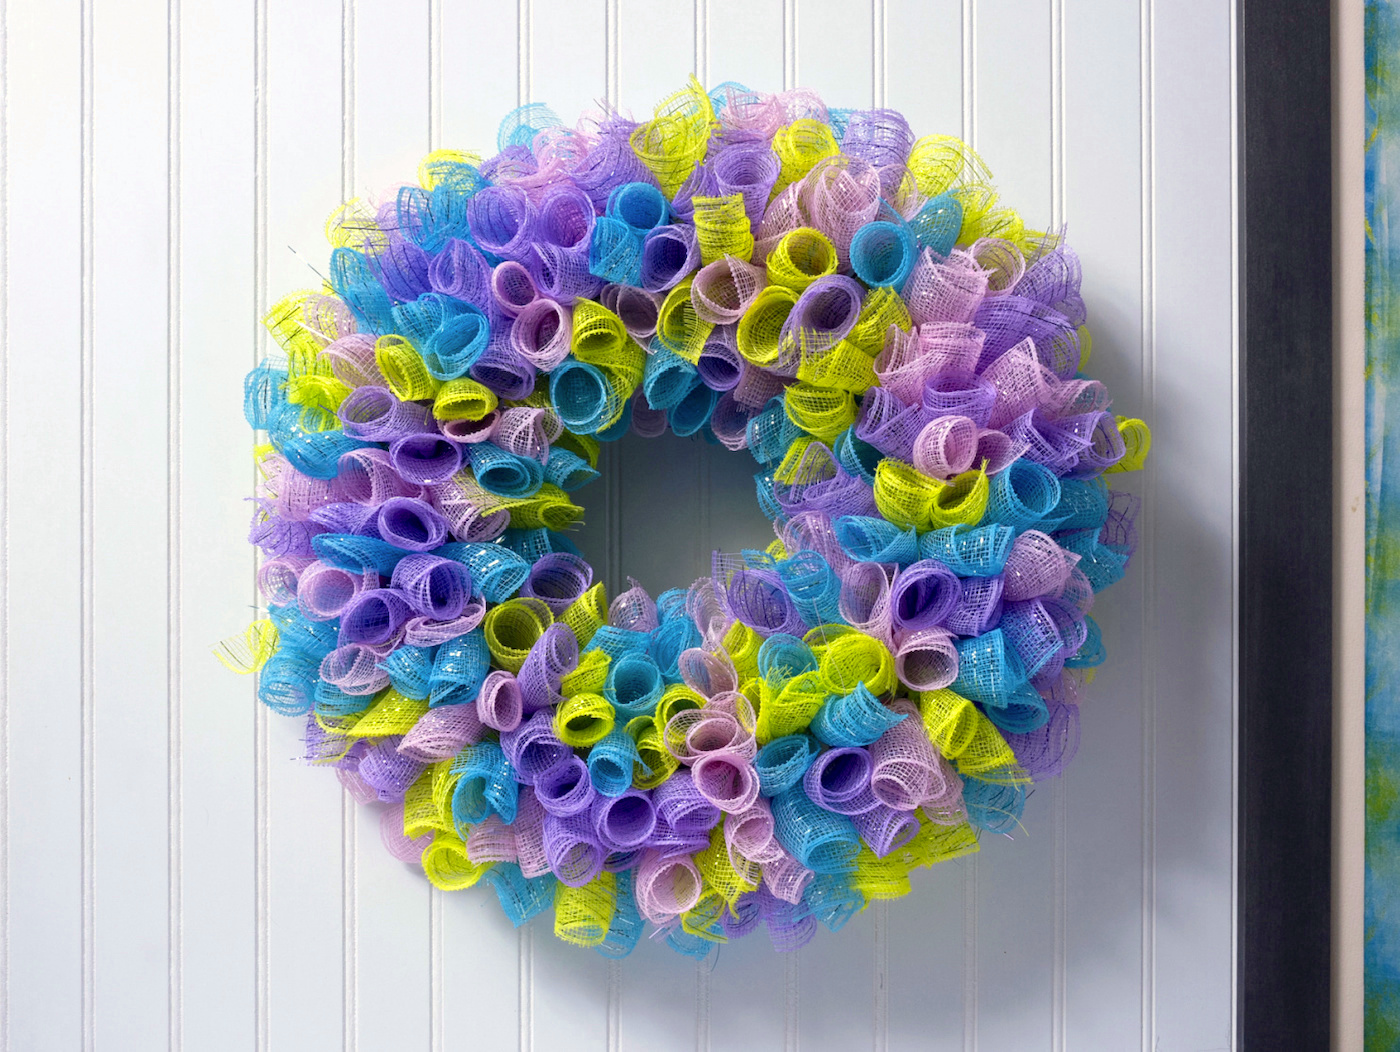
So I made an Easter mesh wreath, and I’m excited to show you how to do it too. If you’re ready for bright, spring colors to grace your Easter decor, this is the project for you.
I’ll show you have to make a basic one, and then you can embellish it any way you like. If you haven’t worked much with mesh, it’s okay, because this is easy enough for anyone (probably even kids).
Tips for Making a Wreath with Mesh
The thing about mesh wreaths is that they are easy, but they do take a bit of time to assemble. Magic doesn’t just happen, people! It takes a minute.
So sit down with a great movie or podcast, a glass of wine, and prepare to get crafty. You’re going to make this project in three easy steps.
You’re going to cut the mesh, then cut the pipe cleaners. Then you’re going to attach the mesh to the wire form. That’s it! The bow is optional but I really think it adds something.
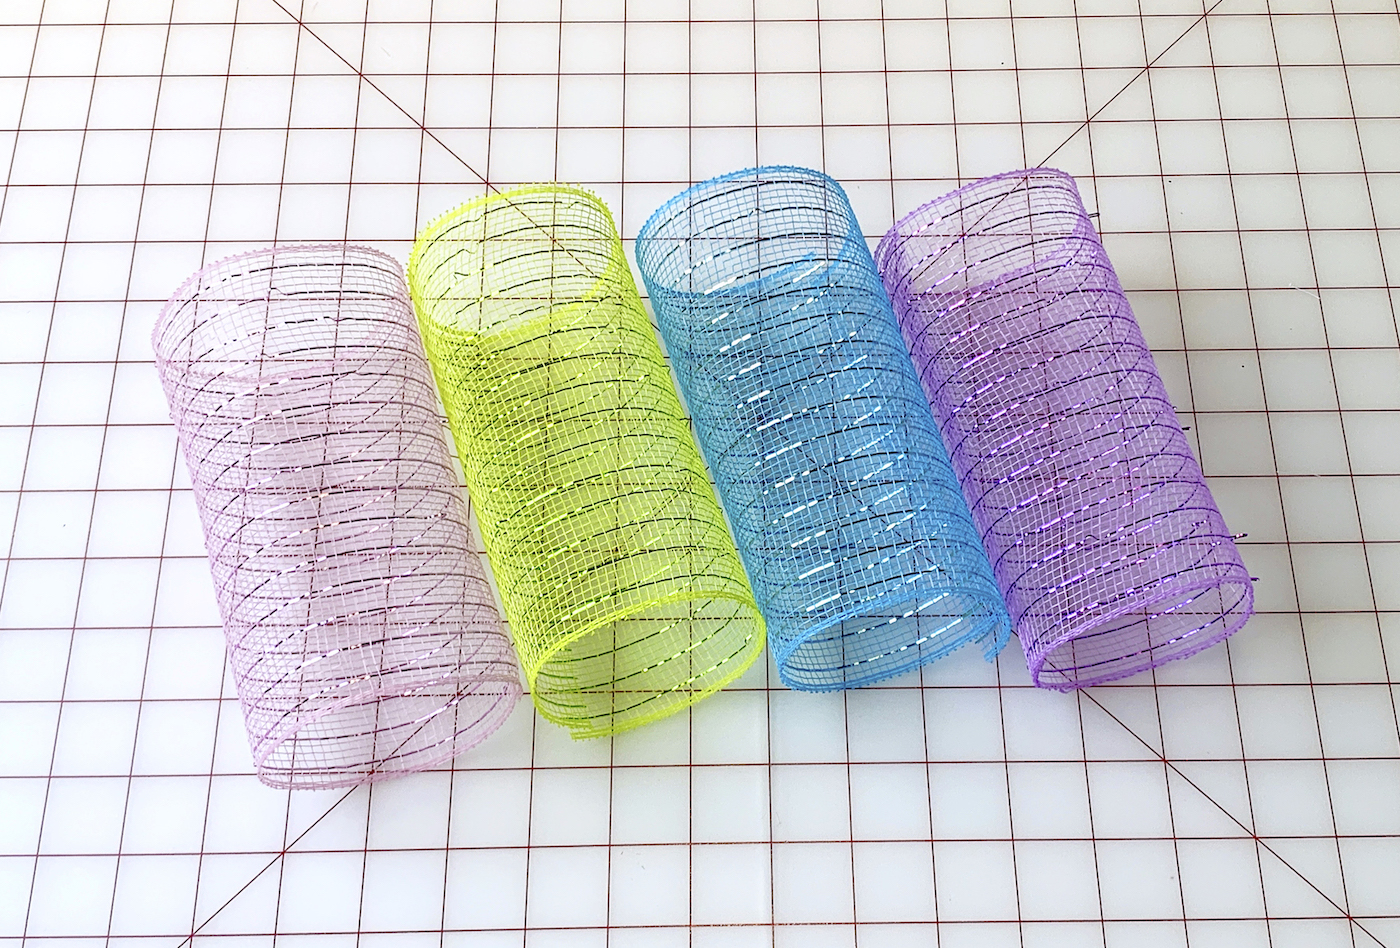
Mesh to Use
A few notes because mesh comes in different widths: this uses 6″ deco mesh. Depending on the craft store, you might only find 10″ rolls or wider (there are some good sets on Amazon).
If needed, you can cut down the mesh horizontally as well as vertically. The wreath does look a little bit more frilly if you trim the mesh horizontally. I would describe it as “hairy”. But it’s still cute, I just happen to like the crisp edges a bit better.
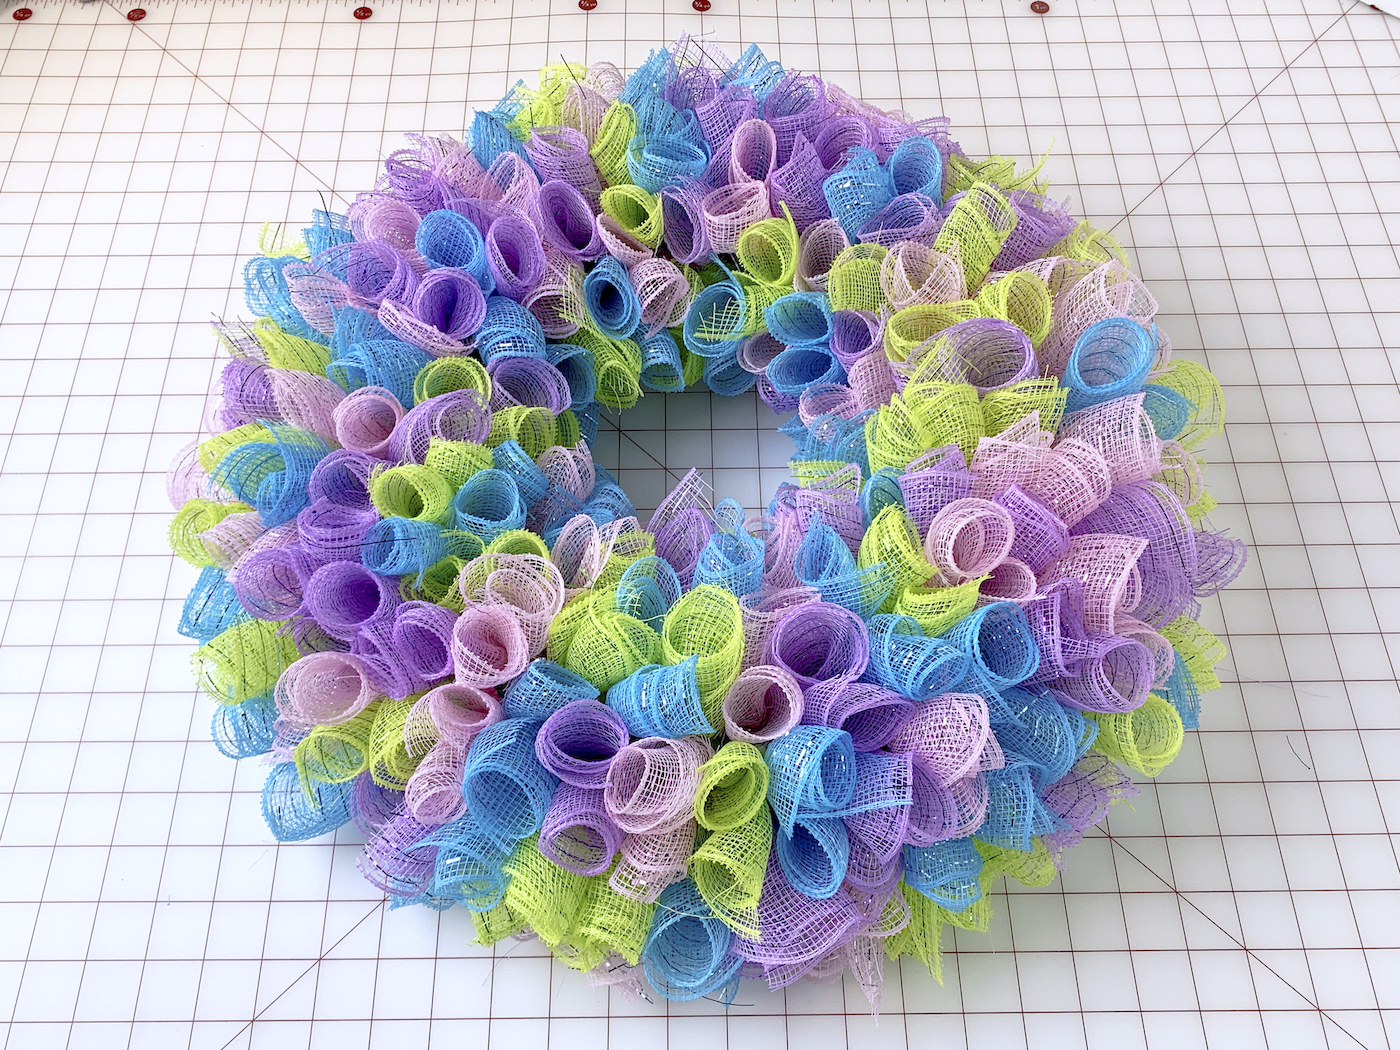
I also want to note that it didn’t take all four of the rolls of mesh to make this Easter wreath. There was a little bit left over from each of the colors. With the lengths they come in, it’s nearly impossible to not have some left over. Plus if you want to go a little larger on the form, you can.
Where to Get a Form
You can get wire wreath forms at the dollar store if you’re lucky. They get sold out pretty quickly though, especially in the seasonal patterns like stars or bunnies (which, you can definitely use the same method as you see here).
These forms are also available at craft stores in the floral section (usually) OR you can get a wire wreath form on Amazon here.
Are you ready to make this Easter mesh wreath? Here’s how it’s done below!
Gather These Supplies
- Wire wreath form – 14″ (you can also use a 12″ if that’s what you can find)
- 6” X 30 ft rolls of decorative mesh
- Pink – 1
- Purple – 1
- Blue – 1
- Lime Green – 1
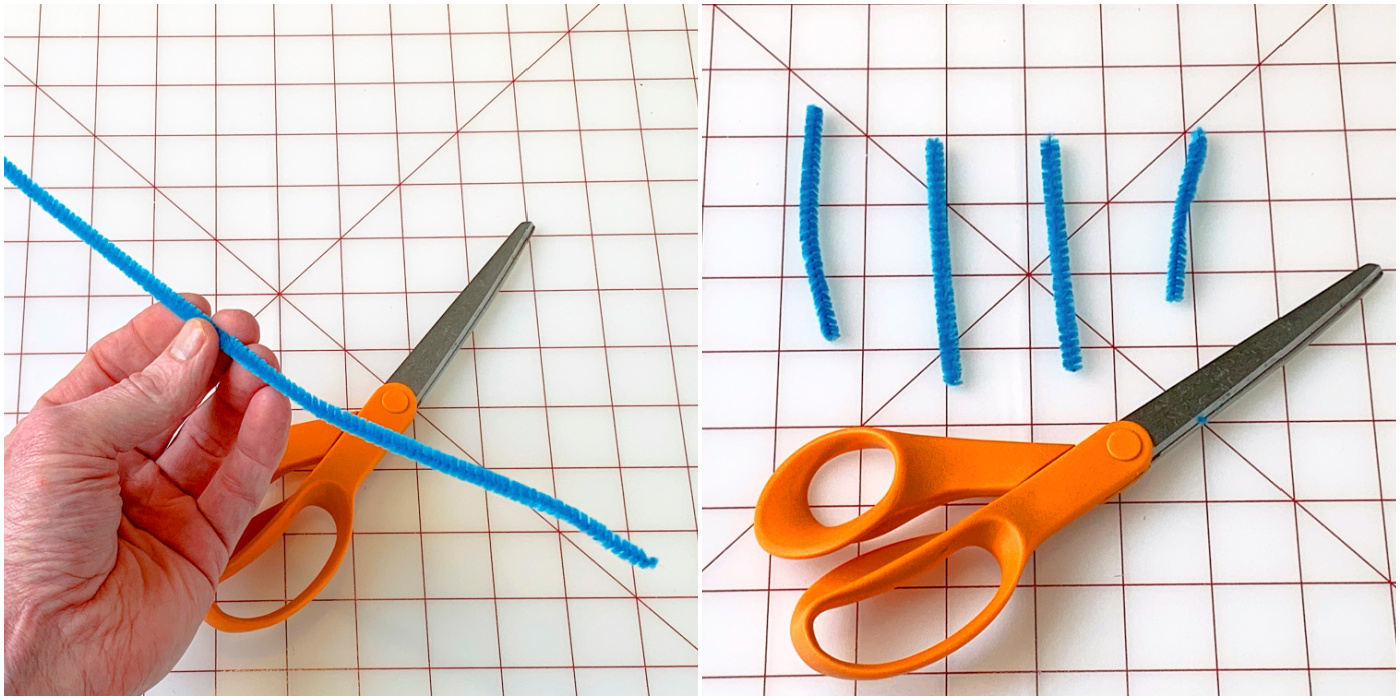
- Chenille pipe cleaners, 12″ – 1 package
- Heavy duty scissors or wire cutters
- Ruler
- Cutting mat
- Rotary cutter (scissors work too, but this makes it easier)
Tips and Thoughts for This Project
Honestly, you can use any color pipe cleaners for this project because you won’t see them. I usually try to coordinate with one of the colors in my wreath or use white.
If you’ve never used a Bowdabra to make a bow – you’re missing out. It’s actually really easy and I recommend everyone get a Bowdabra. Trust me on this.
And for reference, here’s how it looks from the back. You can see how randomly I attached the tubes (use this exact placement if you like).
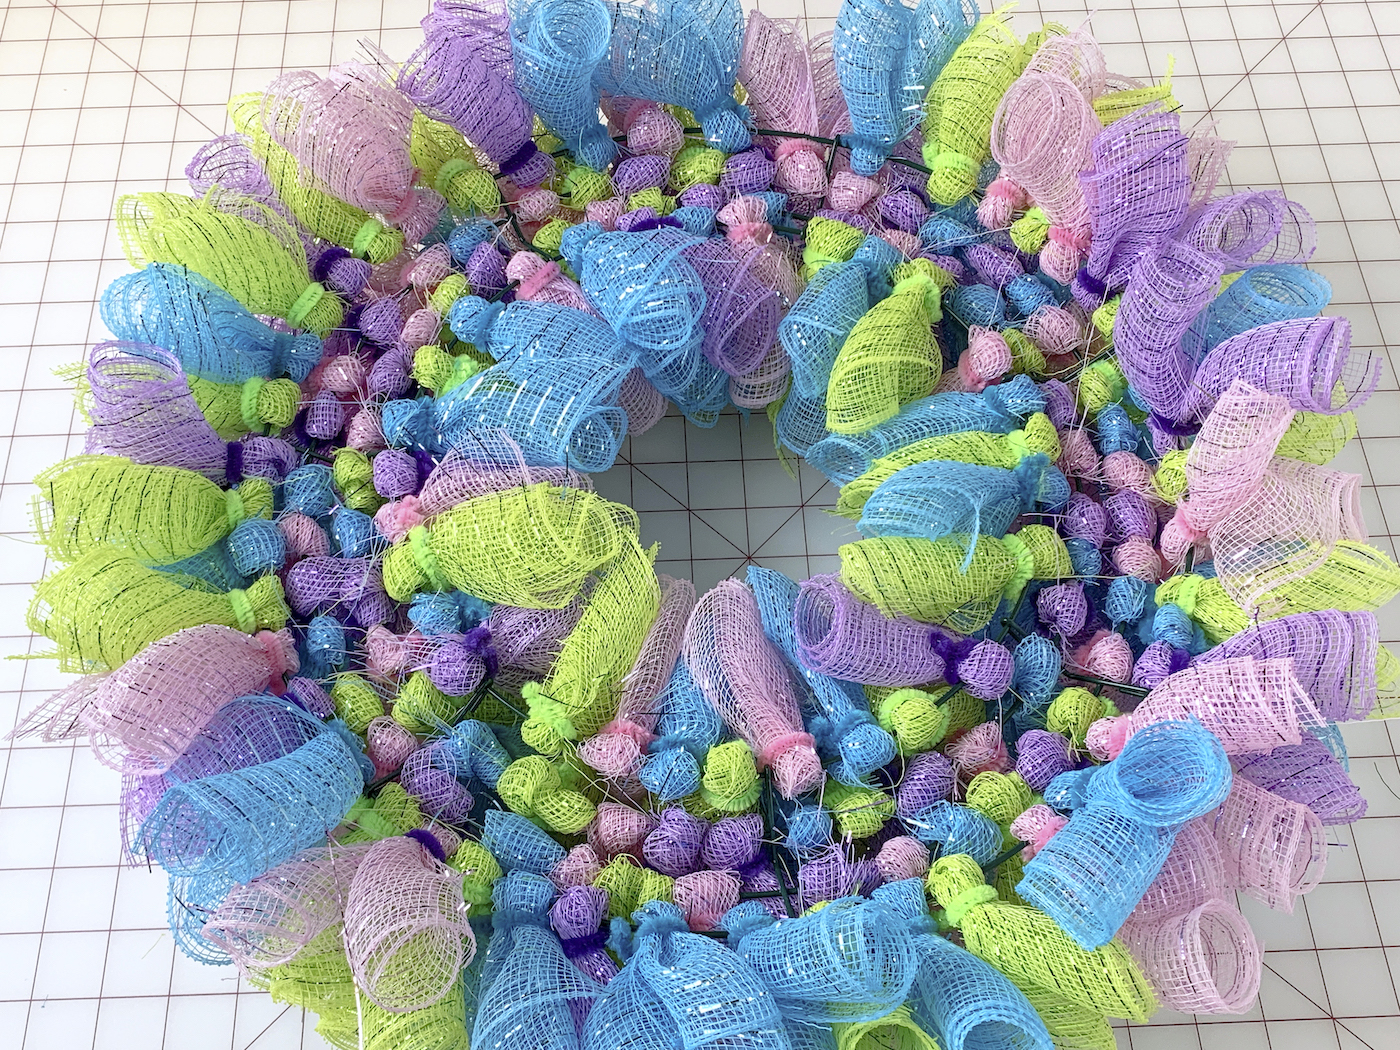
The wire wreath form used has four wires across, and “rows” were made of mesh about 3- 4 tubes wide.
Get the printable how to card for this project below!
Easter Mesh Wreath
Equipment
- 1 Heavy duty scissors or wire cutters
- 1 Ruler
- 1 Rotary cutter or scissors
Materials
- 1 Wire wreath form 14"
- 4 rolls 6” X 30 ft rolls of decorative mesh pink (1), lime (1), lavender, (1), blue (1)
- 1 package Pipe cleaner(s) 12″
Video
Instructions
- Start the project by cutting tubes of mesh approximately 10" in length. Unroll the mesh onto your cutting mat and measure, then cut with scissors or a rotary cutter. The width of the mesh should be around 6", and so you'll be working with a bunch of 10" x 6" pieces you're going to roll into tubes.
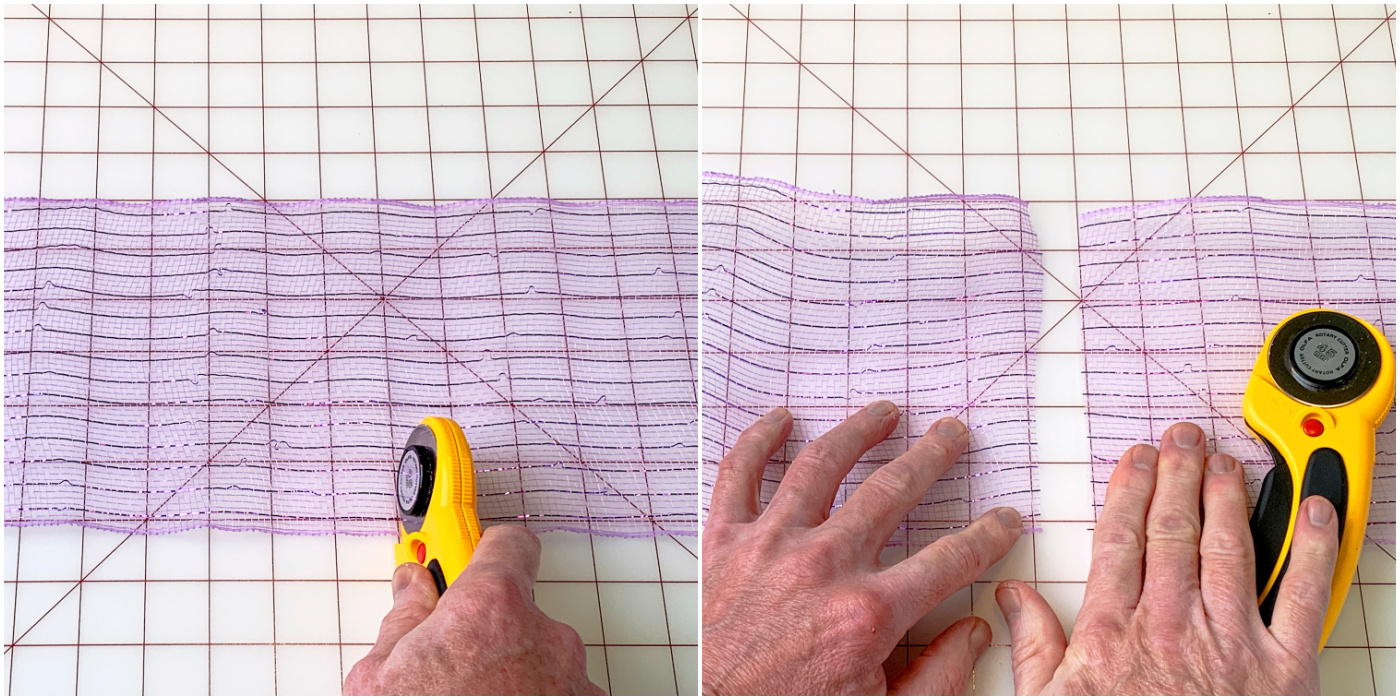
- Cut several pieces of all four colors at once. I usually start with about 15 tubes of each color because I know I'm going to need at least that many. Then I add as needed.
- Grab the package of pipe cleaners and cut each one into four pieces. You don't need to cut every single pipe cleaner in the package; just cut enough to get started. Set aside.
- The process of attaching the mesh is really easy. Start with a mesh piece and roll it into a tube. It doesn't have to be really tight. Hold the tube in one of your hands and pinch and twist between your fingers.
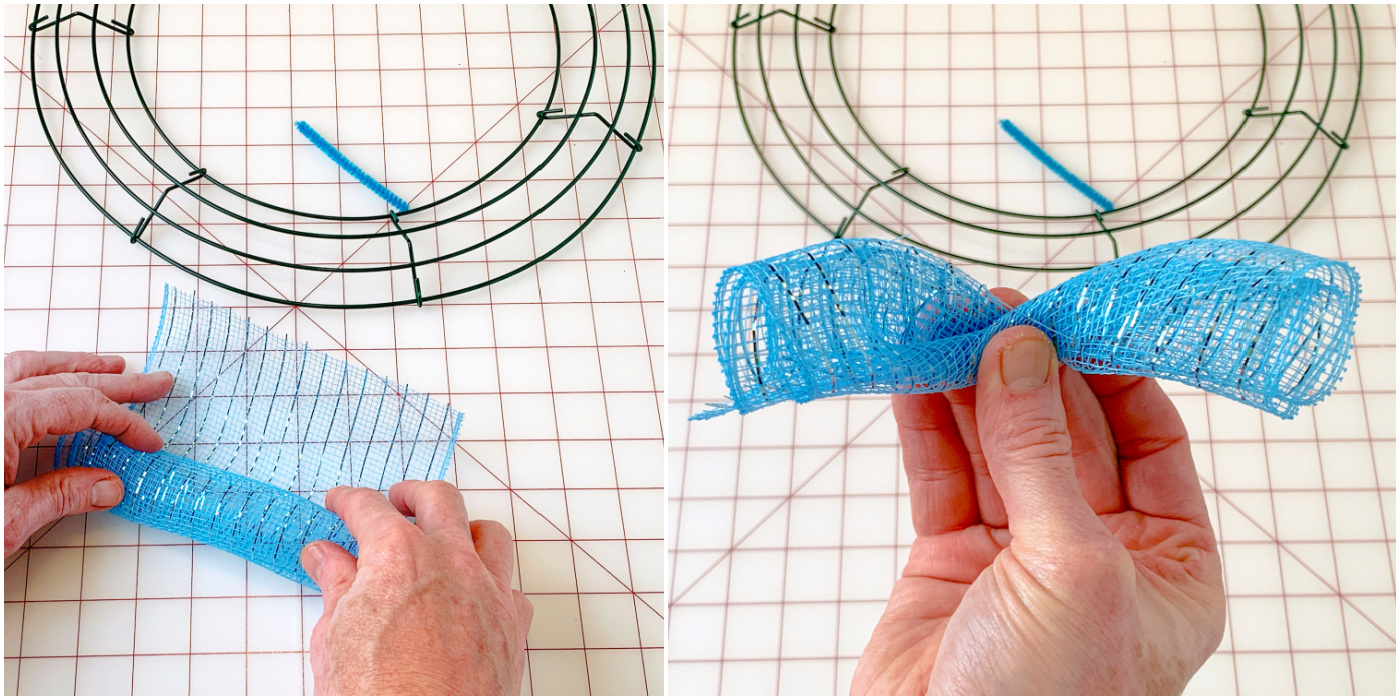
- Wrap this tube around any spot on the wreath form. I recommend starting anywhere on the form towards the outside. Bring the ends of the mesh around to touch each other, and then wrap a pipe cleaner piece around and twist.
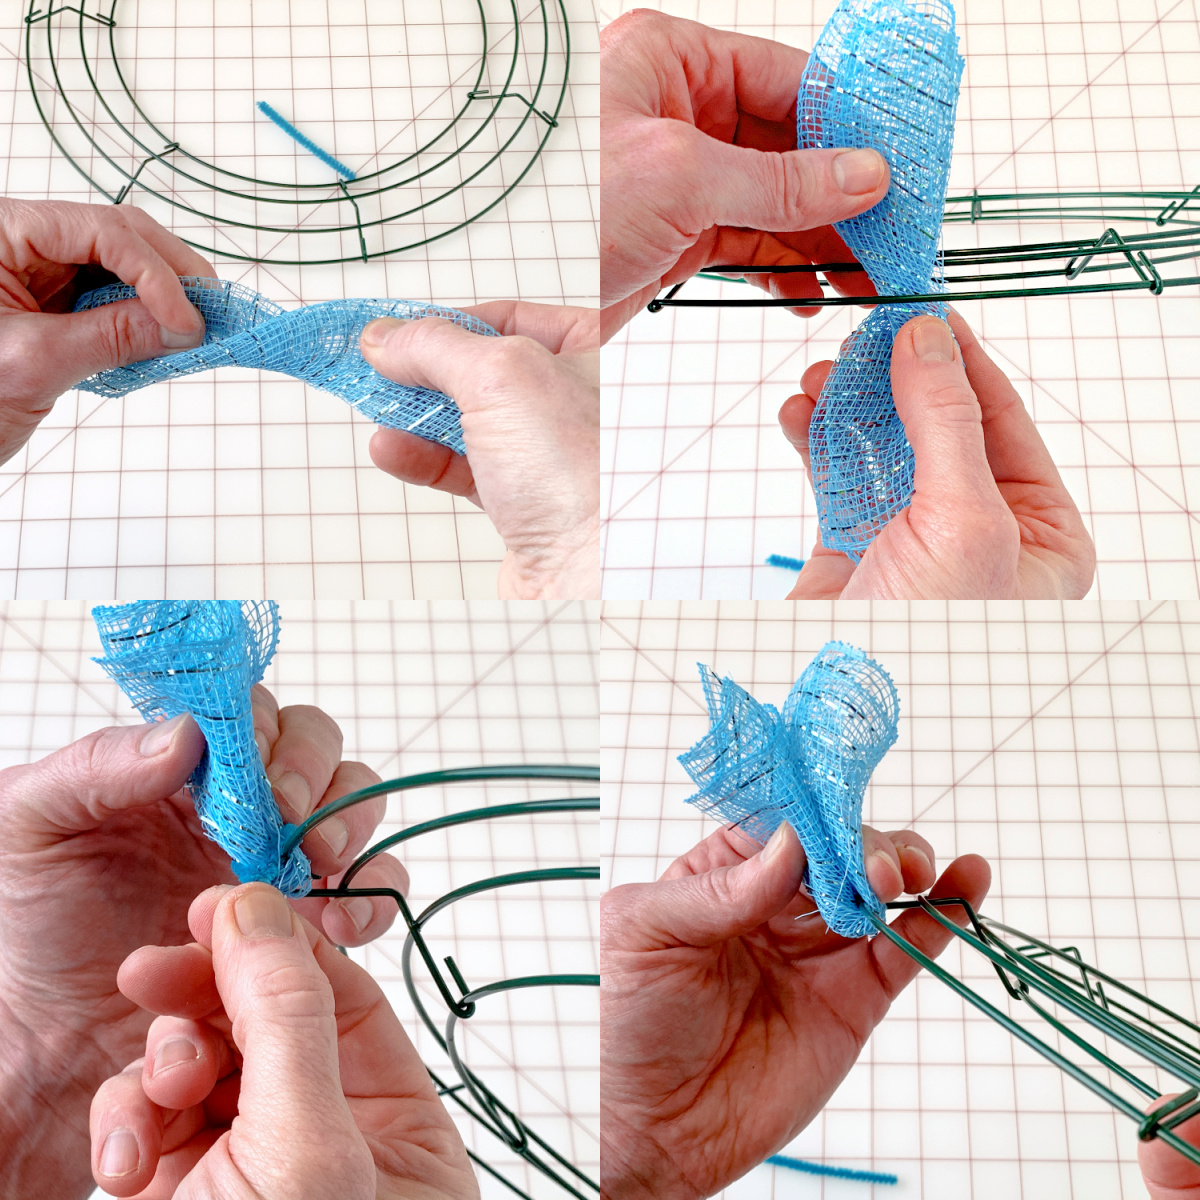
- Repeat step 5 over and over and over again from wire to wire until the wreath form is full. You have three colors, so I recommend randomly placing the mesh tubes so the colors are spread out.
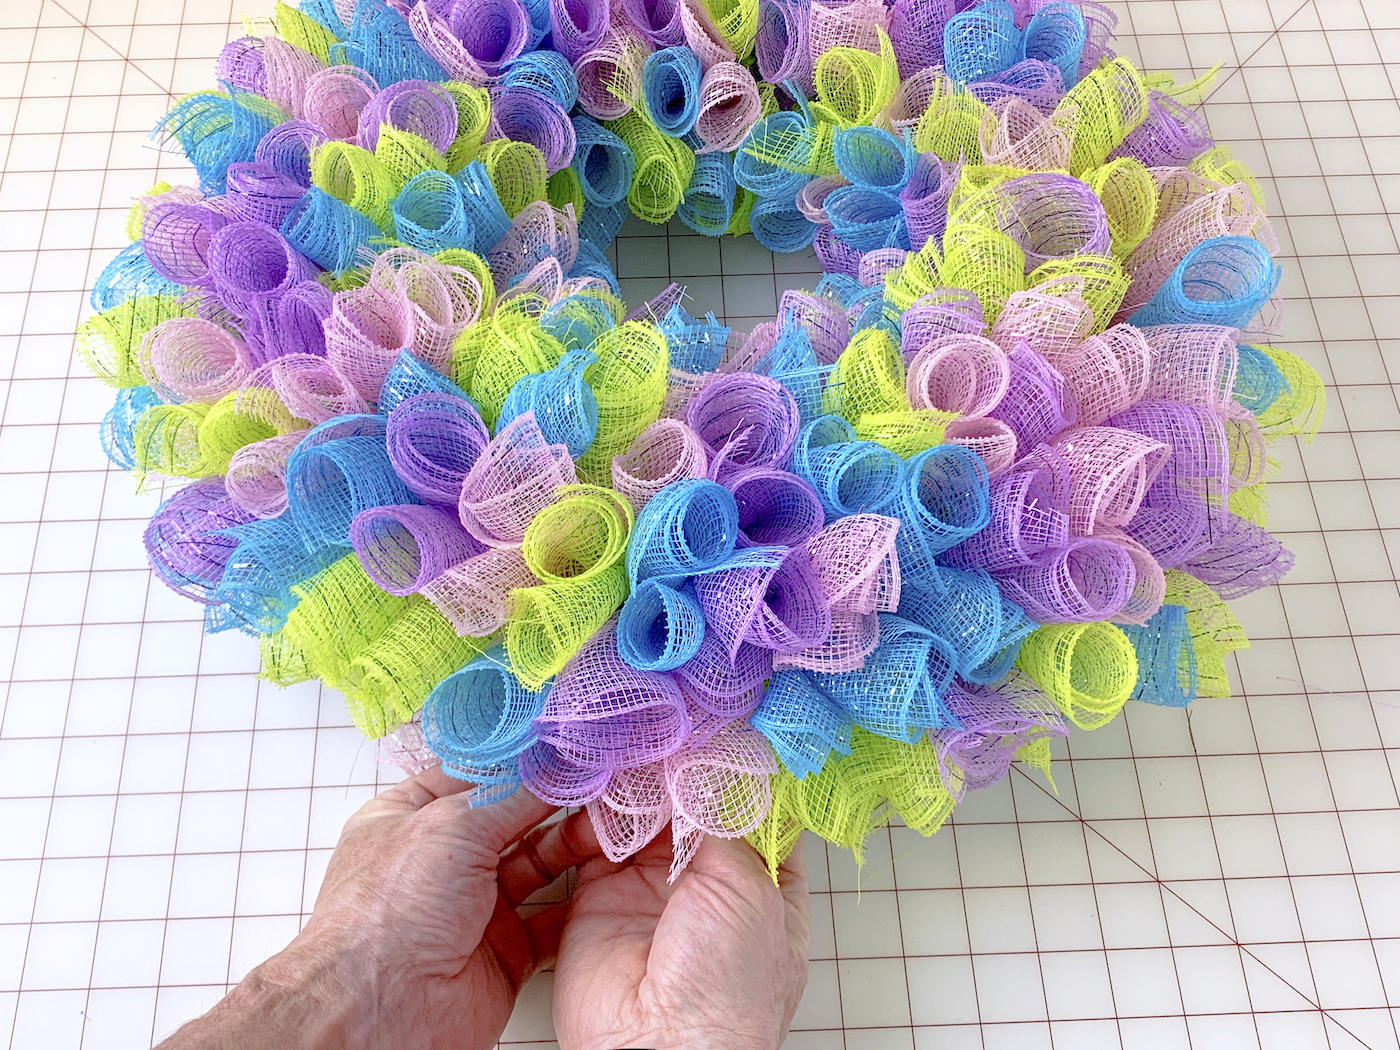
- After you've added a bunch of the mesh tubes, step back and see where the wreath might need more. Add the tubes in just as before to fill in the sparse areas.
- Push the center of the mesh out with your hands and fluff the wreath as needed. Hang using a wreath hook or Command strip hook.
If you make a mesh Easter wreath, I’d love to know how it went for you in the comments. Please also check out the following DIY wreath ideas for other themes and holidays:
4th of July Door • 4th of July Fireworks • 4th of July Mesh • Candy Cane Mesh • Christmas Garland • Christmas Pom Pom • Coffee Filter • Fall • Felt • Halloween Ornament • Pinecone • Mini Pumpkins • Pool Noodle • Pool Noodle Floral • Pom Pom • Ribbon • Wine Cork • Witch Hat